How to Actually Read Rust’s Standard Library Documentation
A survival guide for developers who stare at type signatures and feel lost
TL;DR
read != look at— Learn to actually read documentation signatures, not just glance at them- Once you learn to “speak documentation,” every crate (
std,tokio,axum,serde…) follows the same patterns - 🟢 Part 1 — Navigation basics:
- Use VS Code hover (mouse) and F12 (Go to Definition)
- Every doc page has the same structure: path, declaration, description, implementations, trait impls
- The trick: hover over the next method in the chain to understand what the previous one must return
- Methods from
Deref<Target = ???>is your best friend — many methods come from deref coercion - Deref coercion is transitive:
Box<String>→String→str→.is_ascii()
- 🔵 Part 2 — Generics & trait bounds:
<T, F, B>are type parameters (placeholders);whereclauses constrain themFn/FnMut/FnOnce— closure traits (can call multiple times? can mutate? can consume?)Self::Item— associated type; the type an iterator yields- Bounds like
Destruct,Sizedcan often be ignored for everyday code
- 🔴 Part 3 — Advanced patterns:
- Associated types (
type Item) vs generics (<T>): associated = one impl per type, generics = multiple impls possible - Lifetimes (
'a,'_): “references have scopes”;'_= “compiler tracks it”,'static= “lives forever” ?Sized: removes the defaultSizedbound, allows DSTs likestror[T]- Marker traits (
Send,Sync,Copy,Unpin): no methods, just compile-time guarantees
- Associated types (

Great Scott!
Table of Contents
- Introduction
- The Setup
- 🟢 Part 1: Easy — Finding Our Way Around
- 🟢 Part 1.5 : Fixing a Compilation Error Using the Documentation
- 🔵 Part 2: Intermediate — Generics and Trait Bounds
- 🔴 Part 3: Difficult — Advanced Patterns
- Putting It All Together: Complete Analysis of Our Code
- Quick Reference: Doc-Reading Cheat Sheet
- Conclusion
- Webliography
Introduction
You know that feeling when you’re reading someone else’s Rust code, you hit a method you don’t recognize, you open the docs, and… you’re greeted by something that looks like it was written in an alien language?
Yeah, we’re going to fix that today.
This guide is a conversation between two developers: Marty, who’s “speaking” Rust but is constantly frustrated by the documentation, and Emmett (aka Doc), a senior developer who’s going to show him how to actually read those type, module, trait, or function signatures.
The key word here is read. See, too often we just glance, we skim, we decode the words—kinda like when we were kids staring at a math formula in a textbook. We didn’t really get what it meant. The formula didn’t speak to us, didn’t tell us a story. Well actually, it did tell its story, but we weren’t ready to hear it or appreciate it. So we’d rush past it and cross our fingers that eventually, through sheer repetition, we’d somehow survive.
The idea here is to fight that bad habit and invest the time needed to learn a new language: the language of Rust’s Standard Library documentation. Why? Because there’s a real disconnect between the code we write and how it’s documented:
- Method calls hide the receiver — We write
my_string.is_ascii(), but the docs showpub fn is_ascii(&self) -> bool. That&selfparameter? It’s the thing before the dot, but you’d never guess that from looking at the signature. - We think in concrete types; docs speak in generics — Our code says
Vec<i32>orOption<String>. The docs sayVec<T, A>orOption<T>. Mapping one to the other requires a mental translation step that takes practice. - Extra type parameters add noise — That
AinVec<T, A>? It’s the allocator—something most of us never touch. But there it is, making the signature look more complex than it needs to be for everyday use. - Trait bounds can overwhelm — Seeing
where P: FnOnce(&T) -> bool + Destructfeels like reading a legal contract when all you wanted was “pass a closure that returns true or false.” - Lifetimes appear out of nowhere — The docs show
<'a>annotations that our code often omits thanks to lifetime elision rules.
The good news? Once you learn to “speak documentation,” these signatures become readable—even helpful. That’s what this guide is about: bridging the gap between the Rust you write and the Rust you read in the docs.
And besides, “Great Scott!”, the Rust documentation folks didn’t spend all that time and energy writing this stuff just for us to ignore it. That’d be like wasting 1.21 gigawatts. 1.21 gigawatts!!!
By the end of this article, we should be able to read something like this:
pub const fn filter<P>(self, predicate: P) -> Self
where
    P: FnOnce(&T) -> bool + Destruct,
    T: Destruct,
…and actually hear the story it tells us. Let’s dive in.
The Setup
Before we start, let’s make sure we’re on the same page:
- You already wrote some code and tried to find your way in the Standard Library documentation. You are not an expert but you are not a beginner either.
- You have read at least half of THE book, The Rust Programming Language (aka TRPL book).
The Rust Programming Book
- You are somewhat frustrated because you tried but, most of the time you don’t understand what you see in the Standard Library documentation.
- You are motivated and ready to read a lot knowing that you are investing for the future (walk before run)
- OS: Windows 11 (but the post is OS agnostic)
- Editor: VS Code with rust-analyzer installed
- Rust: A working installation (run
rustc --versionto check)rustc --version rustc 1.91.1 (ed61e7d7e 2025-11-07)If needed, check my Rust setup under WIN11
- Browser: Any browser with docs.rust-lang.org/std open
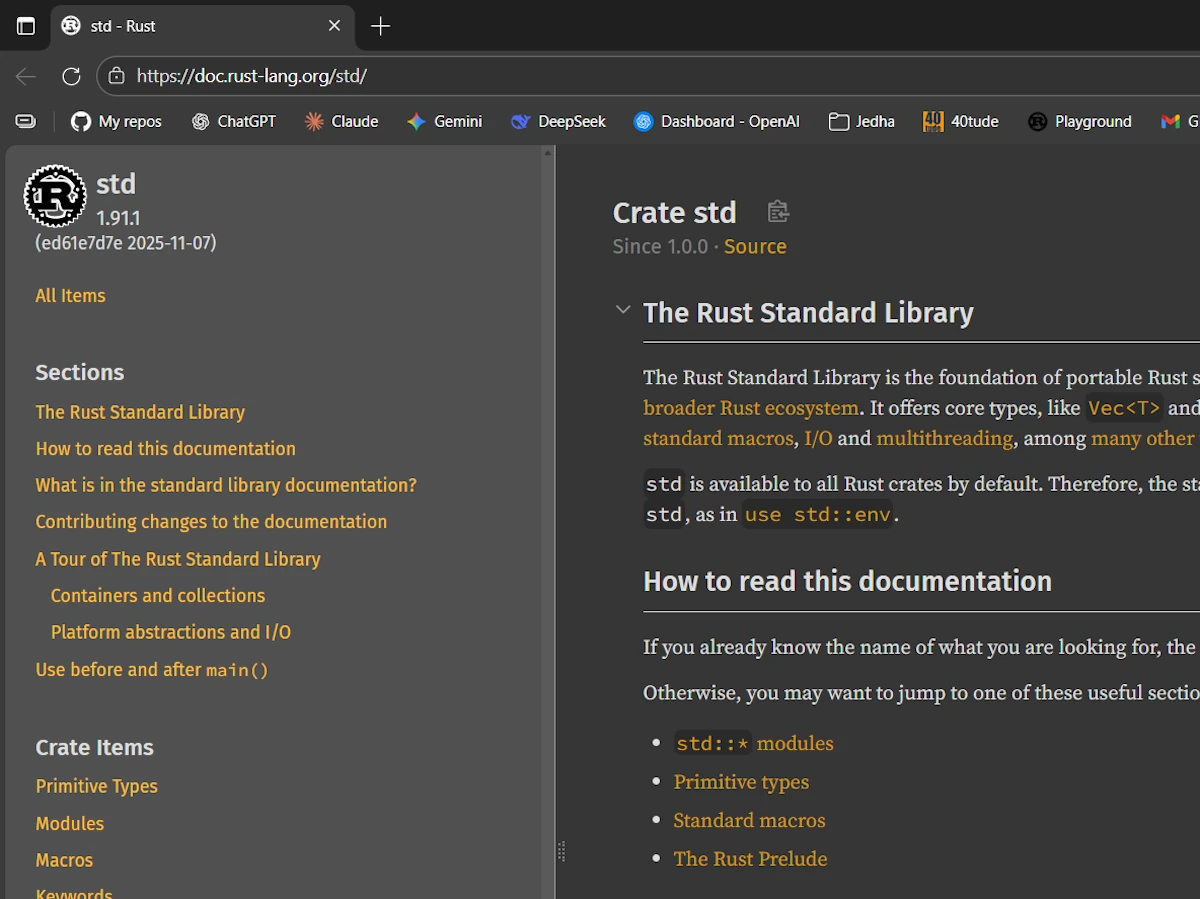
Click the images to zoom in. The Standard Library Documentation Home Page
About Naming Conventions Before we dive in, let’s talk about how Rust names things. This matters because when you’re scanning documentation, the capitalization alone tells you what you’re looking at:
| Pattern | What It Is | Example |
|---|---|---|
PascalCase | Types, traits, enums | String, Vec, Option, Iterator |
snake_case | Functions, methods, variables, modules | to_uppercase(), my_string, std::vec |
SCREAMING_SNAKE_CASE | Constants and statics | MAX_VALUE, MAIN_SEPARATOR |
self | The current instance (like this in other languages) | fn len(&self) |
Self | The current type (an alias for the implementing type) | fn new() -> Self |
The self vs Self distinction trips up many newcomers. When you see &self in a method signature, it means “a reference to this instance.” When you see -> Self, it means “returns the same type as the one we’re implementing this for.”
For example, in impl Vec<T>, a method returning Self returns a Vec<T>. In impl String, that same Self means String. The actual type depends on context.
Keep this table in mind as you read signatures — it will help you parse them faster.
Finally, here’s the code we’ll be dissecting throughout this guide. As part of your setup, copy it into the Rust Playground or a local rust project:
fn main() {
    let numbers = vec![Some(1), Some(15), Some(25), None, Some(5)];

    // Filter keeps only Some(v) where the predicate is true
    let filtered: Vec<Option<i32>> = numbers
        .iter()
        .map(|&opt| opt.filter(|&n| n > 10))
        .collect();

    println!("Raw numbers: {:?}", numbers);
    println!("Filtered   : {:?}", filtered);
}
Output:
Raw numbers: [Some(1), Some(15), Some(25), None, Some(5)]
Filtered   : [None, Some(15), Some(25), None, None]
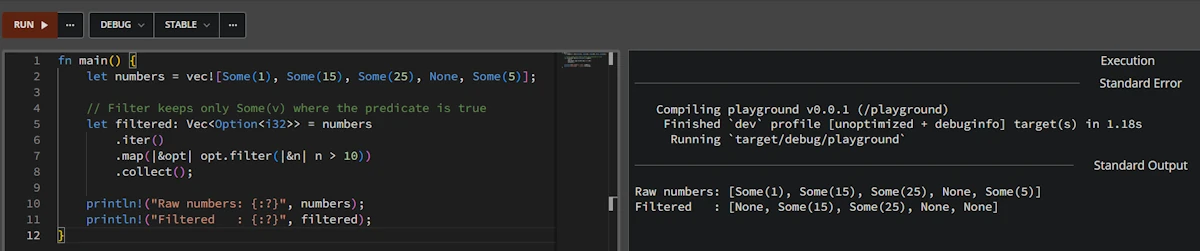
Run the code in Rust Playground
Fewer than 10 LOC, but there’s so much going on here. Let’s unpack it all.
🟢 Part 1: Easy — Finding Our Way Around
Marty: Okay, I’m looking at this code and I already have questions. What even is vec!? Is it a function? Why the exclamation mark? Is it a not operator?
Emmett: Great first question! The ! tells you it’s a macro, not a function. In Rust, macros have that trailing bang. Let’s find it in the documentation.
Marty: Hey Doc, how do I even search for that?
Emmett: Two ways. First, the easy way, directly in VS Code.
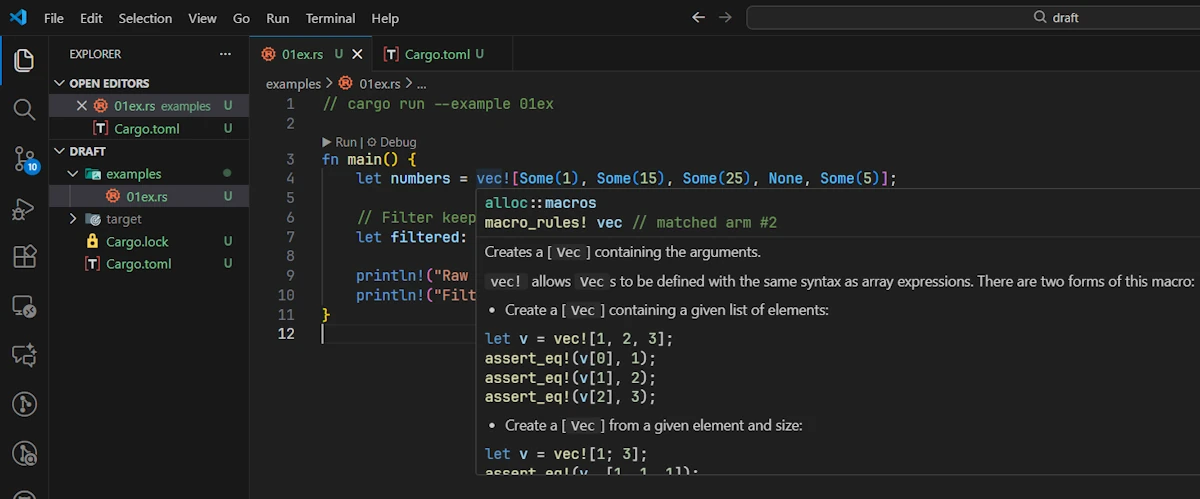
Getting help in VScode. Again click the images to zoom in and see the tooltip.
Hover over vec! and you’ll see a tooltip from rust-analyzer. It’ll show you something like:
alloc::macros
macro_rules! vec // matched arm #2
Creates a [Vec] containing the arguments.
But let’s also learn to use the official documents. Go to doc.rust-lang.org/std and use the search bar at the top. Type “vec” and you’ll see results. Look for vec in the std module (aka std::vec), select the line that says macro std::vec.
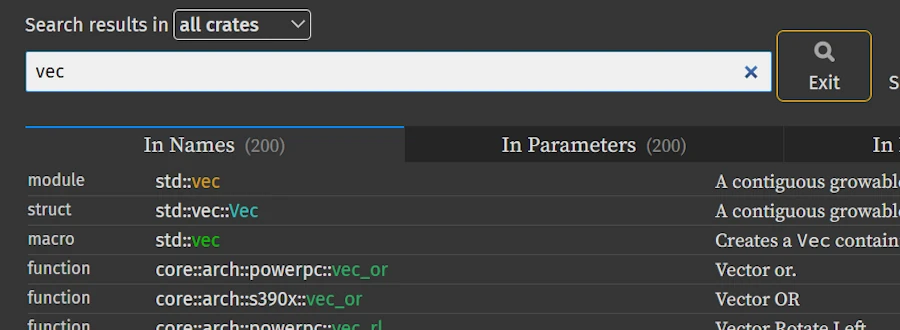
Searching in the Standard Library
Marty: Found it! macro std::vec. Okay, it says it “creates a Vec containing the arguments.” Simple enough.
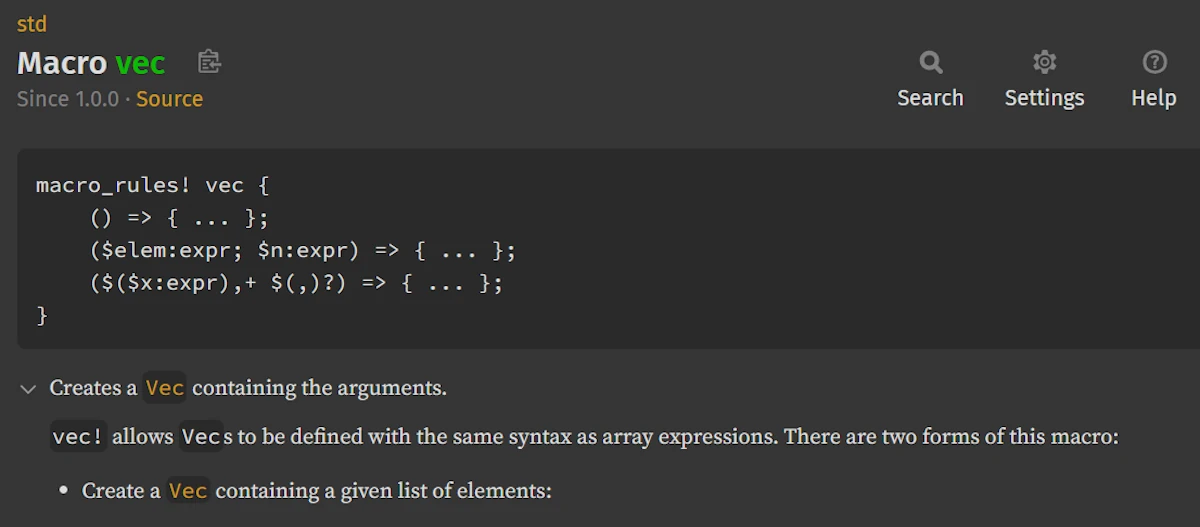
The Rust documentation page for
Macro vec Emmett: See? Not so scary. Now, let’s talk about reading the docs page structure, because every page follows the same pattern.
Anatomy of a Documentation Page
Emmett: Every item in the Standard Library has a documentation page with a consistent structure. Let’s look at Vec<T> as an example.
Side Note:
- On the previous page you can click on any of the links
Vec.- Or better yet, go back to doc.rust-lang.org/std, search for
vecand click on the second item in the list :struct std::vec::Vec(not themacro std::vecas before)
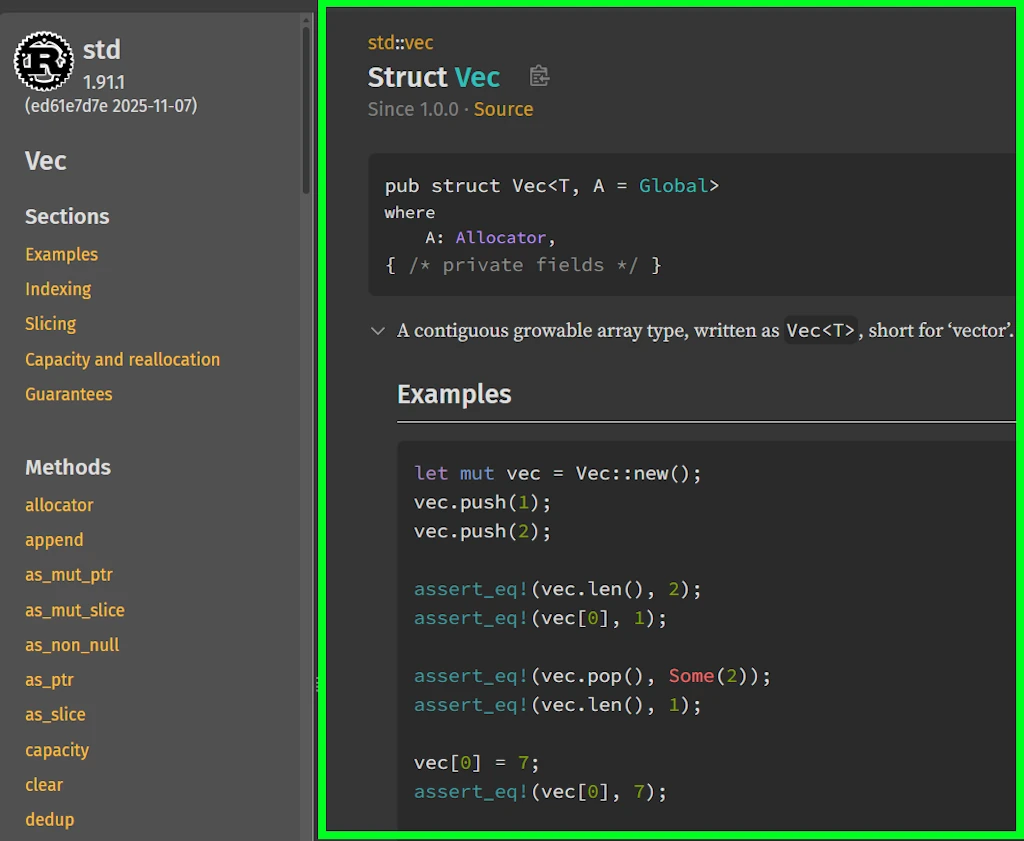
The top of the page looks like:
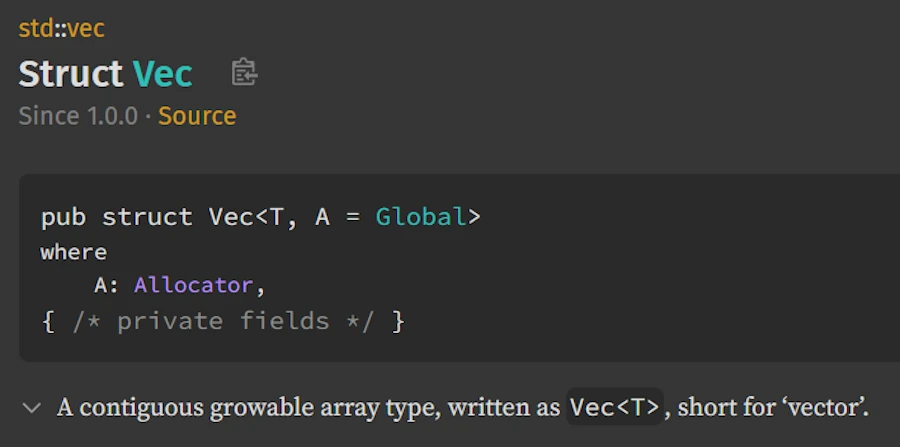
The Rust documentation page for
Struct Vec At a high level we can identify:
- The path at the top:
std::vec— this tells us where the item lives. - The name: Struct Vec - Below is a link to the source code and the version in which it was first available.
- The declaration:
pub struct Vec<T, A = Global>— the actual type definition - Description: A short description of what it does
- Implementations: The
implblocks shows all the methods available. - Methods from Deref
<Target = ???>: Types inherit behavior from their deref target. This block shows the methods provided by the dereferenced target types - Trait Implementations: What traits this type implements (
Clone,Debug, etc.) - Auto Trait Implementations: Auto traits automatically derived by the compiler
- Blanket Implementations: Traits implemented for all types meeting certain bounds
This said, since we will use the pages of the documentation extensively, it is IMPORTANT to feel “at home”. So let’s take some time to explain with much more details how a typical Rust Standard Library documentation page is designed, and how to navigate it effectively.
Overall Architecture of a Standard Library Documentation Page
A Standard Library documentation page generated by rustdoc follows a consistent layout designed to make it easy to explore a type, module, trait, or function. While the visual style has evolved over time, the core structure remains stable and predictable. This is important because once we are comfortable with the documentation of the Standard Library, we will be comfortable with the documentation of any other crate (axum, tokio…).
0. Buttons
This is obvious but, too often forgotten, note that 4 buttons are at our disposal on every page.

Buttons available on every page
Press the Help button (or ?) for example. You will learn some shortcuts. Did you know about _? Try them all.

Help information & keyboard shortcuts
Press ESC to close the Help window then press the Summary button (or your new friend _) and scroll down the page with the down arrow ⬇️.
Summary of the page
As with your beloved code editor it is important to be able to use the keyboard rather than the mouse if you want to save time, lot of time.
1. Sidebar Navigation (Left Panel)

Sidebar Navigation
The left sidebar acts as a quick-access navigation menu for the entire page. It lists the major groups of items related to the entity being documented. For a struct like Vec<T>, the sidebar typically includes entries such as:
- Sections – Links to general page anchors like the description or examples
- Methods – All inherent methods and associated functions. Note that on the page, the Implementations block starts with the
.new()method while on left of the page, in the Methods section the methods are ordered alphabetically. - Methods from Deref<Target = […]> – Methods inherited through the
Dereftrait - Trait Implementations – All traits implemented by the type
- Auto Trait Implementations – Auto traits automatically derived by the compiler
- Blanket Implementations – Traits implemented for all types meeting certain bounds
The sidebar allows us to jump directly to the part of the page we’re interested in, without scrolling through complex or long sections. It functions as a table of contents tailored for the type we are viewing.
2. Main Header and Description
Main content
At the top of the main content area (on the right), again, but it doesn’t hurt to repeat ourselves, you’ll find:
- The path at the top:
std::vec— this tells you where the item lives.- Here it is in the module
std::vec. - Click on the word
vecinstd::vecat the very top - You will land in the module
vecpage which belongs to thestdcrate
- Here it is in the module
- The type or item name (e.g.,
struct Vec<T>) - The declaration:
pub struct Vec<T, A = Global>— the actual type definition
3. Detailed Description and Examples
Main content
Below the header, many items include a more detailed explanation, design notes, and carefully crafted usage examples. These examples often demonstrate idiomatic ways to use the type and highlight common patterns or pitfalls.
This section can be expanded or collapsed to quickly access to the Implementations section.
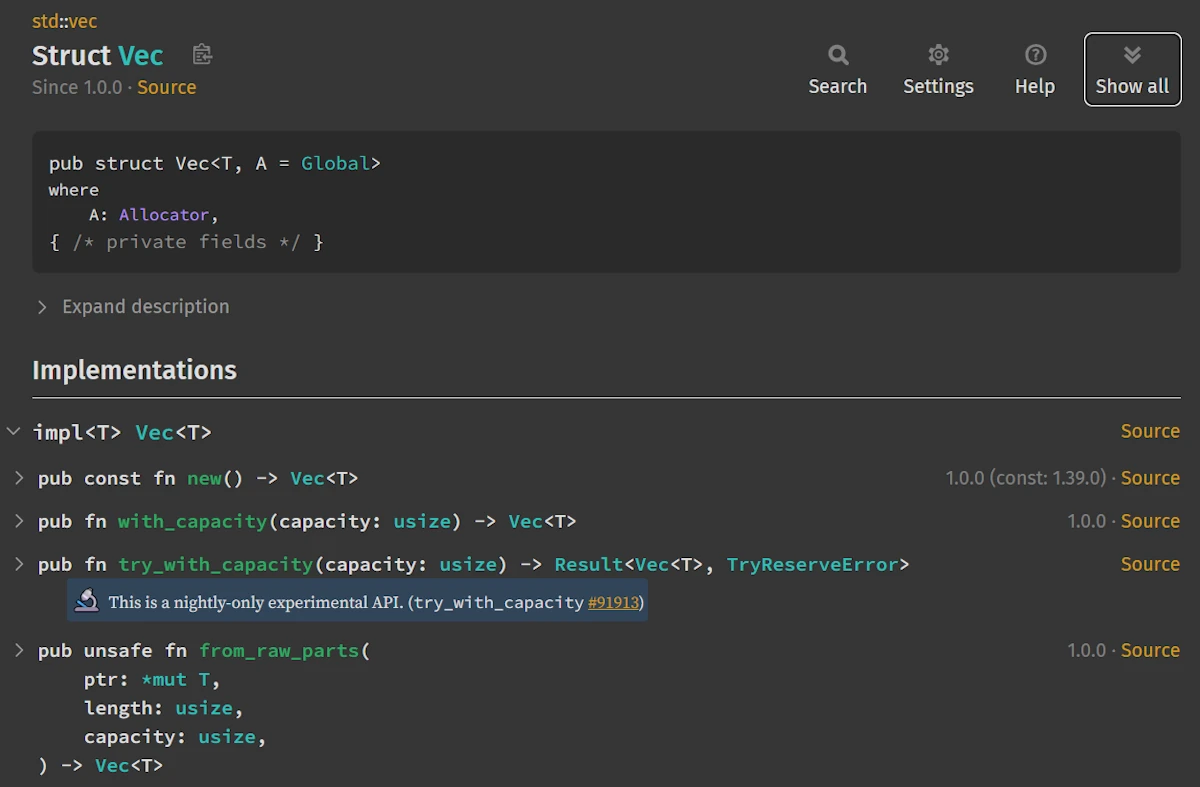
4. Implementations Section

Implementations section - The description is collapsed
This is one of the most important parts of the page. The documentation groups methods and associated items by their impl blocks, not strictly alphabetically or by category.
Take your time to visit your new home… Scroll down and find out impl<T> Vec<T> then continue and find impl<T, A> Vec<T, A>… Usually, the first implementation (impl<T> Vec<T> here) is where the core behavior of the type is defined.
5. Methods from Deref
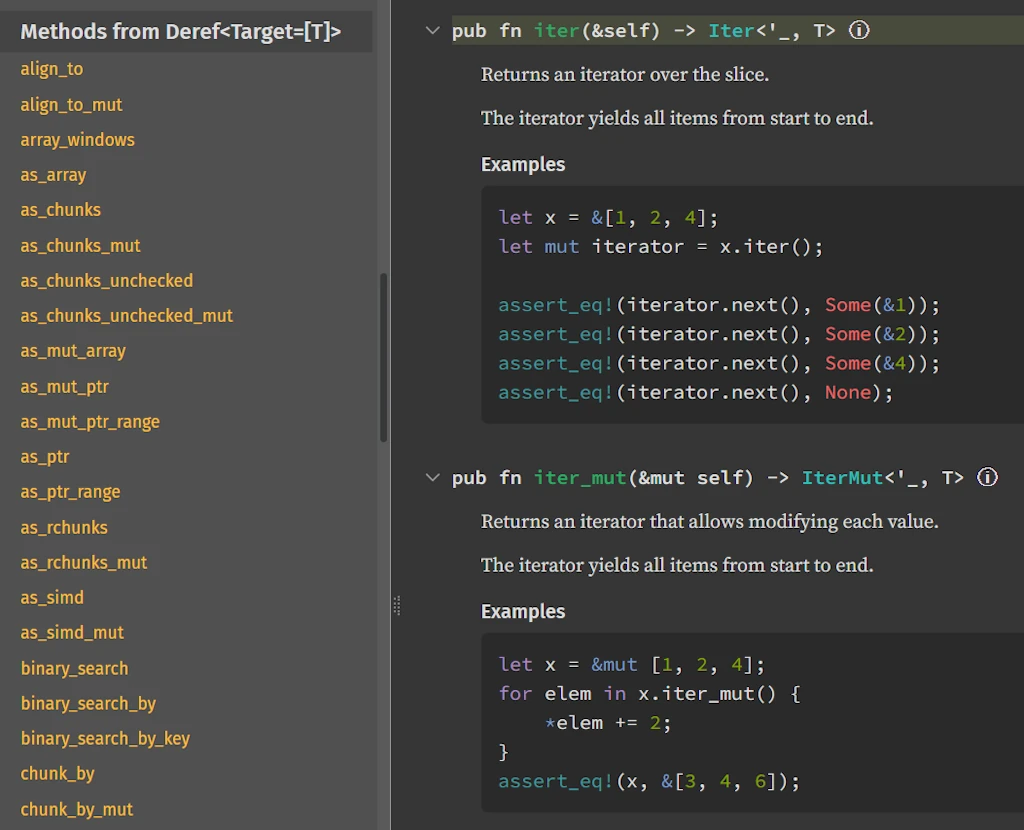
Methods from Deref for
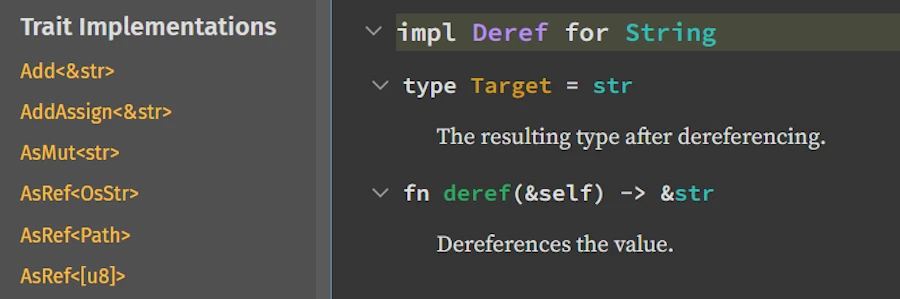
std::vec::Vec In our case it says Methods from Deref<Target = [T]> but obviously this is not always the case. Duplicate the tab in your favorite browser, press / (or s) to search, type string, once the results are displayed, press the down arrow ⬇️, highlight the line struct std::string::String, press ENTER, scroll down the sidebar to find the section Methods from Deref, it should say : Methods from Deref<Target = str>. Don’t trust me. Do it and do it now!
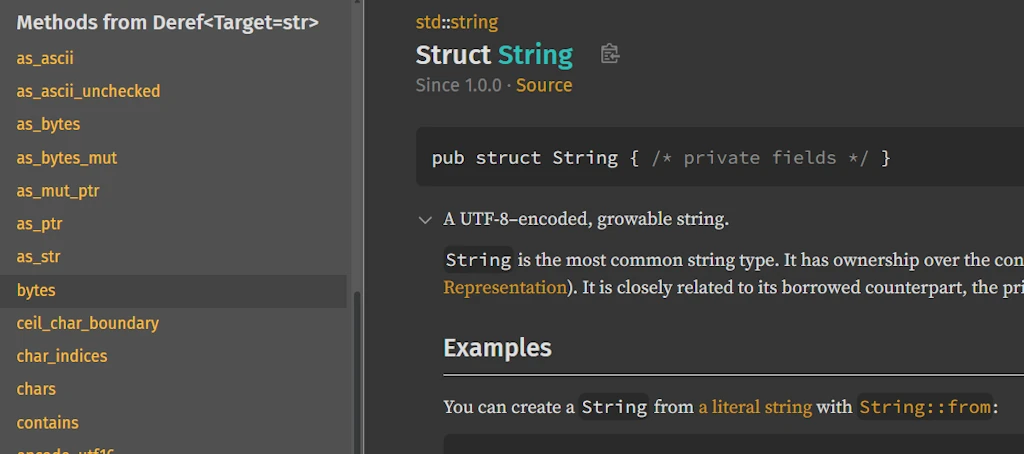
Methods from Deref for
std::string::String Some types implement the Deref trait to behave like another underlying type. When this is the case, the documentation includes a dedicated section listing all methods inherited through dereferencing. These methods are not defined on the type itself but come from the deref target, such as slice methods for Vec<T> or string slice methods for String. This section is useful when a method cannot be found among the inherent methods, since it may originate from the type’s deref target instead.
Marty: And, to take your metaphor, what is the story that the documentation is telling me?
Emmett: In the second case it tells you that a &String can be used where a &str is used. Don’t you remember what you read in Chap 15 of the TRPL book about the implicit deref coercions: “Deref coercion convert a reference to a type that implements the Deref trait into a reference to another type.” For example the String type does NOT have any .is_ascii() method but str has one. While the tab for std::String::string is still available in the brwoser, scroll down the sidebar. Check that there is no .is_ascii() method for String but one in the section Methods from Deref<Target = str>:
Don’t trust me, check for yourself and run this code in the playground:
fn main() {
    let group_01 = "Level 42".to_string();
    let group_02 = "Earth Wind & Fire 🦀".to_string();
    println!("{} is all ascii? {}", group_01, group_01.is_ascii());
    println!("{} is all ascii? {}", group_02, group_02.is_ascii());
}
Marty: But we are not really using String as argument when we invoke is_ascii() on group_01 or group_02. Are we?
Emmett: I don’t know. Check for yourself. What would you do? What can you do to confirm (or not) your assertion?
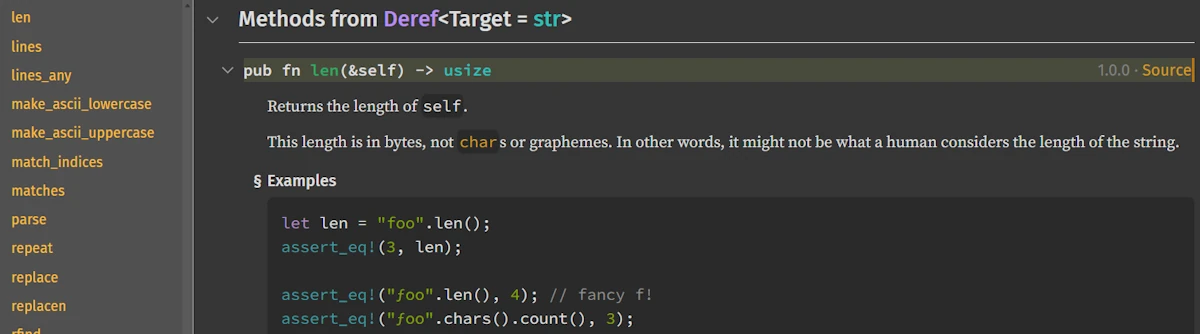
Marty: I know, I read the documentation for .is_ascii(). Ok… It says…
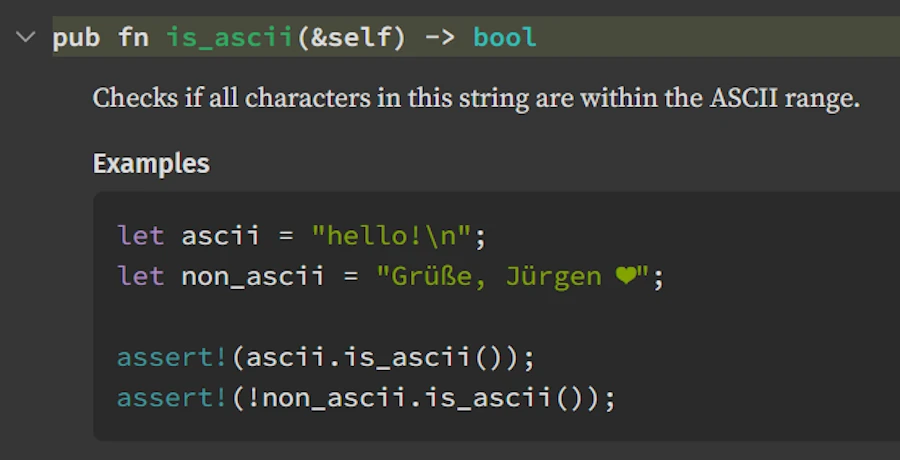
“Checks if all characters in this string are within the ASCII range.”
Emmett: No! This is what you look at but this is NOT what you should read. Again, read it aloud from the very beginning, and I want to hear you loud and clear.
Marty: Ok.. It says… pub fn is_ascii(&self) -> bool meaning that .is_ascii() take as first and unique parameter a reference to self, which means here, a reference to a str (&str) because we are in the section Methods from Deref<Target = str>. At the end it returns a bool. Then the text explains “Checks if all characters in this string are within the ASCII range.”.
I get it! The key point here is, again, in the method signature which tells us that it is called on a reference. So in the code when I write group_01.is_ascii(), what actually happens is the following:
- First, since
is_ascii()takes&selfas its parameter, the method call syntaxgroup_01.is_ascii()is essentially equivalent to callingis_ascii(&group_01). - But wait,
is_ascii()is a method onstr, not onStringso… - Rust’s deref coercion kicks in. Since
StringimplementsDeref<Target = str>, Rust compiler automatically converts&Stringto&strfor me. So the call effectively becomesis_ascii(&group_01_as_str). - This implicit conversion explains why I can call
strmethods directly on aStringwithout having to explicitly write.as_str()or&*everywhere.
Emmett: This is why the section Methods from Deref<Target = ???> is so IMPORTANT. If looking in the documentation you cannot find the method you need, then first thing first, scroll down to the section Methods from Deref<Target = ???>.
Last point before we come back to the documentation of std::vec::Vec. The deref coercion is transitive. This means that if str had a section Methods from Deref<Target = Xyz> (which is not the case) then the methods of the type Xyz would have been available for String type.
You know what? Copy’n paste the code below in Rust Playground then press CTRL+ENTER.
fn main() {
    let bgroup_01 = Box::new(String::from("Kool and the Gang"));
    let bgroup_02 = Box::new(String::from("Earth Wind & Fire 🦀"));

    println!("{} is all ascii? {}", bgroup_01, bgroup_01.is_ascii());
    println!("{} is all ascii? {}", bgroup_02, bgroup_02.is_ascii());
}
Here, bgroup_01 is a Box<String>, yet we can call is_ascii() directly on it. Rust, at compile time (NOT at runtime) follows the deref chain: Box<String> → String → str, and finds .is_ascii() on str. That’s what I call transitivity in action.
Now, Marty, give me a favor. Show me how you would trace the deref chain using only the Rust Standard Library documentation.
Marty: Well… Here are the steps I would follow:
- On the tab where the Standard Library page is, press
/and typeboxorBox<T>
- Navigate with the down arrow ⬇️ and highlight the line
struct std::boxed::Boxthen pressENTERto land on the pagestd::boxed::Box. - I scroll down the sidebar and I look for the section “Trait Implementations” and find
Deref. I read thatBox<T>implementsimpl<T, A> Deref for Box<T, A>.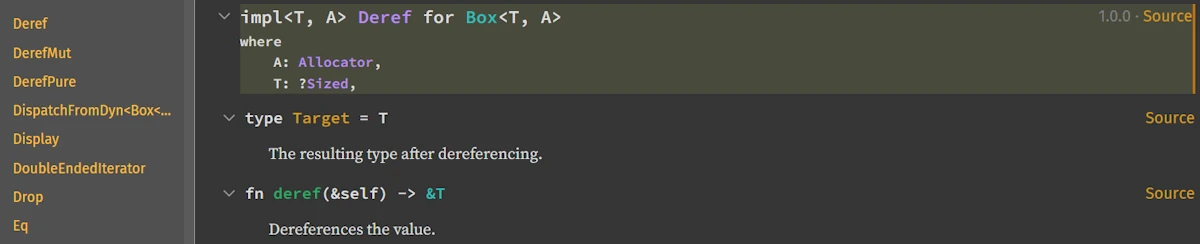
I don’t know yet what
Ais (more info later) but reading the signature ofderefI understand that for aBox<String>, dereferencing gives me a&String. - Now I press
/, typestring, use the down arrow ⬇️, highlight the linestruct std::string::String, pressENTERto go to theStringdocumentation page. - Here I realize I have 2 possibilities.
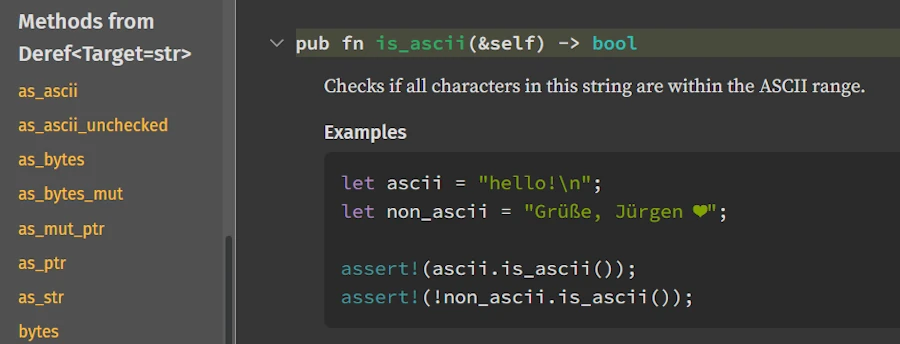
- As before, I can scroll down the sidebar and Look for the section
Methods from Deref<Target = str>, find the.is_ascii()method and click on it
- Or, I can scroll down the sidebar and look for the section “Trait Implementations” and find
Derefand click on it. I read thatStringimplementsDeref<Target = str>.
On the line
type Target = strI click on the wordstr(in green) and I land on thestrdocumentation page. In the “Methods” section, I findis_ascii()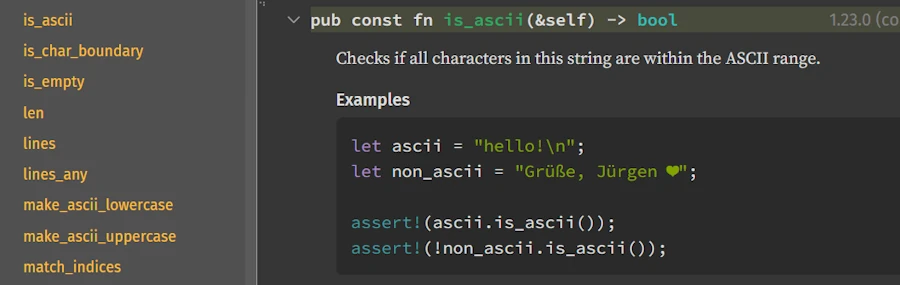
- As before, I can scroll down the sidebar and Look for the section
That’s it, and I guess the summary is: Box<String> → String → str → is_ascii().
Hey Doc, you know what?
- I feel much more confortable navigating and reading the documentation. I know I must read from the beginning, check if the parameters are references or not, click here and there and follow the white rabbit, use the keyboard to navigate quickly… Thank you.
- I understand also why you said before that, for you, the section
Methods from Deref<Target = ???>is so IMPORTANT. I guess this is because deref coercion is a key element of the Rust programming language.
6. Trait, Auto-Trait, and Blanket Implementations
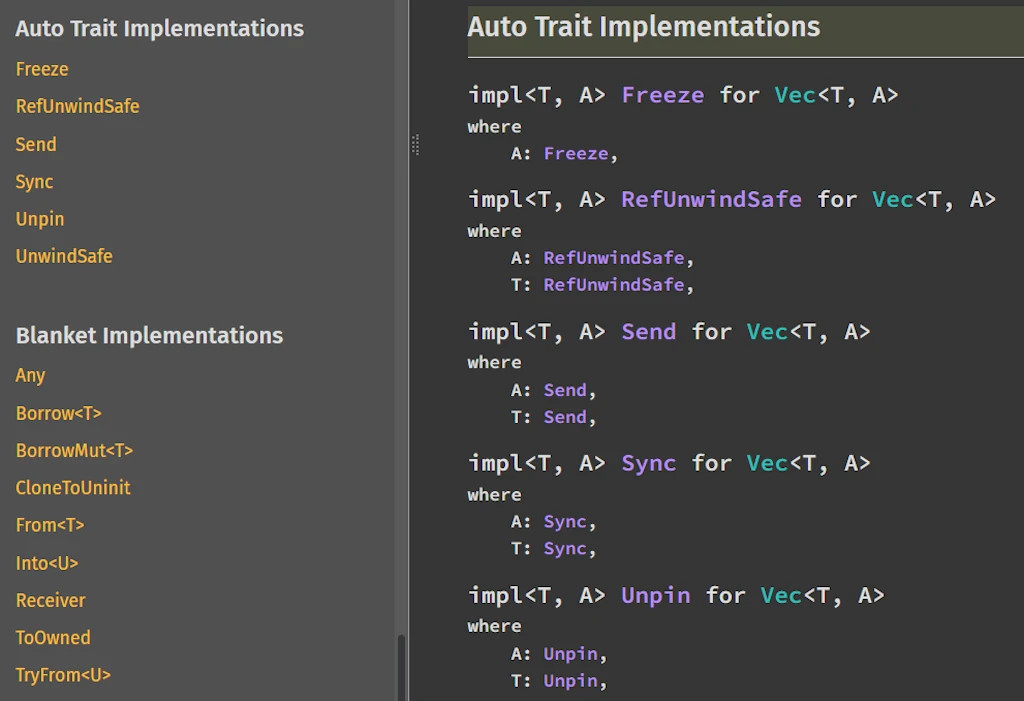
Trait, Auto-Trait, and Blanket Implementations
These sections explain:
- Which traits the type implements, such as
Clone,Debug, orDeref - Which auto traits apply, like
SendorSync - Which blanket implementations exist, such as
impl<T> FromIterator<T> for Vec<T>
These sections really help to understand how the type interacts with Rust’s trait system and what behaviors it gains automatically. However, for now, focus on the previous sections, the need to master theses one will come later.
How to Make the Best Use of These Sections
- Use the sidebar for quick navigation when you already know what you’re looking for (e.g., a specific method).
- Use the Implementations section to understand why a method exists and which impl block provides it. This is especially helpful when generic bounds or trait implementations matter.
- Check the Methods from Deref section when a method doesn’t appear among the inherent ones. Again types can inherit behaviors from their deref target, so many methods come from other types such as slices or string slices.
- Use the Trait Implementations section to discover what extra capabilities a type has, such as formatting, iteration, conversions, or concurrency support.
- Use examples and descriptions to learn idiomatic usage rather than just API details.
- Use search (
CTRL+F) on the page to quickly find method names or trait names when the page is long.
Marty: Waouh… This is a lot of information. I didn’t know all that. Hm… Can we go back to the top of the page? What’s that A = Global thing? I met it already when I checked that Box<T> implements impl<T, A> Deref for Box<T, A>. Last time I ignored it but here, it comes again…
The Rust documentation page for
Struct Vec Emmett: That’s a default type parameter. It means “if you don’t specify an allocator, use Global.” In everyday code you only write Vec<T>, and Rust silently expands it to Vec<T, Global>. You can ignore it 99% of the time. Most people just write Vec<T> and never think about custom allocators. However, if a project decides to use a different allocator — for example the mimalloc crate — then Vec would not use Global anymore but MiMalloc instead. You can forget it for now and continue as usual.
Marty: Okay, noted. So when I see extra type parameters with = Something, I can usually ignore them?
Emmett: Exactly. They’re there for advanced use cases. Focus on the main type parameter first.
Our First Investigation: What Does .iter() Returns?
Marty: Alright, in the code we have numbers.iter(). What does that return? How do I find out?
fn main() {
    let numbers = vec![Some(1), Some(15), Some(25), None, Some(5)];

    // Filter keeps only Some(v) where the predicate is true
    let filtered: Vec<Option<i32>> = numbers
        .iter()
        .map(|&opt| opt.filter(|&n| n > 10))
        .collect();

    println!("Raw numbers: {:?}", numbers);
    println!("Filtered   : {:?}", filtered);
}
Emmett: Let’s use VS Code first. Put your cursor on .iter() and hover over it. Alternatively you can right click on .iter() then select F12 (Go to Definition), or click on it and press F12 directly.
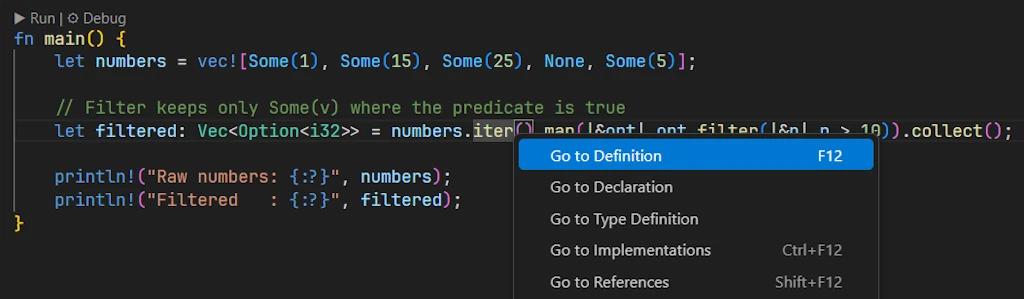
Right click on
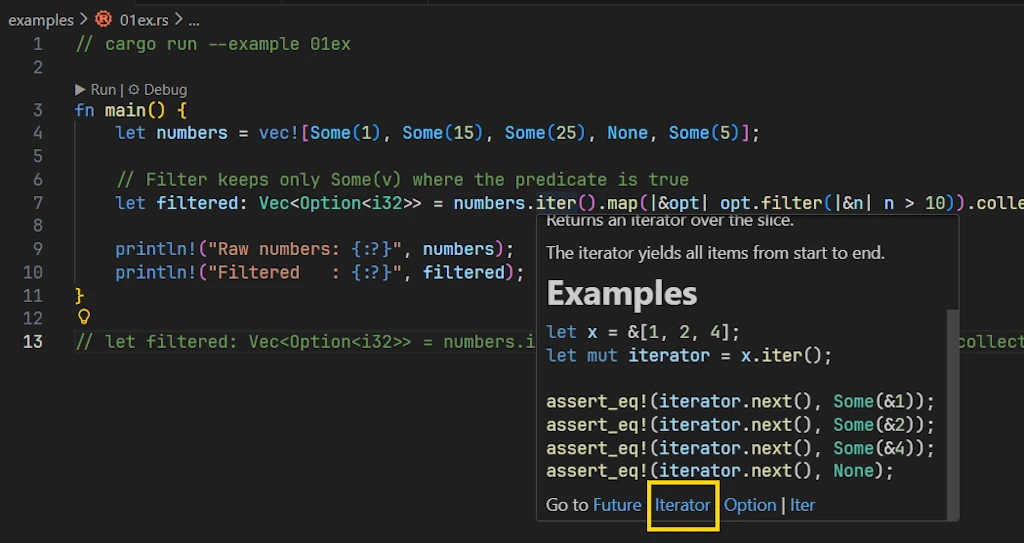
.iter() Marty: If I hover over .iter() and read the content of the IntelliTooltip
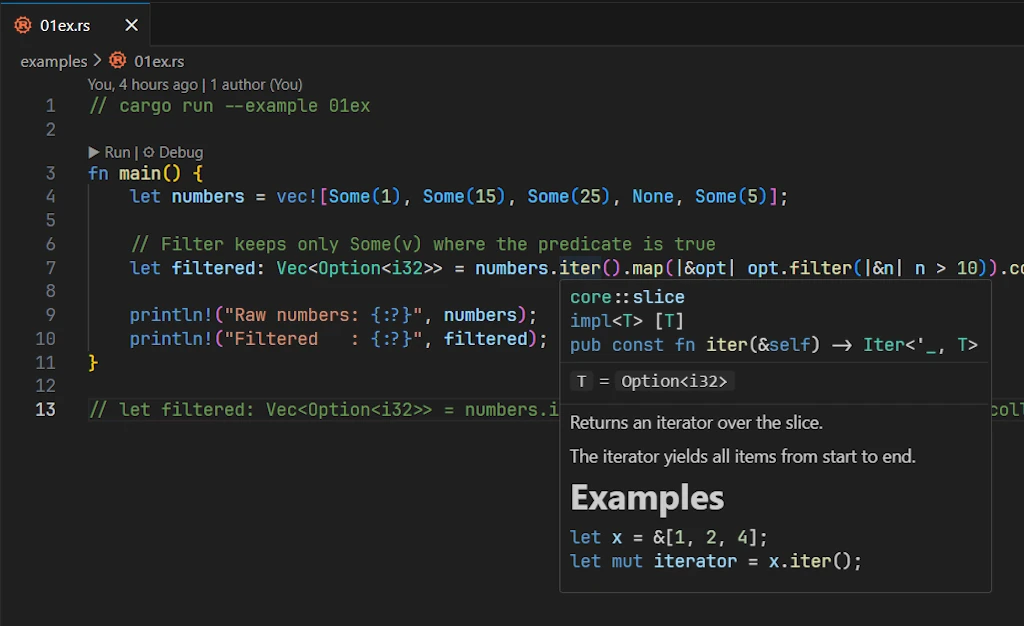
IntelliTooltip, Intellisense or Hover Information
It says… pub const fn iter(&self) -> Iter<'_, T>. It is always the same thing. It doesn’t help at all. What is the Iter<'_, T>?
Emmett: No! Again, read the content! Do NOT look at it. Say it aloud from the very beginning, trust me this helps.
Marty: Ok… I read core::slice then impl<T> [T] then pub const fn iter(&self) -> Iter<'_, T> and finally T = Option<i32>. I guess there is a bug somewhere: we lost the vector and we get a slice instead…
Emmett: Ah! That’s much better. No, this is not a bug, this is the expression of a feature and a great feature of the language, if you ask me. We already talked about it. Yes, I talk again about our friend deref coercion. Anyway, let me explain what you just read:
- Line 1:
core::slice- Module location: The method
.iter()which will be invoked is defined in the modulecore::slice. The Rust Standard Library’s slice implementation.
- Module location: The method
- Line 2:
impl<T> [T]- Implementation block. This is an implementation of methods for the slice
[]containing things of typeT, aka[T]. - Read it as: “implementation of generic type parameter
Tfor slice ofT”. This means the.iter()method is defined on the slice type itself, not onVec!.
- Implementation block. This is an implementation of methods for the slice
- Line 3:
pub const fn iter(&self) -> Iter<'_, T>- This is the method signature
pub: publicly accessibleconst fn: can be called in constant contexts (more on this later)&self: takes a reference to the slice-> Iter<'_, T>: returns an iterator over typeTwith an elided lifetime ('_)
- Line 4:
T = Option<i32>- Type substitution. In our specific case, the generic
Thas been substituted withOption<i32> - This shows what concrete type is being used in our particular call
- Type substitution. In our specific case, the generic
The story told in these four lines is as follows: “This is the iter() method from the core::slice module, implemented on the slice type [T]. In your code, T is Option<i32>, so you’re calling .iter() on a slice of Option<i32> (i.e., [Option<i32>]), which returns an Iter<'_, Option<i32>>.”
Marty: And this is exactly what usually happens. It doesn’t help at all because at the end of the day the question remains: What is Iter<'_, T>?
Emmett: I disagree, you’ve made progress since now you know that the .iter() is NOT applied over a vector but over a slice and you understand that you will get Iter<'_, Option<i32>>. Not that bad I you realize that, so far, you just moved the mouse over .iter().
Marty: Ok… But, sorry to insist, what is Iter<'_, T> and what I’m suppose to do now?
Emmett: Here is THE trick of the day. Move the cursor over .map() and read the tooltip.
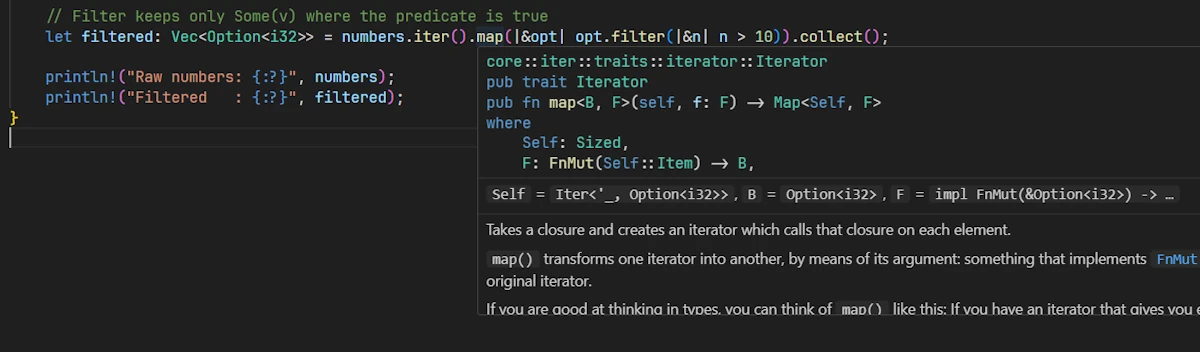
Marty: Your wish is my command. I read
- Line 1:
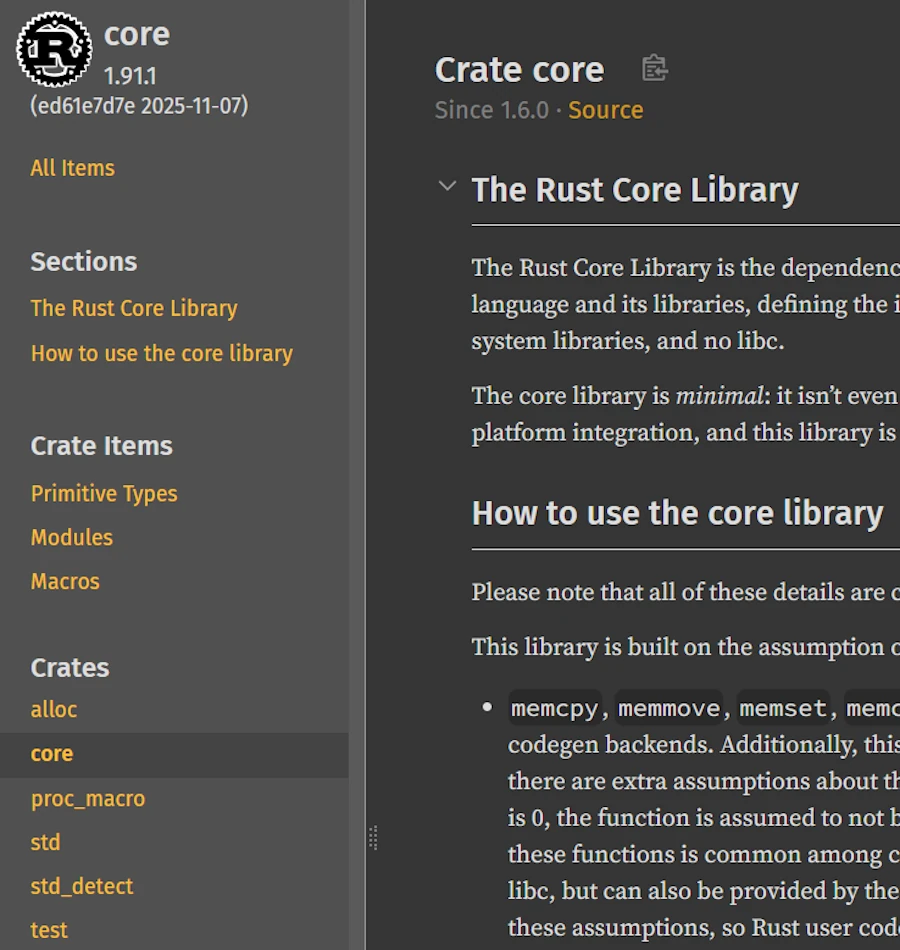
core::iter::traits::iterator::Iterator. This tells us we’re looking at documentation for themapmethod from theIterator. At this point, I’m not sure to know what is anIterator. However I know it is one of the core element of the Rust language since it is available “before” (or outside) thestdcrate… Anyway, the full path shows it’s in the core library, under iter, then traits, then iterator. On the Standard Library documentation home page,coreis at the same level thanstd. Theses are 2 different beasts.
- Line 2:
pub trait Iterator. Now I know.Iteratoris a trait, not a struct or a concrete type. This is the actual trait declaration. It’s public, meaning I can use it in my code. All types that implement this trait get access to its methods, includingmap. - Line 3:
pub fn map<B, F>(self, f: F) -> Map<Self, F>. This is the method signature. Breaking it down it comes:pub fn mapmeans it’s a public function calledmap
At this point, the rest looks to me like Klingon.
Emmett: That’s OK. What do you keep in mind? What .map() expects to act on?
Marty: I understand .map() act on a iterator. According to the text it even transforms one iterator into another one. Ah OK, I get it. Since .map() expect an Iterator I need to check that the Iter<'_, Option<i32>> implement the Iterator trait and if so, read what it yields.
So I go on the page with the Standard Library documentation, press /, type Iter, select the std::slice::Iter, press ENTER

In the side bar of the std::slice::Iter, I find the Trait Implementations section. Tadaa! The struct implement the Iterator trait and the type of the item it iterates over is &a' T. So in my case it will return &Option<i32>.
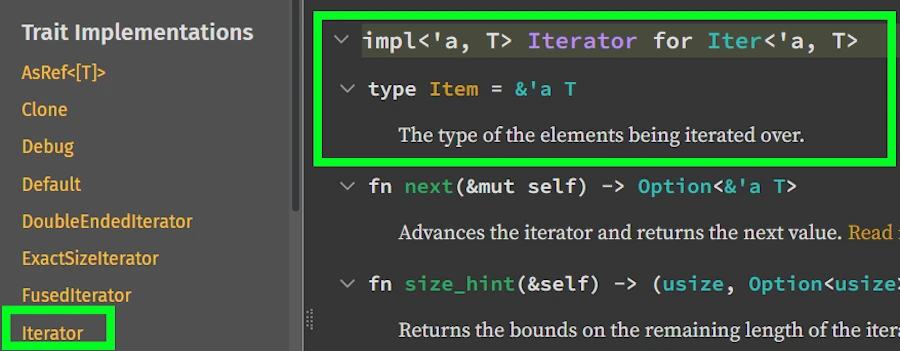
Emmett: Well done Sherlock! This concludes our first investigation. Yes, in our code .iter() yields &Option<i32>.
Before we move on I would like to emphasis how important the “trick of the day” is important and help you start thinking like a compiler…
How the Rust Compiler Reads Our Code: A Dance Between Both Directions
When we look at a chain of method calls like:
numbers.iter().map(|&opt| ...)
We might wonder: does the compiler read left-to-right or right-to-left? The answer is it performs a sophisticated dance between both directions, and understanding this can help us debug type errors.
The Two-Phase Analysis
Phase 1: Left-to-right type propagation (the “what do we have?”)
numbers.iter() -> returns Iter<'_, Option<i32>>
At this point, the compiler knows:
numbersis aVec<Option<i32>>.iter()on aVec<T>returnsstd::slice::Iter<'_, T>- So we have an
Iter<'_, Option<i32>>
Phase 2: Right-to-left constraint checking (the “what do we need?”)
.map(|&opt| ...) <- needs an Iterator
Now the compiler checks:
.map()is a method of theIteratortrait- Does
Iter<'_, Option<i32>>implementIterator? - Yes! Because
Iterhasimpl<'a, T> Iterator for Iter<'a, T>
A Mental Model for Compiler Thinking
I like to imagine the compiler having an internal conversation: “I see .map() being called. .map() requires an Iterator. Let me check what’s to the left… Ah, it’s numbers.iter() which returns Iter. Does Iter implement Iterator? Checks trait implementations Yes! Perfect match.”
Or in flowchart form:
[.map() needs Iterator] ← checks → [numbers.iter() returns Iter]
              ↑                                    ↑
         "I need this"                      "I provide this"
              ↓                                    ↓
         [Trait constraint] ← matches → [Trait implementation]
A Concrete Example of This Dance
Consider this slightly problematic code:
let numbers = vec![1, 2, 3];
let result = numbers.iter().map(|x| x * 2).collect();
// Error: type annotations needed
Here’s what happens:
- Left-to-right:
numbers.iter()→Iter<'_, i32> - Left-to-right:
.map(|x| x * 2)→Map<Iter<'_, i32>, Fn> - Right-to-left:
.collect()← needs to know what to collect into - Stalemate! The compiler can’t infer the collection type
The fix requires either:
- Left-to-right clue: Add type annotation
- Right-to-left clue: Use turbofish:
.collect::<Vec<_>>()
Why This Matters for Learning
Understanding this bidirectional analysis helps you:
- Decode error messages better: When Rust says “expected X, found Y”, it’s often because the left-to-right and right-to-left analyses didn’t match up.
- Write clearer code: Sometimes adding a type annotation “in the middle” helps both directions meet:
let filtered: Vec<_> = numbers.iter().map(...).collect(); // The annotation helps `.collect()` know what to produce - Appreciate Rust’s type inference: It’s not just “guess what I mean” – it’s a systematic process of matching constraints.
Visual Metaphor
Think of it like two people building a bridge from opposite sides of a river:
- Left side builder (your code’s beginning): “I’m starting with
numbers.iter()” - Right side builder (your code’s end): “I need to end with something collectible into
Vec<Option<i32>>” - Middle pieces (method chains): Must connect both sides properly
- Compiler: The engineer checking that all pieces align perfectly

Do you remember the time (MJ, 1992)
Remember math tests in school? In the problem set there was always one or two questions that were easier than the others. Typically you’d be asked: Verify that x=42. That was cool because you knew that as soon as you found that result you could move on to the next question. In fact, what really helped us was that, like here, we already knew the answer. You had to figure it out however you wanted, but you had to find x=42. Here, checking what .map() expects plays a similar role. We then know the result. All we have to do is figure out how we want (deref coercion) to get there. Anyway, you get the idea…
Quick Reference: Your Toolbox So Far
| Tool | What It Does | Shortcut |
|---|---|---|
| Hover | Shows type info and brief docs | Mouse hover |
| Go to Definition | Jumps to source/declaration | F12 or Ctrl+Click |
| Search on docs.rust-lang.org | Find any std item | Use search bar |
| “Methods from Deref” section | Find inherited methods | Scroll down on documentation page |
- Keep in mind the “left to right” and “right to left” way of reading code.
Exercise 00 — Basic Navigation
Given the following code:
fn main() {
    let text = String::from("Hello Rust");
    let uppercase = text.to_uppercase();
    println!("{}", uppercase);
}
Tasks:
- Use the std documentation to find the
.to_uppercase()method. On which type is it actually defined? (Hint: check which section it appears in forString) - Read its complete signature. What type does it return?
- Does this method take
self,&self, or&mut self? What does this mean fortextafter the call?
Exercise 01 — Following Deref Chains and Traits
Given the following code:
fn main() {
    let numbers = vec![1, 2, 3, 4, 5];
    let sum: i32 = numbers.iter().sum();
    println!("Sum: {}", sum);
}
Tasks:
- Use VS Code (hover + F12) and the documentation to trace the complete path:
- What exactly does
.iter()return? (full type with lifetime) - On which trait is the
.sum()method defined? - Verify that the type returned by
.iter()actually implements that trait
- What exactly does
- In the
.sum()signature, what doesSelf::Itemmean? - Bonus: Why can we call
.iter()on aVecwhen it’s actually a slice method?
Exercise 02 — Complex Signatures with Where Clauses
Given the following code:
fn main() {
    let words = vec!["rust", "is", "awesome"];
    let lengths: Vec<usize> = words
        .iter()
        .map(|w| w.len())
        .collect();
    println!("{:?}", lengths);
}
Tasks:
- Read the complete signature of
.map()in the documentation (including the where clause)- How many generic parameters does it have?
- What does
FnMut(Self::Item) -> Bmean? - Why does it take
selfand not&self?
- Trace the types through the chain:
- Exact type returned by
.iter(): __ - Type of
Self::Itemfor this iterator: __ - Type
Bin our case (what the closure returns): __ - Type returned by
.map(): __
- Exact type returned by
- Read the signature of
.collect(). Why do we sometimes need to explicitly annotate the typeVec<usize>?
Exercise 03 — Autonomous Investigation (Bonus)
Here’s some code that doesn’t compile:
fn main() {
    let data = vec![Some(1), None, Some(3)];
    let filtered: Vec<i32> = data
        .iter()
        .filter(|x| x.is_some())
        .collect();
}
Tasks:
- Without compiling, use only the documentation to explain why this code doesn’t compile
- Find at least 2 different solutions by navigating the docs (hints: look at
.flatten(),.filter_map(), or pattern matching in the closure) - For each solution, explain the type transformations at each step
🟢 Part 1.5 : Fixing a Compilation Error Using the Documentation
Marty: Hey Doc, I was following a tutrial last day, I wrote this code and it doesn’t compile. I’m trying to convert a list of words to uppercase and then print the original list. Sounds simple enough, right?
fn main() {
    let words = vec!["hello", "world", "rust"];

    let result: Vec<String> = words
        .into_iter()
        .map(|word| word.to_uppercase())
        .collect();

    println!("Uppercase: {:?}", result);

    // Now let's try to use the original vector
    for word in words {
        println!("Original: {}", word);
    }
}
The compiler is yelling at me:
error[E0382]: use of moved value: `words`
  --> src/main.rs:12:17
   |
2  |     let words = vec!["hello", "world", "rust"];
   |         ----- move occurs because `words` has type `Vec<&str>`,
   |               which does not implement the `Copy` trait
...
4  |     let result: Vec<String> = words
   |                               ----- value moved here
...
12 |     for word in words {
   |                 ^^^^^ value used here after move
I don’t get it. Why is words “moved”? I just wanted to iterate over it!
Emmett: This a perfect opportunity to use the Standard Library documentation to understand what’s happening. Let’s be methodical. The compiler says “value moved here” and points to line 4 where you call .into_iter(). Let’s investigate that method.
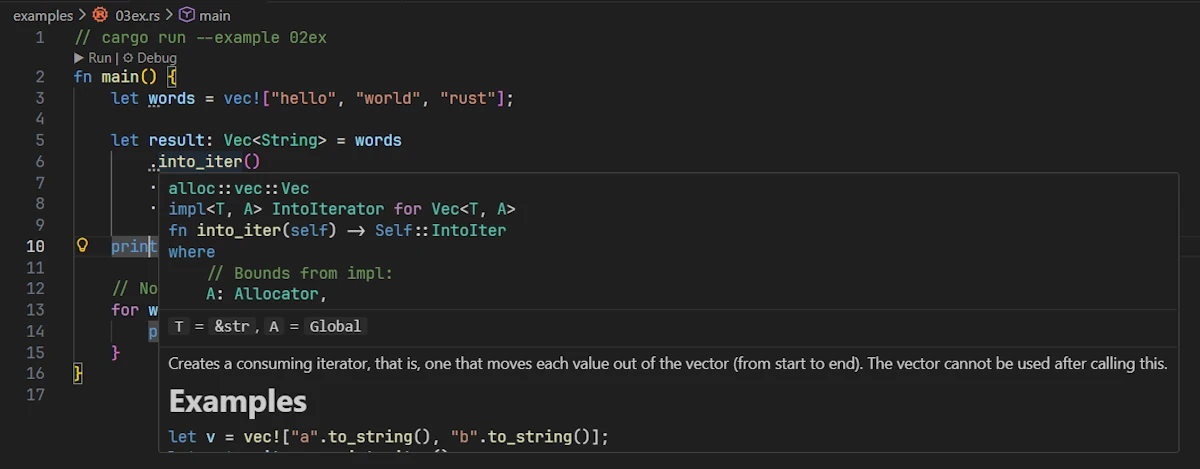
Marty: Okay, I’ll hover over .into_iter() in VS Code…
Hovering over
.into_iter() I read
alloc::vec::Vec
impl<T, A> IntoIterator for Vec<T, A>
fn into_iter(self) -> Self::IntoIter
where
    // Bounds from impl:
    A: Allocator,
T = &str, A = Global
Emmett: Stop right there! What do you see in the signature? Look at the parameter.
Marty: It says fn into_iter(self). Oh! It takes self, not &self. That means…
Emmett: Exactly! It takes ownership of self. When you call words.into_iter(), you’re giving away ownership of words. After that line, words no longer exists — it has been consumed to create the iterator.
Marty: So that’s why I can’t use words in the for loop later. It’s gone!
Emmett: Precisely. By the way you didn’t read all the tooltip. You forgot the example and the line of text right before it. Can you read it now?
Marty: You are right. The line says… “Creates a consuming iterator, that is, one that moves each value out of the vector (from start to end). The vector cannot be used after calling this.” Oops, they could not be more specific. I must slow down and take the time to read what is written. It reminds me of math exams where I used to skim the instructions, rush into solving the equations, and then realize ten minutes later that I was completely off track because I had missed a key detail that was right there in the text.
Emmett: Can you show me how you would find out the method.into_iter() in the Standard Library documentation?
Marty: In the browser, on any tab where a page of the Standard Library is display, I press /, enter into_iter. Wow! It’s packed tonight at the club entrance.

Searching for
into_iter I use the down arrow ⬇️, highlight the line method std::vec::Vec::into_iter, press ENTER, land on the page
alloc::vsstd::— Don’t Panic!When hovering over types like
VecorStringin VS Code, you might see paths starting withalloc::(e.g.,alloc::vec::Vec), while the online documentation showsstd::vec::Vec. Don’t worry — they’re the same type!Rust’s standard library is organized in layers:
core— Minimal, no memory allocation (primitives,Option,Result,Iterator…)alloc— Adds heap allocation (Vec,String,Box…)std— Full standard library, re-exports everything fromcoreandallocVS Code shows the source location (
alloc::), while the docs show the public API path (std::). When searching the documentation, always usestd::. Both refer to exactly the same code.
Emmett: Now, let’s find an alternative. You want to iterate over the vector without consuming it. What method did we use earlier in this guide?
Marty: We used .iter()! Let me check its signature in the documentation. I’ll go to doc.rust-lang.org/std, search for Vec, and look for the iter method.
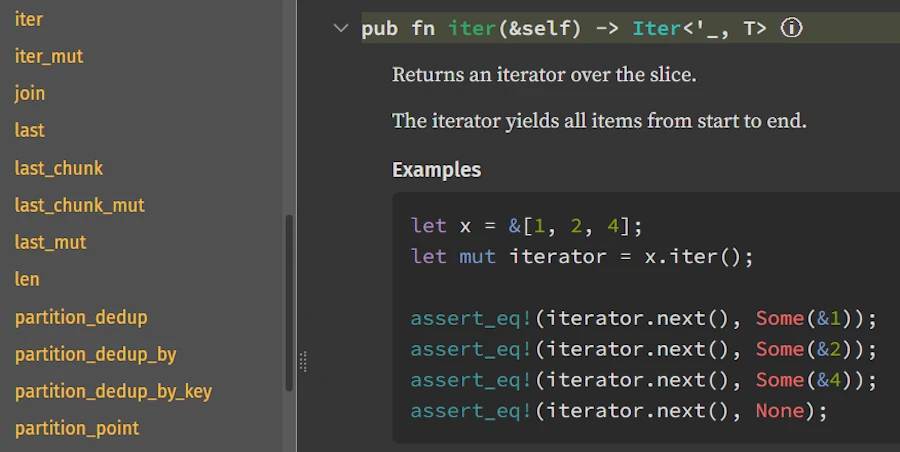
Finding
.iter() in the Vec documentation I find it in the “Methods from Deref<Target = [T]>” section. The signature is:
pub fn iter(&self) -> Iter<'_, T>
It takes &self! A reference. So it just borrows the vector instead of consuming it.
Emmett: Now you’re reading the docs like a pro! So what’s the fix?
Marty: I replace .into_iter() with .iter():
fn main() {
    let words = vec!["hello", "world", "rust"];

    let result: Vec<String> = words
        .iter()
        .map(|word| word.to_uppercase())
        .collect();

    println!("Uppercase: {:?}", result);

    // Now this works!
    for word in words {
        println!("Original: {}", word);
    }
}
Let me run it… It compiles! Output:
Uppercase: ["HELLO", "WORLD", "RUST"]
Original: hello
Original: world
Original: rust
Emmett: Perfect. Let’s recap what we just learned:
| Method | Signature | What it does |
|---|---|---|
.into_iter() | fn into_iter(self) | Consumes the collection, yields owned items |
.iter() | fn iter(&self) | Borrows the collection, yields references |
.iter_mut() | fn iter_mut(&mut self) | Mutably borrows, yields mutable references |
The key insight is that the signature tells you everything. When you see self — ownership is transferred. When you see &self — it’s just a borrow. When you see &mut self — it’s a mutable borrow.
Marty: So every time I get a “use of moved value” error, I should check whether the method I’m calling takes self or &self?
Emmett: Exactly! And now you know how to find that information in the documentation. This pattern will save you countless hours of confusion. The compiler error told you what happened (“value moved here”), and the documentation told you why (.into_iter() takes self).
Marty: This is actually really helpful. The error message suddenly makes much more sense when I understand the method signatures.
Emmett: That’s the power of reading the Standard Library documentation. The compiler and the docs work together — the compiler tells you something’s wrong, and the docs explain the underlying design that caused it. Once you connect those dots, Rust becomes much less mysterious.
🔵 Part 2: Intermediate — Generics and Trait Bounds
The Map Method: Our First Generic Signature
Marty: Okay, next up is .map().
fn main() {
    let numbers = vec![Some(1), Some(15), Some(25), None, Some(5)];

    // Filter keeps only Some(v) where the predicate is true
    let filtered: Vec<Option<i32>> = numbers
        .iter()
        .map(|&opt| opt.filter(|&n| n > 10))
        .collect();

    println!("Raw numbers: {:?}", numbers);
    println!("Filtered   : {:?}", filtered);
}
Let me hover over it…

core::iter::traits::iterator::Iterator
pub trait Iterator
pub fn map<B, F>(self, f: F) -> Map<Self, F>
where
    Self: Sized,
    F: FnMut(Self::Item) -> B,
Self = Iter<'_, Option<i32>>, B = Option<i32>, F = impl FnMut(&Option<i32>) -> ...
Hmm, Emmett… What is all this?
Emmett: Now we’re getting somewhere! You already commented the first 2 lines. I will not repeat what you said. Let’s break down the signature piece by piece.
pub fn map<B, F>(self, f: F) -> Map<Self, F>
This declares a method called map with:
- Two type parameters:
BandF(in the angle brackets) - Takes ownership of self: that’s the
self(not&self) - Takes a parameter
fof typeF - Returns
Map<Self, F>— a new iterator type
Marty: What are B and F? Like, what do those letters mean?
Emmett: They’re generic type parameters — placeholders for actual types. The letters are conventional:
T= “Type” (the main/default generic)B= often “B” as in “the type we’re mapping to” (think: A → B)F= “Function” (for closures/function parameters)E= “Error”K,V= “Key”, “Value” (for maps)
Marty: And why B and F are between brakets? What do they do there?
Emmett: In your own code, when you use a variable you need to declare it, you need to introduce it. Here, this is the same thing but at a higher level. Before to use a type parameter we need to declare it before we can use it.
This is important but you know what? What really matters is the constraints that the where clause put on the type parameters.
Understanding where Clauses
Emmett: Now look at the where clause:
where
    F: FnMut(Self::Item) -> B,
This says: “F must implement FnMut(Self::Item) -> B.”
In plain English: “The function f must be something callable that:
- Takes one argument of type
Self::Item(whatever the iterator yields) - Returns something of type
B - Can be called multiple times (and might mutate its environment — that’s what
Mutmeans)”
Marty: What’s Self::Item?
Emmett: Self refers to the type implementing this trait (in our case, Iter<'_, Option<i32>>). And Item is an associated type of the Iterator trait — it’s the type of elements the iterator produces.
For our Iter<'_, Option<i32>>, the Item type is &Option<i32> — a reference to each element.
Marty: Wait, a reference? Not the actual Option<i32>?
Emmett: Right! Because .iter() borrows the collection. It gives you references (&Option<i32>) not owned values (Option<i32>). Now, let’s look at that line:
.map(|&opt| opt.filter(|&n| n > 10))
The |&opt| uses pattern matching in the closure parameter. It says “take the reference, dereference it, and bind the result to opt.” So opt is Option<i32>, not &Option<i32>.
Marty: Could I also write |opt| (*opt).filter(...)?
Emmett: Absolutely! Or even |opt| opt.filter(...) because of auto-deref. But for Copy types like Option<i32>, the |&opt| pattern is common and clean.
The Three Fn Traits: Fn, FnMut, FnOnce
Marty: You mentioned FnMut. On the other hand I also read about Fn and FnMut. What’s the difference between Fn, FnMut, and FnOnce?
Emmett: Great question. These are the three closure traits:
| Trait | Can call… | Can mutate captured vars? | Can consume captured vars? |
|---|---|---|---|
Fn | Multiple times | No | No |
FnMut | Multiple times | Yes | No |
FnOnce | Once | Yes | Yes |
There’s a hierarchy: Fn implies FnMut, which implies FnOnce. So if something requires FnOnce, you can pass any closure. If it requires Fn, you need a closure that doesn’t mutate anything.
Marty: So .map() uses FnMut because it calls the closure multiple times (once per element I suspect), and the closure might need to mutate some state?
Emmett: Exactly! Even if your specific closure doesn’t mutate anything, .map() is designed to accept closures that could. It’s being flexible.
Reading the Option::filter Signature
Marty: Now let’s tackle the scary one. The filter method on Option.
fn main() {
    let numbers = vec![Some(1), Some(15), Some(25), None, Some(5)];

    // Filter keeps only Some(v) where the predicate is true
    let filtered: Vec<Option<i32>> = numbers
        .iter()
        .map(|&opt| opt.filter(|&n| n > 10))
        .collect();

    println!("Raw numbers: {:?}", numbers);
    println!("Filtered   : {:?}", filtered);
}
Here’s what the docs show:
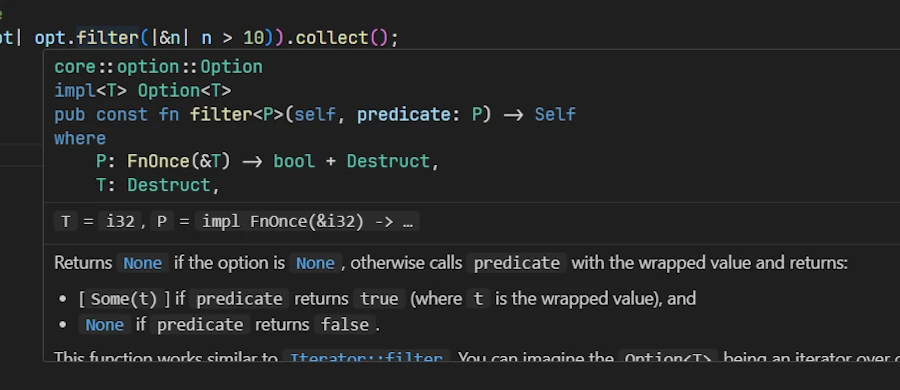
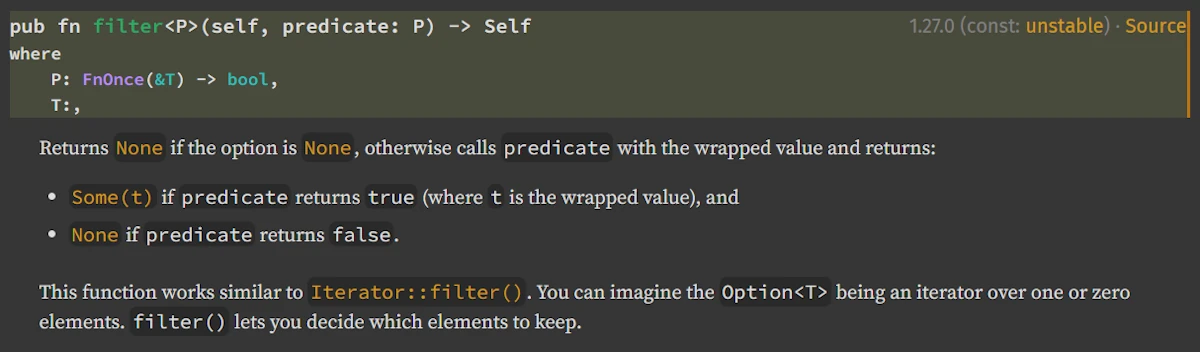
core::option::Option
impl<T> Option<T>

pub const fn filter<P>(self, predicate: P) -> Self
where
    P: FnOnce(&T) -> bool + Destruct,
    T: Destruct,
Using the Standard Library documentation web page I make sure to filter the results and to restrict them to the crate core
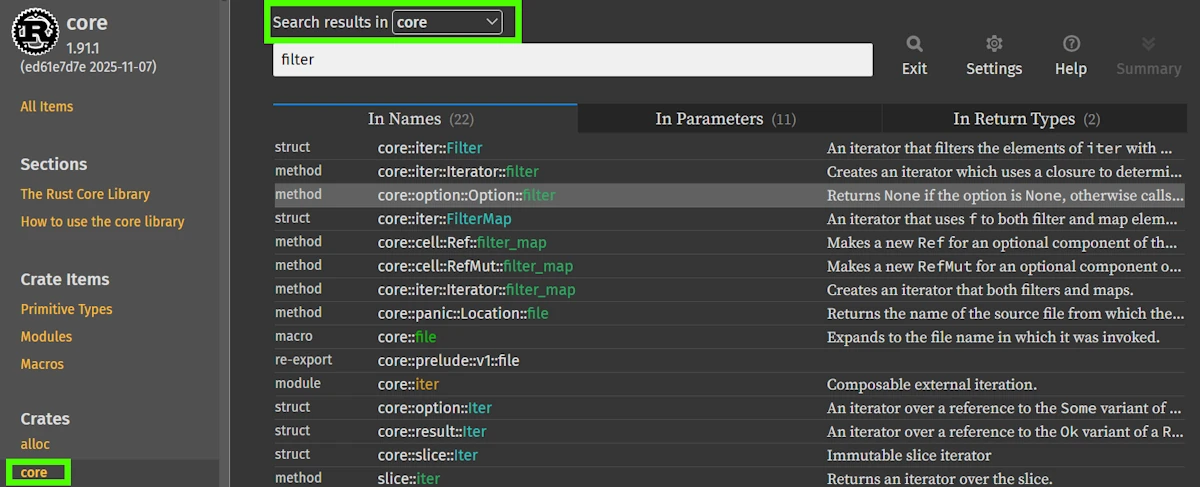
If I click, I realize that the documentation slightly differs from what I can see int the code. For example const had been lost.
Hey doc, do you know why?
Emmett: You are right and this is OK. In fact, Rust’s standard documentation often displays simplified function signatures, which is why Option::filter in the docs appears as a regular fn even though the source code defines it as a const fn. When browsing Rust’s source code (for example through an IDE with “Go to Definition”), you see the full internal version, including pub const fn, compiler attributes like rustc_const_unstable, and [const] trait bounds such as [const] FnOnce. These details are intentionally hidden in the public documentation because they are implementation-specific, may still be unstable, and would make the API harder to read. In short: the web documentation shows the stable, user-facing API, while the source reveals the full compiler-level definition.
Now, let’s go line by line.
core::option::Option
impl<T> Option<T>

pub const fn filter<P>(self, predicate: P) -> Self
where
    P: FnOnce(&T) -> bool + Destruct,
    T: Destruct,
Line 0: core::option::Option Easy. You already know. This is where the item lives, in the crate core in the module option::Option.
Line 1: impl<T> Option<T>
This tells you where this method is defined. It’s in an impl block for Option<T>. As you know, now, the <T> means this works for any type T inside the Option.
Line 2: pub const fn filter<P>(self, predicate: P) -> Self
pub: This method is publicconst fn: Can be called in const contexts (compile-time evaluation) — you can usually ignore thisfilter<P>: Method namedfilterwith one type parameterP(self, predicate: P): Takes ownership ofselfand apredicateof typeP-> Self: Returns the same type (Option<T>)
Marty: Wait, it takes self not &self? So it consumes the Option?
Emmett: Yes! Check the signature. When a method takes self, it takes ownership. That’s why this works:
opt.filter(|&n| n > 10) // opt is moved into filter
If opt were &Option<i32>, you couldn’t call filter directly. You would need to clone or copy first. But since Option<i32> is Copy (because i32 is Copy), the compiler handles this automatically for you.
Lines 3-4: The where clause
where
    P: FnOnce(&T) -> bool + Destruct,
    T: Destruct,
Let’s parse P: FnOnce(&T) -> bool + Destruct:
Pmust implementFnOnce(&T) -> bool— a function taking&Tand returningbool+ Destruct— AND it must implementDestruct
Marty: What the heck is Destruct? I’ve never seen that.
Emmett: Destruct is a trait used for const evaluation. It basically means “this type can be dropped in a const context.” For normal runtime code, you can completely ignore it. It’s automatically implemented for pretty much everything.
When you see bounds like Destruct, Sized, or Unpin, and you’re not doing advanced stuff (const generics, custom DSTs, async…), you can usually skip over them.
Marty: So practically speaking, the signature just tells “give me a function that takes a reference to the inner value and returns bool”?
Emmett: Exactly and this is one way to describe a predicate. Now, the filter method:
- If
selfisNone, returnsNone - If
selfisSome(v), callspredicate(&v)- If true, returns
Some(v) - If false, returns
None
- If true, returns
Marty: Oh! So in our code, Some(1).filter(|&n| n > 10) returns None because 1 is not greater than 10. And Some(15).filter(|&n| n > 10) returns Some(15).
Emmett: You’ve got it!
The Three Versions Explained
Marty: The original code has three “same thing” versions:
// V1
.map(|&opt| opt.filter(|&n| n > 10))

// V2
.map(|opt| opt.filter(|&n| n > 10))

// V3
.map(|opt| opt.filter(|n| *n > 10))
What’s the difference?
Emmett: They’re all equivalent! Let me explain:
V1: |&opt|. We already talked about it. Destructure the reference immediately. opt is Option<i32>.
V2: |opt| — opt is &Option<i32>, but thanks to Deref coercion and the fact that Option<i32> is Copy, calling .filter() works seamlessly. Rust is smart enough to copy the value when needed.
Actually, wait, let me be more precise. In V2, opt is &Option<i32>. When you call opt.filter(...), Rust sees that filter takes self (ownership), but you have a reference. Since Option<i32> is Copy, Rust automatically copies it. This is called auto-deref combined with implicit copying.
V3: |opt| same as V2, but inside the inner closure: |n| where n is &i32, and you manually dereference with *n > 10.
The Rust compiler is incredibly helpful here. All three work because of:
- Auto-deref: automatically dereferencing when needed
- Copy semantics:
i32andOption<i32>areCopy, so they get copied instead of moved - Pattern matching:
|&x|destructures references in closures
Exercise 00 - Reading and Understanding a Generic Function Signature
Consider the code below:
fn apply_twice<T, F>(value: T, func: F) -> T
where
    F: Fn(T) -> T,
{
    // Apply the function twice
    func(func(value))
}

fn main() {
    // Example 1: Double a number twice (x4)
    let result = apply_twice(5, |x| x * 2);
    println!("5 doubled twice: {}", result); // 20

    // Example 2: Add 10 twice
    let result = apply_twice(100, |x| x + 10);
    println!("100 + 10 + 10: {}", result); // 120

    // Example 3: With a String
    let result = apply_twice(String::from("Hello"), |s| s + "!");
    println!("String result: {}", result); // Hello!!
}
- Read the signature (use hover in VS Code or the std docs) and explain:
- The role of
T - The role of
F - Why the constraint
F: Fn(T) -> Tis required
- The role of
- Why is the function
funcallowed to be called twice? - Write two example calls:
- one with an
i32 - one with a
String(note:Stringdoes not implementCopy)
- one with an
Exercise 01 - Understanding the Predicate in Option::filter
fn keep_even(opt: Option<i32>) -> Option<i32> {
    opt.filter(|n| n % 2 == 0)
}

fn main() {
    // Test with an even number
    let even = Some(42);
    println!("keep_even(Some(42)): {:?}", keep_even(even)); // Some(42)

    // Test with an odd number
    let odd = Some(7);
    println!("keep_even(Some(7)): {:?}", keep_even(odd)); // None

    // Test with None
    let none: Option<i32> = None;
    println!("keep_even(None): {:?}", keep_even(none)); // None

    // Test with zero (even)
    let zero = Some(0);
    println!("keep_even(Some(0)): {:?}", keep_even(zero)); // Some(0)

    // Test with negative even
    let neg_even = Some(-4);
    println!("keep_even(Some(-4)): {:?}", keep_even(neg_even)); // Some(-4)
}
- Read and explain the
Option::filtersignature:- Why does it take self (not
&self)? - What does
P: FnOnce(&T) -> boolmean?
- Why does it take self (not
- Why does the closure
|n| n % 2 == 0match the required type (&i32 → bool)? - Predict the result of each call:
keep_even(Some(4))keep_even(Some(5))keep_even(None)
Exercise 02 - Tracking Type Transformations in an Iterator Chain
fn main() {
    let data = vec!["rust", "rocks", "hard"];
    let result = data
        .iter()
        .map(|w| w.len())
        .filter(|l| *l > 3)
        .collect::<Vec<_>>();

    println!("{:?}", result);
}
- For each step (
iter→map→filter→collect), write down the exact type produced:- Type returned by
.iter() - Type of
Self::Item - Type returned by
.map() - Type expected by
.filter() - Final type after
.collect()
- Type returned by
- Why does
.map()require anFnMutwhile.filter()also takes anFnMut, but acting on a reference? - Explain whether this version compiles, and why:
.map(|mut w| { w = "test"; w.len() })
Exercise 03
- Copy, paste and run the code below in Rust Playground
- Review what we said about the 3 different ways to filter a vector of
Option<i32>
#[derive(Debug, Clone)]
struct HeavyData {
    name: String,
    value: i32,
}

fn main() {
    let heavy_data = [
        Some(HeavyData {
            name: "Alice".to_string(),
            value: 10,
        }),
        Some(HeavyData {
            name: "Bob".to_string(),
            value: 50,
        }),
        None,
        Some(HeavyData {
            name: "Charlie".to_string(),
            value: 100,
        }),
        Some(HeavyData {
            name: "Diana".to_string(),
            value: 30,
        }),
    ];

    // INEFFICIENT: clones all structures just to filter
    // .iter(): yields &Option<HeavyData>
    // .map():  opt.clone() creates Option<HeavyData> (clones EVERY structure!)
    // .filter: checks data.value > 42, but already cloned everything
    let filtered_cloned: Vec<Option<HeavyData>> = heavy_data
        .iter()
        .map(|opt| opt.clone().filter(|data| data.value > 42))
        .collect();
    println!();
    println!("Inefficient (clone all): {:?}", filtered_cloned);

    // EFFICIENT: filter first with references, clone only what passes
    // .iter():    yields &Option<HeavyData>
    // .filter():  checks condition on reference, no cloning yet
    // .map():     only clones items that passed the filter
    let filtered_smart: Vec<Option<HeavyData>> = heavy_data
        .iter()
        .filter(|opt| opt.as_ref().map_or(false, |data| data.value > 42))
        .map(|opt| opt.clone())
        .collect();
    println!("Efficient (filter first): {:?}", filtered_smart);

    // ALTERNATIVE: work with references only (no cloning at all)
    // Returns Vec<Option<&HeavyData>> instead of owned data
    let filtered_refs: Vec<Option<&HeavyData>> = heavy_data
        .iter()
        .map(|opt| opt.as_ref().filter(|data| data.value > 42))
        .collect();
    println!("Zero-clone (references): {:?}", filtered_refs);
}
- Read the Standard Library documentation for
.as_ref()and.map_or() - For the 3 different ways above, are you able to name the type of data along the pipeline?
- Do you understand why the first is less efficient than the last 2?
🔴 Part 3: Difficult — Advanced Patterns
Associated Types vs. Generic Type Parameters
Marty: You mentioned Self::Item earlier (see “Understanding where Clauses”). How is that different from just using a generic parameter <T>?
Emmett: Great question. Compare these two approaches:
Generic type parameter:
trait Container<T> {
    fn get(&self) -> T;
}
Associated type:
trait Container {
    type Item;
    fn get(&self) -> Self::Item;
}
The key difference: with generics, you can implement the same trait multiple times for different T:
impl Container<i32> for MyStruct { ... }
impl Container<String> for MyStruct { ... }  // Both valid!
With associated types, there’s exactly ONE implementation per type:
impl Container for MyStruct {
    type Item = i32;
    fn get(&self) -> i32 { ... }
}
// Can't also impl Container for MyStruct with Item = String
Marty: So Iterator uses an associated type because each iterator type yields exactly one kind of item?
Emmett: Precisely. A Vec<i32>::Iter always yields &i32. It wouldn’t make sense to have it also yield &String. The associated type locks it in.
Reading Associated Types in Docs
Marty: How do I find out what the associated types are for a given type?
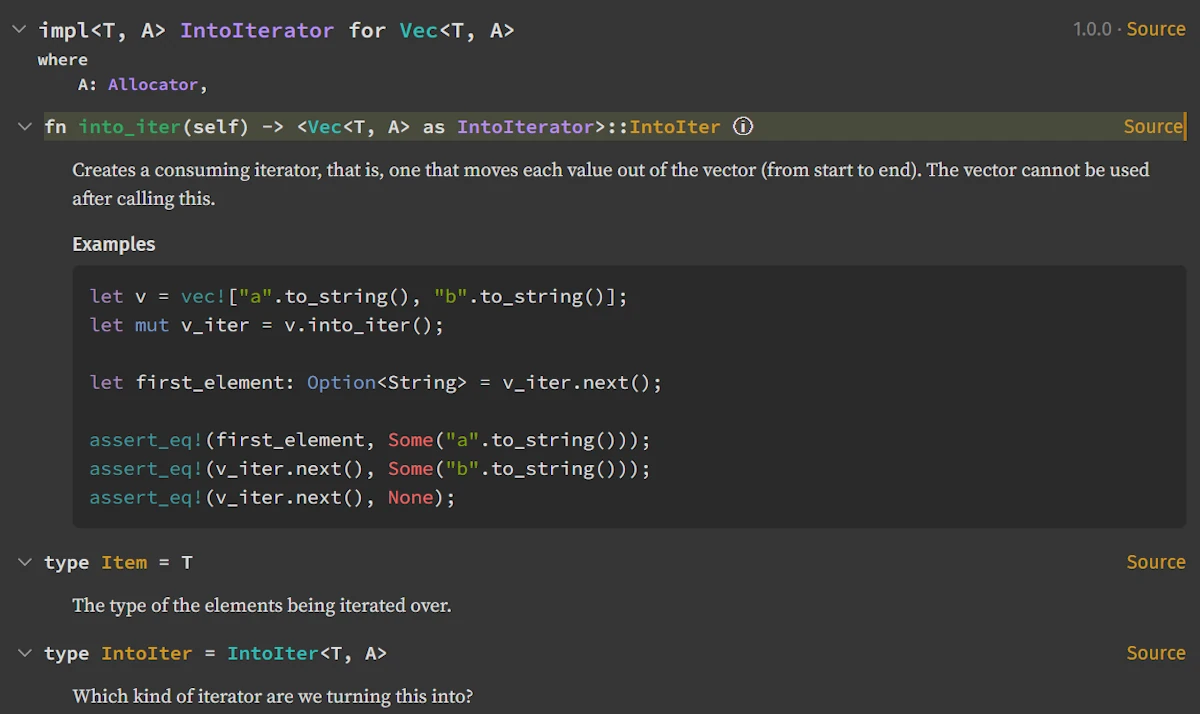
Emmett: In the docs, when you look at a type’s “Trait implementations”, you’ll see lines like:
impl<T, A: Allocator> IntoIterator for Vec<T, A>
    type Item = T
    type IntoIter = IntoIter<T, A>
See those type Item = T and type IntoIter = ... lines? Those are the associated types being specified.
You can also find them in VS Code. Hover over or go to definition of the trait, and you’ll see the associated types declared.
Click on the
Iterator link Let’s look at the Iterator trait:
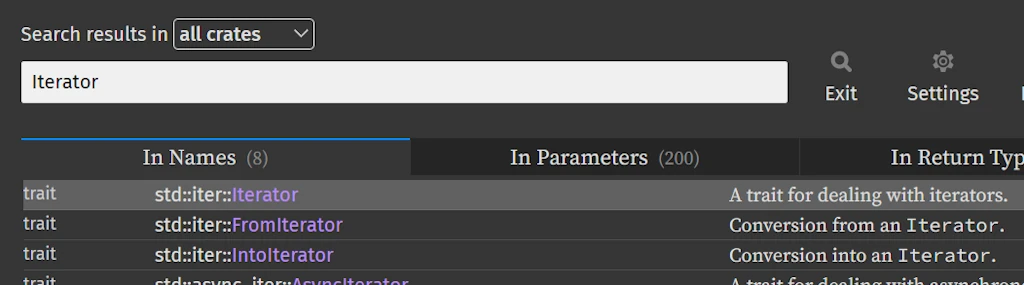
Search for "Iterator" in the Rust Standard Library documentation
Then
Click on
std::iter::Iterator We see
pub trait Iterator {
    type Item;

    fn next(&mut self) -> Option<Self::Item>;

    // ... many other methods
}
That type Item; line declares the associated type. Every iterator must specify what Item is.
Lifetimes in Signatures
Marty: I’ve been avoiding this, but… what about those 'a things I see everywhere?
Emmett: Lifetimes! They’re not as scary as they look. Let’s see them in context:
pub fn iter(&self) -> Iter<'_, T>
The '_ is a lifetime. It says “the returned Iter cannot outlive self.” It’s the compiler ensuring you don’t have dangling references.
Here’s a more explicit version:
pub fn iter<'a>(&'a self) -> Iter<'a, T>
This says:
'ais a lifetime parameter&'a self— we borrow self for lifetime'aIter<'a, T>— the iterator is valid for lifetime'a
In other words: “the iterator lives as long as the borrow of self.”
Marty: What about when I see multiple lifetimes?
Emmett: Then you’re dealing with relationships between them:
fn longest<'a>(x: &'a str, y: &'a str) -> &'a str
This says “both inputs and the output all share the same lifetime 'a.” The returned reference is valid as long as BOTH inputs are valid.
You’ll also see lifetime bounds:
fn foo<'a, 'b: 'a>(x: &'a str, y: &'b str) -> &'a str
The 'b: 'a means “‘b outlives ‘a” so that y’s data lives at least as long as x’s.
Marty: Honestly, this is where my eyes start to glaze over.
Emmett: Here’s my practical advice: when you’re reading docs, you can often simplify mentally:
- If you see
'_, think “this borrows from something, and the compiler tracks it” - If you see
'static, think “this data lives forever (like string literals)” - If you see multiple lifetimes, think “these references have a relationship the compiler enforces”
You need to really understand lifetimes when writing complex data structures. For reading docs? The key insight is just “references have scopes, and lifetimes express that.”
The Mysterious ?Sized Bound
Marty: I sometimes see T: ?Sized. What’s that question mark about?
Emmett: Great catch! This is one of those “bounds that relax restrictions.”
By default, all generic types have an implicit T: Sized bound, meaning T must have a known size at compile time. But sometimes you want to accept dynamically sized types (DSTs) like str or [u8].
The ?Sized says “T might not be Sized.” It removes the default Sized requirement.
Look at From for PathBuf:
Side Note:
- Go back to doc.rust-lang.org/std, press
/, search forpathbufand click on the first item in the list :struct std::path::PathBuf- On the left hand side of the page, scroll down, find the “Trait Implementations” section and click on
From<&T>
Welcome home!
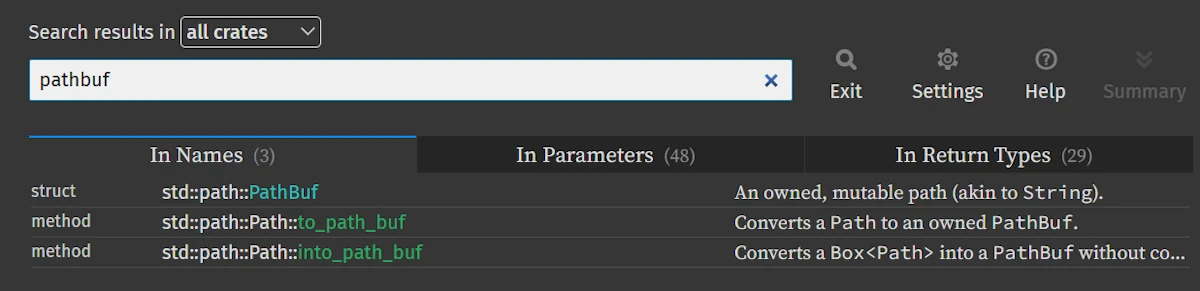
Search for "pathbuf" in the Rust Standard Library documentation
Scroll down on the left
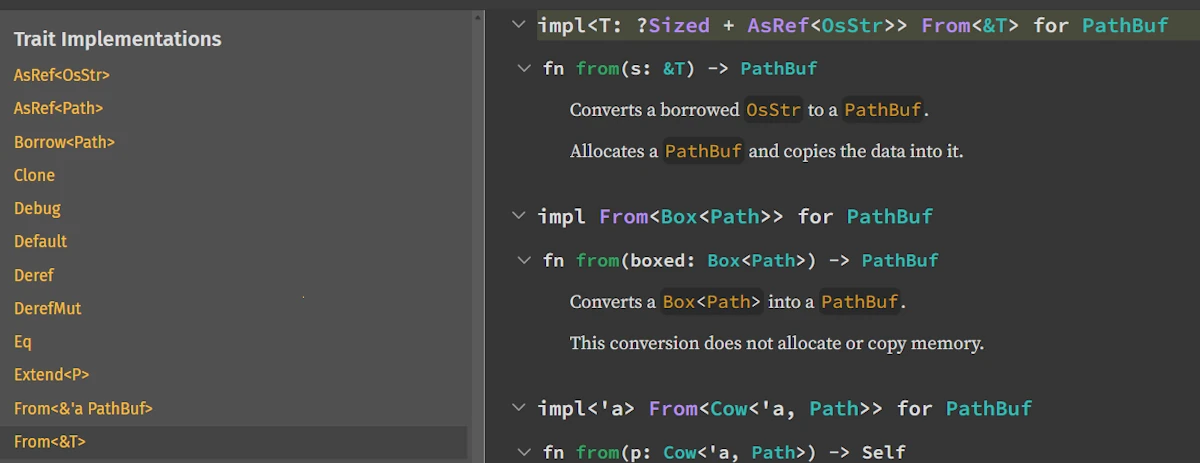
Trait Implementations
Finally you read
impl<T> From<&T> for PathBuf
where
    T: ?Sized + AsRef<OsStr>,
The T: ?Sized allows T to be str (unsized). So you can do:
let path = PathBuf::from("hello"); // T = str (unsized!)
Without ?Sized, you couldn’t pass &str because str doesn’t have a known size.
Marty: So ?Sized makes functions more flexible?
Emmett: Exactly. It’s the trait bound that says “I don’t need to know the size.”
Deref Coercion Deep Dive
Marty: Earlier you mentioned Deref lets Vec use slice methods. Can you explain more?
Emmett: Sure! Deref is a trait that enables implicit dereferencing. Here’s how Vec implements it:
impl<T, A: Allocator> Deref for Vec<T, A> {
    type Target = [T];

    fn deref(&self) -> &[T] { ... }
}
This says “a Vec<T> can be treated as &[T] automatically.”
When you write vec.iter(), here’s what Rust does:
- Look for
iter()onVec<T>— not found - Check if
Vec<T>implementsDeref— yes, to[T] - Look for
iter()on[T]— found! - Automatically call it as
(*vec).iter()(conceptually)
This cascades! String derefs to str, Box<T> derefs to T, Rc<T> derefs to T, etc.
Marty: How do I see what a type derefs to?
Emmett: In the docs, look for the “Methods from Deref<Target = X>” section. Or look for impl Deref for ... in the “Trait Implementations”.
In VS Code, if you can’t find a method, try going to definition on the type and looking for Deref.
Reading Complex Trait Hierarchies
Marty: Sometimes I see things like Iterator + Clone + Send. What’s going on there?
Emmett: Those are multiple trait bounds. The + means “and”:
fn process<I>(iter: I)
where
    I: Iterator<Item = u32> + Clone + Send,
This says I must:
- Be an
Iteratoryieldingu32 - Be
Cloneable - Be
Send(safe to send across threads)
You’ll also see trait inheritance (called “supertraits”):
pub trait Copy: Clone { }
This means “anything implementing Copy must also implement Clone.” You can’t have Copy without Clone.
Marty: So if something requires Copy, I know it’s automatically Clone too?
Emmett: Exactly!
Marker Traits and Auto Traits
Marty: What about Send, Sync, Sized, Unpin? I see these but they seem… empty?
Emmett: These are marker traits — they have no methods! They just “mark” types with certain properties:
| Trait | Meaning |
|---|---|
Send | Safe to transfer to another thread |
Sync | Safe to share between threads (&T is Send) |
Sized | Has a known size at compile time |
Unpin | Can be moved after being pinned (for async) |
Copy | Can be duplicated via simple bit-copy |
Most of these are auto traits — the compiler implements them automatically when safe. You rarely implement them manually.
When you see them in bounds, they’re usually ensuring thread safety or other guarantees. For example, spawn requires F: Send because the closure must be safe to send to another thread.
Marty: So when I’m reading docs and I see these, I can often think “this is for thread safety or compiler guarantees” and move on?
Emmett: Exactly! Unless you’re doing unsafe code, advanced async, or FFI, you can usually trust that if your code compiles, these bounds are satisfied.
Exercise 00 - Associated Types vs Generic Parameters
trait WithGeneric<T> {
    fn get(&self) -> T;
}

trait WithAssoc {
    type Item;

    fn get(&self) -> Self::Item;
}

// Implementation using generic trait
struct ContainerGeneric<T> {
    value: T,
}

impl<T: Clone> WithGeneric<T> for ContainerGeneric<T> {
    fn get(&self) -> T {
        self.value.clone()
    }
}

// Implementation using associated type
struct ContainerAssoc {
    value: i32,
}

impl WithAssoc for ContainerAssoc {
    type Item = i32;

    fn get(&self) -> Self::Item {
        self.value
    }
}

fn main() {
    // Using the generic trait
    let gen_container = ContainerGeneric { value: 42 };
    let val: i32 = WithGeneric::get(&gen_container);
    println!("WithGeneric: {}", val);

    // Same struct can implement WithGeneric for multiple types
    let str_container = ContainerGeneric { value: String::from("Hello") };
    let val: String = WithGeneric::get(&str_container);
    println!("WithGeneric (String): {}", val);

    // Using the associated type trait
    let assoc_container = ContainerAssoc { value: 100 };
    let val = assoc_container.get(); // Type is inferred from associated type
    println!("WithAssoc: {}", val);
}
- Why can a type implement
WithGeneric<T>multiple times, but only implementWithAssoconce? - Which model does the
Iteratortrait use? Why is it the best choice here? - Implement
WithAssocfor the following type:
struct Boxed<T>(T);
Specify the associated type, and write a function that uses Boxed and retrieves the item using get.
Exercise 01 - Analyzing a Deref Implementation
use std::ops::Deref;

struct Wrapper<T>(T);

impl<T> Deref for Wrapper<T> {
    type Target = T;

    fn deref(&self) -> &Self::Target {
        &self.0
    }
}

fn main() {
    // Wrapper around an i32
    let wrapped_int = Wrapper(42);
    println!("Wrapped int: {}", *wrapped_int); // Explicit deref

    // Deref coercion in action: calling a method on the inner type
    let wrapped_string = Wrapper(String::from("Hello, Rust!"));
    println!("Length: {}", wrapped_string.len()); // Deref coercion to &String

    // Deref coercion: &Wrapper<String> -> &String -> &str
    fn print_str(s: &str) {
        println!("print_str: {}", s);
    }
    print_str(&wrapped_string); // Automatic coercion chain

    // Wrapper around a Vec
    let wrapped_vec = Wrapper(vec![1, 2, 3, 4, 5]);
    println!("First element: {:?}", wrapped_vec.first()); // Deref to &Vec<i32>
    println!("Vec length: {}", wrapped_vec.len());

    // Nested wrapper (double deref)
    let nested = Wrapper(Wrapper(100));
    println!("Nested value: {}", **nested);
}
- What does
Derefallow in this implementation? - Explain why this code works:
let w = Wrapper(String::from("Hello"));
println!("{}", w.len()); // uses Deref
- Identify which method is actually being called (
String::len) and why Rust is able to resolve it. - Give an example where
Derefalone is not enough, andDerefMutwould be required.
Exercise 02 - Understanding a Function with Multiple Lifetimes
Given the following code:
fn longest<'a>(x: &'a str, y: &'a str) -> &'a str {
    if x.len() > y.len() {
        x
    } else {
        y
    }
}

fn main() {
    // Basic usage with string literals (static lifetime)
    let result = longest("short", "much longer string");
    println!("Longest: {}", result);

    // With String references of same scope
    let s1 = String::from("hello");
    let s2 = String::from("hi");
    let result = longest(&s1, &s2);
    println!("Longest: {}", result);

    // Demonstrating lifetime constraint
    let s3 = String::from("long string");
    {
        let s4 = String::from("tiny");
        let result = longest(&s3, &s4);
        println!("Longest (nested scope): {}", result);
        // result is valid here because both s3 and s4 are still alive
    }

    // Equal length case (returns second one)
    let equal1 = "abc";
    let equal2 = "xyz";
    let result = longest(equal1, equal2);
    println!("Longest (equal length): {}", result);

    // Empty string comparison
    let empty = "";
    let non_empty = "something";
    let result = longest(empty, non_empty);
    println!("Longest (with empty): {}", result);
}
- Why must both parameters and the return type use the same lifetime
'a? - Provide:
- one example that compiles,
- one example that does not compile, and explain why.
- Rewrite a more restrictive version:
- where each parameter has its own lifetime,
- but Rust prevents returning an invalid borrow.
- Explain how Rust prevents dangling references in this situation.
Exercise 03 - Reading a Signature Using ?Sized
Consider:
fn print_any<T: ?Sized + ToString>(val: &T) {
    println!("{}", val.to_string());
}

fn main() {
    // With a sized type: i32
    let num = 42;
    print_any(&num);

    // With a sized type: String
    let s = String::from("Hello, world!");
    print_any(&s);

    // With an unsized type: str (thanks to ?Sized)
    let slice: &str = "I'm a string slice!";
    print_any(slice);

    // With a sized type: f64
    let pi = 3.14159;
    print_any(&pi);

    // With a sized type: bool
    let flag = true;
    print_any(&flag);

    // Demonstrating why ?Sized matters:
    // Without ?Sized, this wouldn't compile because str is unsized
    fn print_str(s: &str) {
        print_any(s); // Works because of ?Sized bound
    }
    print_str("Direct str slice");

    // With a custom type implementing ToString (via Display)
    use std::fmt;

    struct Point {
        x: i32,
        y: i32,
    }

    impl fmt::Display for Point {
        fn fmt(&self, f: &mut fmt::Formatter<'_>) -> fmt::Result {
            write!(f, "({}, {})", self.x, self.y)
        }
    }

    let point = Point { x: 10, y: 20 };
    print_any(&point);
}
- Why is
?Sizednecessary to support types likestr? - Why must
valbe passed by reference? - Provide three valid calls (e.g.,
&str,&String,&[u8]). - Find another example in the Standard Library that uses
?Sized(hint:From<&T>forPathBuf).
Putting It All Together: Complete Analysis of Our Code
Let’s trace through our code one more time, now with full understanding:
fn main() {
    let numbers = vec![Some(1), Some(15), Some(25), None, Some(5)];
    //  ^^^^^^^ Vec<Option<i32>> — inferred from the elements

    let filtered: Vec<Option<i32>> = numbers
        .iter()
        //^^^^ Returns std::slice::Iter<'_, Option<i32>>
        //     Item = &Option<i32>

        .map(|&opt| opt.filter(|&n| n > 10))
        //    ^^^^^ Pattern matches &Option<i32>, giving us Option<i32>
        //          opt: Option<i32>
        //                       ^^^ Pattern matches &i32, giving us i32
        //                           n: i32
        //          Returns Option<i32> (Some if n > 10, else None)
        //
        // map's F is FnMut(&Option<i32>) -> Option<i32>
        // Returns std::iter::Map<Iter<'_, Option<i32>>, ...>

        .collect();
        // Collects into Vec<Option<i32>> (type annotation guides this)
        // Uses FromIterator<Option<i32>> for Vec

    println!("Raw numbers: {:?}", numbers);
    //                      ^^^ Uses Debug trait, requires {:?} format
    println!("Filtered   : {:?}", filtered);
}
Every type, every trait, every method — we can trace it all through the documentation!
Quick Reference: Doc-Reading Cheat Sheet
Navigation Shortcuts (VS Code + rust-analyzer)
| Action | Shortcut |
|---|---|
| Hover for type info | Mouse hover |
| Go to definition | F12 or Ctrl+Click |
| Peek definition | Alt+F12 |
| Find all references | Shift+F12 |
| Show hover permanently | Ctrl+K, Ctrl+I |
Common Generic Names
| Letter | Usually Means |
|---|---|
T, U | Any type |
E | Error type |
F | Function/closure |
I | Iterator |
K, V | Key, Value |
R | Return type / Reader |
W | Writer |
S | State / String-like |
A | Allocator |
Trait Bound Patterns
| Pattern | Meaning |
|---|---|
T: Clone | T must implement Clone |
T: Clone + Send | T must implement both |
T: Iterator<Item = u32> | Iterator yielding u32s |
T: ?Sized | T doesn’t need to be Sized |
T: 'static | T contains no non-static refs |
T: 'a | T is valid for lifetime ‘a |
'b: 'a | Lifetime ‘b outlives ‘a |
Bounds You Can Often Ignore
Destruct— const evaluation detailAllocatorparameters — use default- Complex lifetime bounds — trust the compiler
Unpin— unless doing advanced async
Conclusion
Marty: I feel like I can actually read these docs now. The signatures that terrified me before are just… information.
Emmett: That’s the key insight. Every piece of a type signature is telling you something useful:
- Type parameters tell you what’s generic
- Trait bounds tell you what capabilities are required
- Lifetimes tell you how long references are valid
self,&self,&mut selftell you how the method accesses the value
Marty: And when in doubt?
Emmett: Use the tools:
- Hover in VS Code for quick info
- F12 to dive deeper
- Search docs.rust-lang.org for the full story
- Look at the examples in the docs — every page has them
- When you see scary bounds like
Destruct, check if you can ignore them for your use case
The Standard Library docs are incredibly thorough. Once you know how to read them, they become your most valuable resource. And the best part? Every crate follows the same patterns. Learn to read std, and you can read tokio, axum, serde, or anything else.
Webliography
- Standard Library documentation home
- The Rust Reference
- The Rust Book — Chapter 10: Generic Types, Traits, and Lifetimes
- The Rustonomicon — Advanced Topics (when you’re ready for deep dives)
- Rust by Example — Learn through code
- Rust on Windows 11, My Complete Setup Guide
- (beginners) Would you like to check your knowledge with some flashcards? Works fine on cell phones. It is hosted for free on Heroku and may be slow to startup.
- Read Pragmatic programmer. It cannot hurt.
- You’re welcome to share comments or suggestions on GitHub to help improve this article.
Watch this video: