Rust Error Handling, Demystified
A beginner-friendly conversation on Errors, Results, Options, and beyond.
This is Episode 00
TL;DR
-
For beginners, tinkerers, hobbyists, amateurs, and early-career developers…
-
The code is on GitHub.
- Rust has no exceptions:
- Episode 00
- recoverable errors (handled with the
Result<T, E>type). - unrecoverable errors (handled by panicking using
panic!()). - We must explicitly handle errors.
Result<T, E>enum:- Episode 01
- Represents either success (
Ok(T)) or error (Err(E)). - Use
matchexpression or methods like.unwrap()/.expect()(whichpanic!()on error). - Prefer
.expect()with a meaningful message.
?operator for propagation:- Episode 01
- To propagate errors upward with a lite syntax.
- Only works in functions returning a compatible
Result<T, E>(orOption<T>). - When
main()returnsResult<T, E>we can use?here
Option<T>vsResult<T, E>:- Episode 02
- Use
Option<T>when the absence of a value is not an error (e.g., no search result) and no error info is needed. - Use
Result<T, E>when an operation can fail in an exceptional way and we need to convey an error message or reason.
- When to panic:
- Episode 02
- On bugs or invalid states in our code (e.g. asserting invariant).
- If failure is possible in normal operation (e.g. invalid user input…), return a
Result<T, E>. - Library code should avoid panicking on recoverable errors, bubbles them up and let the caller decide.
- Custom error types:
- Episode 03
- For sophisticated libraries or binaries.
- Define our own error types to represent various error kinds in one type.
- Implementing
std::error::Error(=> implfmt::Displayand#[derive(Debug)]) - Use pattern matching or helper methods like
.map_err()(or theFromtrait implementation) to convert std lib errors into our custom error and return it with?
anyhowandthiserror- Episode 04
anyhowin binaries when we don’t need a public, fine-grained error type and just want easy error propagation with.context("blah blah blah").thiserrorin libraries when we need custom error types without writing all implementations forDisplay,Debug,Fromtrait andError.- Don’t mix them blindly (anyhow inside the lib, thiserror API of the lib)
- From Experimentation to Production:
- Episode 05
- Key Concepts
- 3 experimental prototypes, 1 template
- Steps to Production:
- Episode 06
- From Experimentation to Production (including testing) in 7 steps

Let's have a beginner-friendly conversation on Errors, Results, Options, and beyond.
Posts
Table of Contents
- Why Alice and Bob are here?
- Introduction: Why Rust Cares About Errors
- Setting Up our Development Environment
- Solution to Exercice #2
Why Alice and Bob are here?
A long time ago (2010, may be) I read a .pdf about the N-Body Simulations. Too bad, I can’t find it on the web anymore, but here’s a copy of volume 1. It was based on Ruby but it was great, easy to follow etc. One thing was that it was written as a conversation between Bob and Alice. Later the code was re-written in Python and the set of .pdf was merged into an expensive printed book (55$ when I bought my copy). Today (sept 2025) you can find it on AMZN for 28€.

Moving Planets Around
Last week I start reading The Basics of Bitcoins and Blockchains (AMZN).

The Basics of Bitcoins and Blockchains
In Part 3, there is a section Why Alice and Bob. Believe it or not, I then discovered where they came from.
I like to write in a conversational tone, so let’s imagine a discussion between Bob and Alice and let’s see how it goes…
Introduction: Why Rust Cares About Errors
Alice: I ran a Rust code snippet and it forced me to handle an error – it wouldn’t even compile until I did! What’s going here?
Bob: The compiler (rustc) makes sure we acknowledge and handle errors properly before our code even runs. This helps prevent crashes at runtime.
Alice: There are no exceptions at all?
Bob: Exactly. Rust doesn’t have exceptions. Instead, it has a different model for errors. Essentially, Rust groups errors into two categories: recoverable and unrecoverable.
- Recoverable errors are things we expect might happen and can be dealt with (like a file not found – we might just create the file or use a default). These are handled with the
Result<T, E>type. - Unrecoverable errors are bugs on our side or unexpected conditions (like indexing past the end of an array – something’s really bad if that happens). For these cases Rust provides the
panic!()macro to stop the program.
Alice: So Result<T, E> is for errors I can handle, and panic!() is for the program-halting ones?
Bob: Yes!
- Think of
Result<T, E>as Rust’s way of saying “operation might succeed or fail”. We then decide what to do if it fails. - Whereas a
panic!()is Rust saying “I can’t deal with this, I must crash now”.
By making error handling explicit with Result, Rust ensures we don’t just ignore errors. It won’t let us compile unless we either handle the Result<T, E> (e.g. [exempli gratia], check for an error) or explicitly choose to crash (like using .unwrap() which triggers a panic!() if there’s an error). This leads to more robust programs because we’re less likely to have an error go unnoticed.
Alice: Um… This is may be a silly question but, if I know my function can succeed or fail, can it returns Result<T, E>.
Bob: Yes, absolutely! Returning a Result<T, E> is not limited to functions of the std library. Oh, by the way, do you know how to read the documentation of the std lib?. Anyway… All your functions, even main() can return Result<T, E> and it is a very good practice. Before writing any function code, ask yourselves “can this function fail? Should it return Result<T, E> (or Option<T>)?”. Then work on the rest of the function’s signature.
Alice: It’s a bit scary that the program can just crash with panic!() though.
Bob: Again, panic!() is for cases that are not supposed to happen like an invariant being broken. And even when a panic!() occurs, Rust will unwind the stack and cleanup (or we can opt to abort immediately). Most of the time, you’ll use Result<T, E> for possible errors and only panic!() on bugs that are your responsibility. We’ll talk more about choosing between them later.
Alice: This is may be too early but how can I opt to abort immediately?
Bob: Your’re right, it’s too early but your wishes are my commands. In Cargo.toml add the following section:
[profile.release]
panic = "abort"
The default is unwind. With abort opted in:
- No cleanup: at the first panic, the program terminates immediately with an
abort(). - No destructor (Drop) is invoked.
- This reduces the binary size and the build time (fewer symbols to generate)
Alice: Ok… So Rust wants me to handle every error. This will be a pain… How do I actually do that with Result<T, E>? What does a Result<T, E> look like?
Bob: That’s a good question. We’ll answer it by examining how Result<T, E> works and how to use it, but before that, it’s time to recap and practice a little.
Summary – Introduction
Summary – Introduction
- Rust requires we handle errors explicitly. Code that can fail must return a
Result<T, E>(orOption<T>), forcing the caller to address the possibility of failure.- Rust distinguishes
- recoverable errors (e.g. file not found, invalid input – handled with
Result)- unrecoverable errors (bugs like out-of-bounds access – handled with
panic!()).- No exceptions are used. This language design decision helps prevent unchecked errors. We either deal with the error or deliberately choose to
panic!()/.unwrap(), making error handling clear in the code.
Exercises – Introduction
- Identify Error Types: Think of two scenarios in programming:
- one that would be a recoverable error
- one that would be an unrecoverable error
For each scenario, explain whether we would use Rust’s
Result<T, E>or apanic!(), and why. - Compile-time Check: Write a Rust code that attempts to open a non-existent file with
std::fs::File::open(foo.txt)without handling the returnedResult<T, E>. Observe the compiler error or warning. Then, fix it by handling theResult<T, E>(for now, we can just use a simplepanic!()or print an error message in case ofErr). One can read this page
Setting Up our Development Environment
Let’s make sure we can Debug our code. If your IDE is already set up and you know how to execute your code step by step, jump over this section and check your Solution to Exercice #2
Let’s install what we need
Requirements:
- I expect either
CodeLLDBextension (code --install-extension vadimcn.vscode-lldb)- or the
Build Tools for Visual Studioto be installed.
CodeLLDB might be faster and easier to install (after all, it is “just” a VSCode extension). Both can be installed on your PC if you wish or need (this is my case). We will see how to use one or the other. We need them to debug our code.
- I also expect the
command-variableextension to be installed. We need it also to debug our code.code --install-extension rioj7.command-variable
This said, I use VSCode under Windows 11 and I wrote a post about my setup. Here I use a workspace because I can have more than one package in a single “space”. Think of workspaces as meta-package.
Now, having this in mind here is what I do and why.
- Get a copy of the repo from GitHub
- Right click the directory name then select
Open with Code - Once in VSCode, click on
00_u_are_errors/examples/ex00.rsin the VSCode editor
At the time of writing here is what I see:
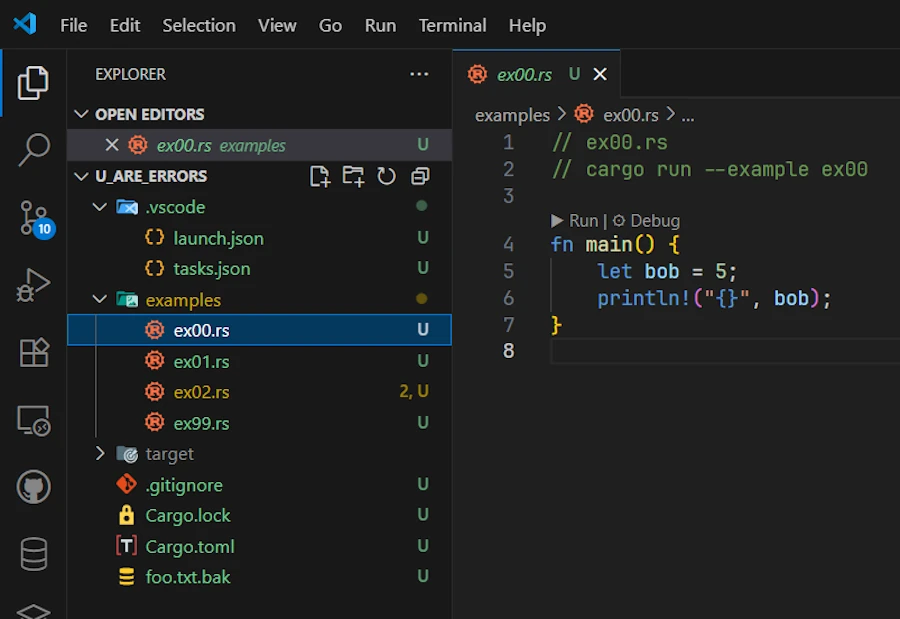
Click on the image to zoom in
-
Just for testing purpose, delete the
target/directory if it exists (at this point it should’nt exist yet since you just got the workspace from GitHub) -
Press
CTRL+SHIFT+B. This should build a debug version of the code- Check
target/debug/examples/. It should containsex00.exe - If
CTRL+SHIFT+Bdoes not work, open a terminal (CTRL+ù on a French keyboard) and use this command:cargo build -p u_are_errors --example ex00 - You need
-p u_are_errorsbecause in a workspace we need to indicate the name of the package (which you find inCargo.toml)
- Check
Using the debugger
If and only if (LLDB || Build Tools for Visual Studio) && command-variable are installed
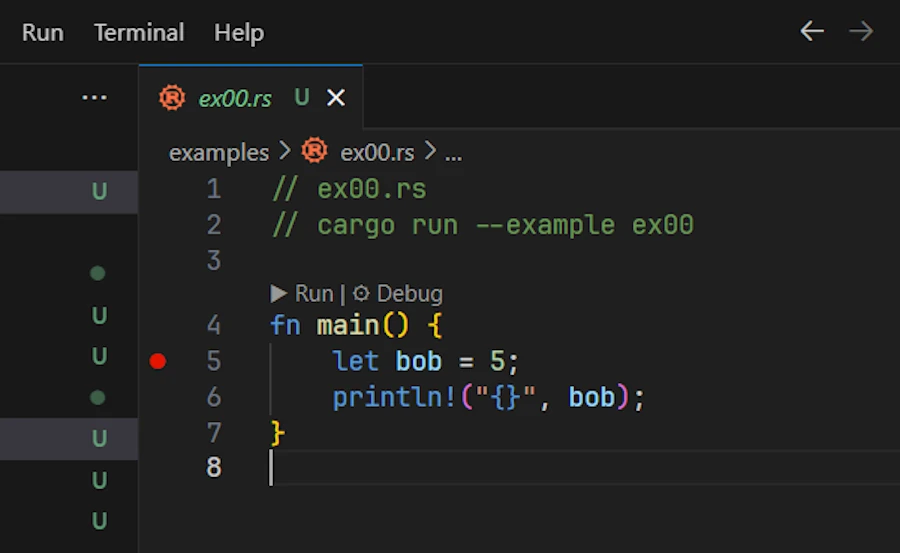
- Set the cursor on line 5 then press
F9 - This set a breakpoint on line 5. See below:
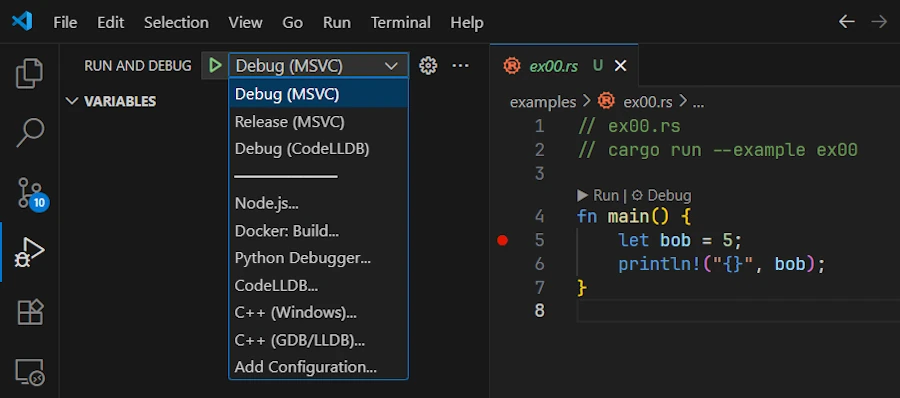
- Open de
Run & Debugtab on the side (CTRL+SHIFT+D) - In the list box, select the option corresponding to your configuration (LLDB or MSVC). See below:
- Press
F5- This starts the debug session
- If needed the application is built (not the case here because it is already built)
- The execution stops on line 5. See below:

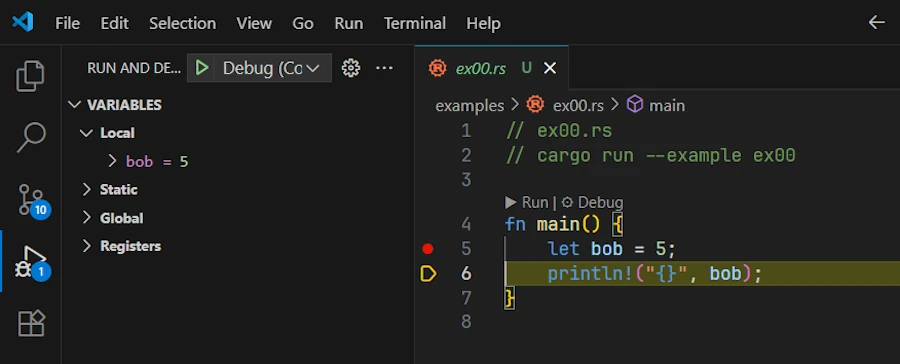
- Press
F10to move forward- Line 5 is executed
- On the left hand side, in the Local subset of variables, we can check that
bobis now equal to 5. See below:
- Press
F5to continue and reach the end of the code
Let’s make a last test. Just to make sure…
- Delete the
target/directory- Select it then press
DELETE
- Select it then press
exe00.rsshould still be open in the editor with a breakpoint set on line 5- Press
F5- The
ex00.exeis built - The debug session starts
- Execution stops on line 5 as before
- The
The making of
If you read this post for the first time, skip this section and come back to it later when you really need to understand how compilation and debugging tasks work.
The secret ingredient lies in ./vscode/task.json and ./vscode/launch.json
1. .vscode/tasks.json:
{
  "version": "2.0.0",
  "tasks": [
    {
      "label": "cargo-build-debug",
      "type": "cargo",
      "command": "build",
      "args": [
        "-p",
        "${input:packageName}",
        "--example",
        "${fileBasenameNoExtension}"
      ],
      "problemMatcher": ["$rustc"],
      "group": { "kind": "build", "isDefault": true }
    },
    {
      "label": "cargo-build-release",
      "type": "cargo",
      "command": "build",
      "args": [
        "--release",
        "-p",
        "${input:packageName}",
        "--example",
        "${fileBasenameNoExtension}"
      ],
      "problemMatcher": ["$rustc"]
    },
  ],
  "inputs": [
    {
      "id": "packageName",
      "type": "command",
      "command": "extension.commandvariable.transform",
      "args": {
        "text": "${relativeFileDirname}",
        "find": "^(.{3})([^\\\\/]+)(?:[\\\\/].*)?$",
        "replace": "$2"
      }
    }
  ]
}
- In the first object of the array
tasks, the key namedgrouphelps to make the task the one by default. This explains how and whyCTRL+SHIFT+Bworked. - Note that since the source code to compile is in the
examples/directory, we pass--exampleand the name of the file (see${fileBasenameNoExtension}, e.g.ex00) in theargsarray. - Since we are in a workspace we need
-pfollowed by the name of the package (input:packageName) - If you get lost, just review the build command you enter in the terminal before. What we do here is exactly the same thing:
cargo build -p u_are_errors --example ex00. Except that we want to discover the name of the package dynamically. Indeed not all the source code are in theu_are_errorspackage. You may have seen the 2 other directories:01_experimentationand02_productionfor example.- In
01_experimentation/, inCargo.toml, the name of the package isexperimentationfor example
- In
- Finding out the name of the package is done in the
inputsarray and this is where thecommand-variableextension shines. Indeed we create a variablepackageNamewhich is initialized with the output of a command which is a regular expression applied to the${relativeFileDirname}of the source code opened in the editor.- To make a long story short from
01_experimentation/examples/it extractsexperimentation
- To make a long story short from
- Then the
${input:packageName}variable can be used in the build tasks.
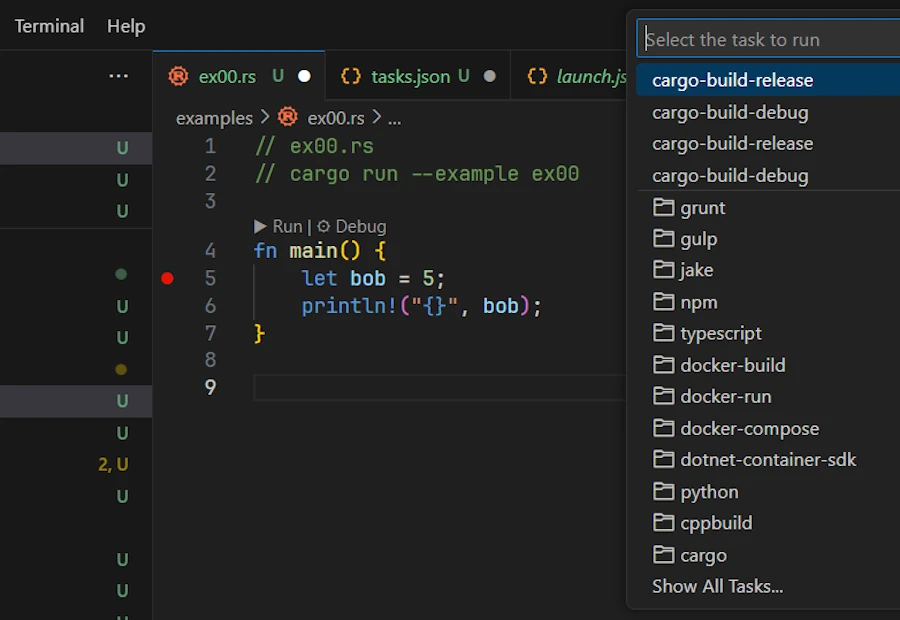
To see the list of tasks, in VSCode, press ALT+T then press R. Below we can see both tasks:
cargo-build-debug- and
cargo-build-release
2. .vscode/launch.json:
{
    "version": "0.2.0",
    "configurations": [
        {
            "type": "cppvsdbg",
            "request": "launch",
            "name": "Debug (MSVC)",
            "program": "${workspaceFolder}/target/debug/examples/${fileBasenameNoExtension}.exe",
            "args": [],
            "cwd": "${workspaceFolder}",
            "environment": [
                {
                    "name": "RUST_BACKTRACE",
                    "value": "short"
                }
            ],
            "preLaunchTask": "cargo-build-debug"
        },
        {
            "type": "cppvsdbg",
            "request": "launch",
            "name": "Release (MSVC)",
            "program": "${workspaceFolder}/target/release/examples/${fileBasenameNoExtension}.exe",
            "args": [],
            "cwd": "${workspaceFolder}",
            "environment": [
                {
                    "name": "RUST_BACKTRACE",
                    "value": "short"
                }
            ],
            "preLaunchTask": "cargo-build-release"
        },
        {
            "type": "lldb",
            "request": "launch",
            "name": "Debug (CodeLLDB)",
            "program": "${workspaceFolder}/target/debug/examples/${fileBasenameNoExtension}.exe",
            "args": [],
            "cwd": "${workspaceFolder}",
            "sourceLanguages": ["rust"],
            "preLaunchTask": "cargo-build-debug"
        }
    ]
}
- There are 3 objects in the array
configurations. This is why we can debug code with LLDB or MSVC. The third helps to launch the release version. - In each object of the array
configurations, the path in theprogramkey, points to the executable created at the end of the build (do you see${fileBasenameNoExtension}?) - Note the
preLaunchTaskkey. It explains why we can press F5 (debug) even if the executable is not yet built. In such case, the taskcargo-build-debugis executed then the debug session starts.
Solution to Exercice #2
Let’s take some time and see how one could work on the second exercice. If I search “Rust open txt file” on Google, one of the links drive me to the excellent Rust By Example. See below:

This is great because on line 11 it uses std::fs::File::open() but the code is a little bit too complex for me and it seems it handles errors while I want the compiler to complain then fix the errors.
Let’s make a fist test
Copy/paste/save the file as ex01.rs or open your eyes: the code is already in 00_u_are_errors/examples/ex01.rs. To make sure the code works as expected I can press F5 or open a terminal then enter cargo run -p u_are_errors --example ex01. Here is what I see in the Debug Console once I pressed F5:
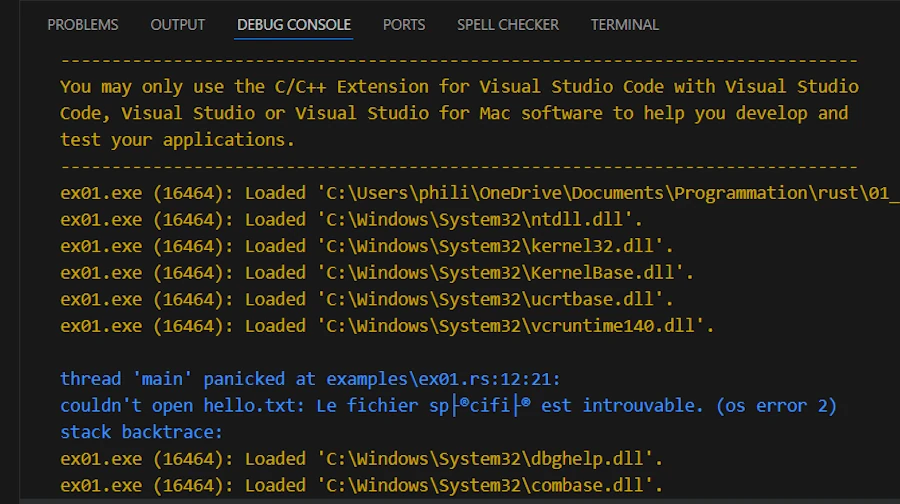
The code cannot find hello.txt and panic!().
Let’s try something else
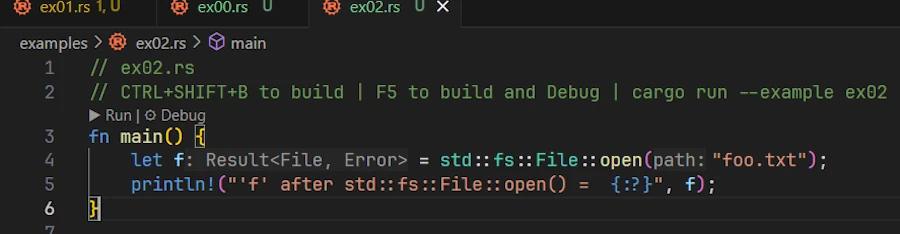
Copy/paste/save the file as ex02.rs. From the previous code, I just keep what I need:
// ex02.rs
fn main() {
    let f = std::fs::File::open("foo.txt");
    println!("'f' after std::fs::File::open() =  {:?}", f);
}
Surprisingly if I press F5, it builds and runs in a debug session without complain.
------------------------------------------------------------------------------
You may only use the C/C++ Extension for Visual Studio Code with Visual Studio
Code, Visual Studio or Visual Studio for Mac software to help you develop and
test your applications.
------------------------------------------------------------------------------
ex02.exe (30708): Loaded 'C:\Users\phili\OneDrive\Documents\Programmation\rust\01_xp\018_err_for_blog_post\u_are_errors\target\debug\examples\ex02.exe'. Symbols loaded.
ex02.exe (30708): Loaded 'C:\Windows\System32\ntdll.dll'.
ex02.exe (30708): Loaded 'C:\Windows\System32\kernel32.dll'.
ex02.exe (30708): Loaded 'C:\Windows\System32\KernelBase.dll'.
ex02.exe (30708): Loaded 'C:\Windows\System32\ucrtbase.dll'.
ex02.exe (30708): Loaded 'C:\Windows\System32\vcruntime140.dll'.
'f' after std::fs::File::open() =  Err(Os { code: 2, kind: NotFound, message: "Le fichier sp├®cifi├® est introuvable." })
ex02.exe (30708): Loaded 'C:\Windows\System32\kernel.appcore.dll'.
ex02.exe (30708): Loaded 'C:\Windows\System32\msvcrt.dll'.
The program '[30708] ex02.exe' has exited with code 0 (0x0).
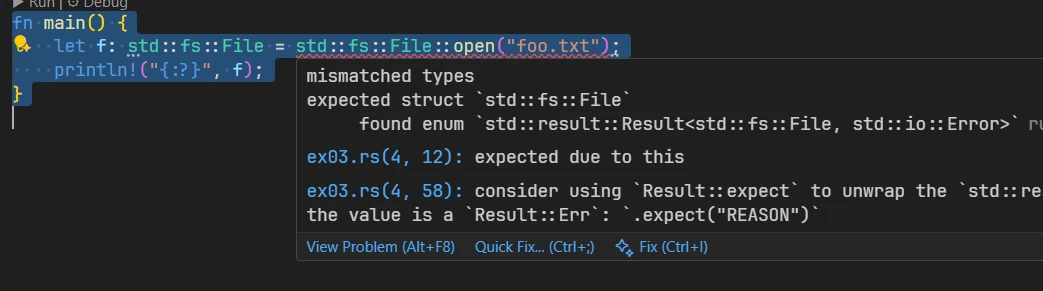
In fact, with my setup, if I press CTRL+ALT I can reveal the datatype. Click on the screen capture below and look for the data type in gray:
We can see that f is a Result<File, Error>. It is a Result<T, E> but what happens, is that when I asked to print it with {:?}, Rust displays the content of the Result<T, E> and this is why we can see:
'f' after std::fs::File::open() = Err(Os { code: 2, kind: NotFound, message: "Le fichier sp├®cifi├® est introuvable." })
In fact despite ourselves, we cheat. We call a function returning Result<T, E> in a context that expects a file f without using it (e.g. trying to read something).
Let’s make sure the build system complains
Copy/paste/save the file as ex03.rs. Let’s make sure the build system complains. Modify the previous code with the one below:
// ex03.rs
fn main() {
    let f: std::fs::File = std::fs::File::open("foo.txt");
    println!("{:?}", f);
}
On the lhs of the equal sign, I express my expectation. I expect a std::fs::File. Obviously this does not fly very well. We don’t even need to try to build. Indeed, the red squiggles warn us and if we hover them with the cursor we get a clear explanation and some advises. See below:
Let’s fix it
Copy/paste/save the file as ex04.rs. Let’s find a solution. Modify the previous code with the one below:
// ex04.rs
use std::fs::File;

fn main() {
    let result_file = File::open("00_u_are_errors/foo.txt");

    match result_file {
        Ok(file) => println!("Successfully opened file: {:?}", file),
        Err(why) => panic!("Panic! opening the file: {:?}", why),
    }
}
result_fileis aResult<T, E>, it is not aFile. It took me a moment to realize that when reading the code.matchis an expression. It is not a statement. This one is easy because almost everything is an expression in Rust.- If the difference between expression and statement is not crystal clear follow and read the 2 previous links.
- The
matchexpression forces us to handle all possible cases - Set a break point on the line with
matchexpression (F9) - Press F5 and step forward with F10
- The code starts from the directory at the root of the workspace. This explains why I need to specify
00_u_are_errors/foo.txtto test theOK()arm (withfoo.txtin../workspace_directory/00_u_are_errors/foo.txt)
match is an expression
Copy/paste/save the file as ex05.rs. Let’s take advantage of the fact that match is an expression. Modify the previous code with the one below:
// ex05.rs
use std::fs::File;
use std::io::Read;

fn main() {
    let result_file = File::open("00_u_are_errors/foo.txt");
    let mut bob = match result_file {
        Ok(alice) => alice,
        Err(why) => panic!("Panic! opening the file: {:?}", why),
    };
    println!("{:?}", bob);

    let mut s = String::new();
    match bob.read_to_string(&mut s) {
        Ok(_) => print!("Content:\n{}", s),
        Err(why) => panic!("Panic! reading the file: {:?}", why),
    }
}
Side Note
I know,
bobandaliceare weird variable names in this context. I just want to make clear thataliceexists only inside the body ofmatchwhilebobexists outside thematch. Remember from the Rust By Example we had variable shadowing on thefilevariable. We had:let mut file = match File::open(&path) { Err(why) => panic!("couldn't open {}: {}", display, why), Ok(file) => file, };
- The outer
let mut file = …;declares a new variablefilein the current scope.- Inside the
Ok(file)match arm, the namefileis a pattern variable that temporarily binds theFileobject contained in theOk()variant.- That inner
filevariable is shadowing the outer one just for the right-hand side of the assignment.- Once the match expression finishes evaluating, the inner
fileis moved out of theOk(file)pattern and becomes the value assigned to the outerfile.- This is a case of variable shadowing.
- The
filein the match pattern and thefilebound by theletare two distinct variables with the same name, in different scopes.
This said, let’s go back to the source code:
- As before,
std::fs::File::open()returns aResult<File, io::Error>, that we store inresult_file. - Since
matchis an expression, it evaluates to a value, and with the firstmatchwe assign that value tobob. - It is important to understand that
matchdestructures theResult<T, E>. So that the body of thematchcan be read as:- If the
Result<File, io::Error>inresult_filematches the patternOk(alice), then the innerFileis bound to the variablealice, and thatFileis returned from thematch. This meansbobnow owns the file handle. - If it matches
Err(why), the program callspanic!. Thepanic!macro has the special “never” type (!) which never resolve to any value at all. So this arm never returns. This allows the entirematchexpression to still have typeFile. This arm prints a short message then… “Don’t press the little button on the joystick, abort! abort! abort!”
- If the

Don't push the little button on the joystick
Run the code (F5) to see it in panic!()
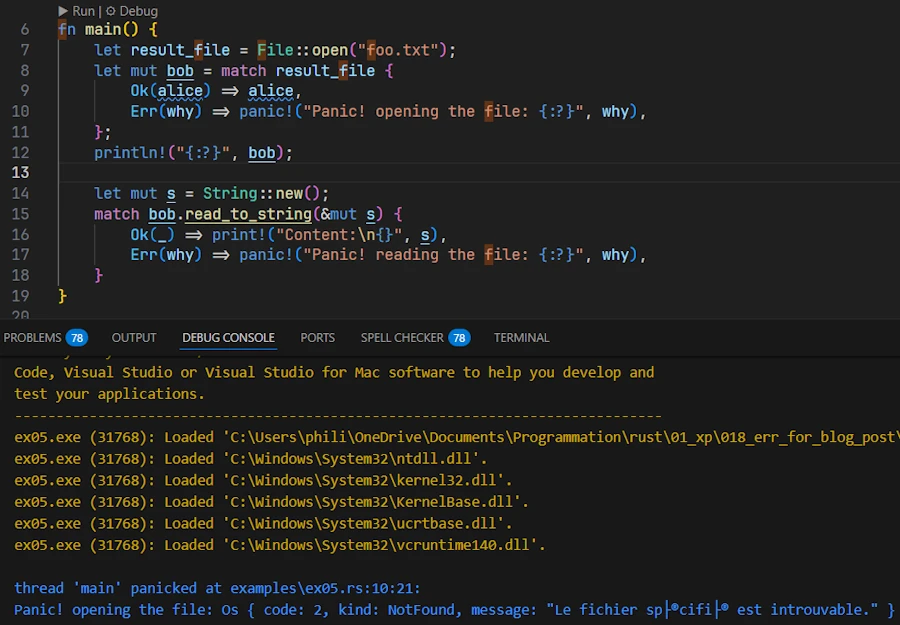
Now rename the file foo.txt.bak at the root of the directory (00_u_are_errors/) to foo.txt and run the code (F5)
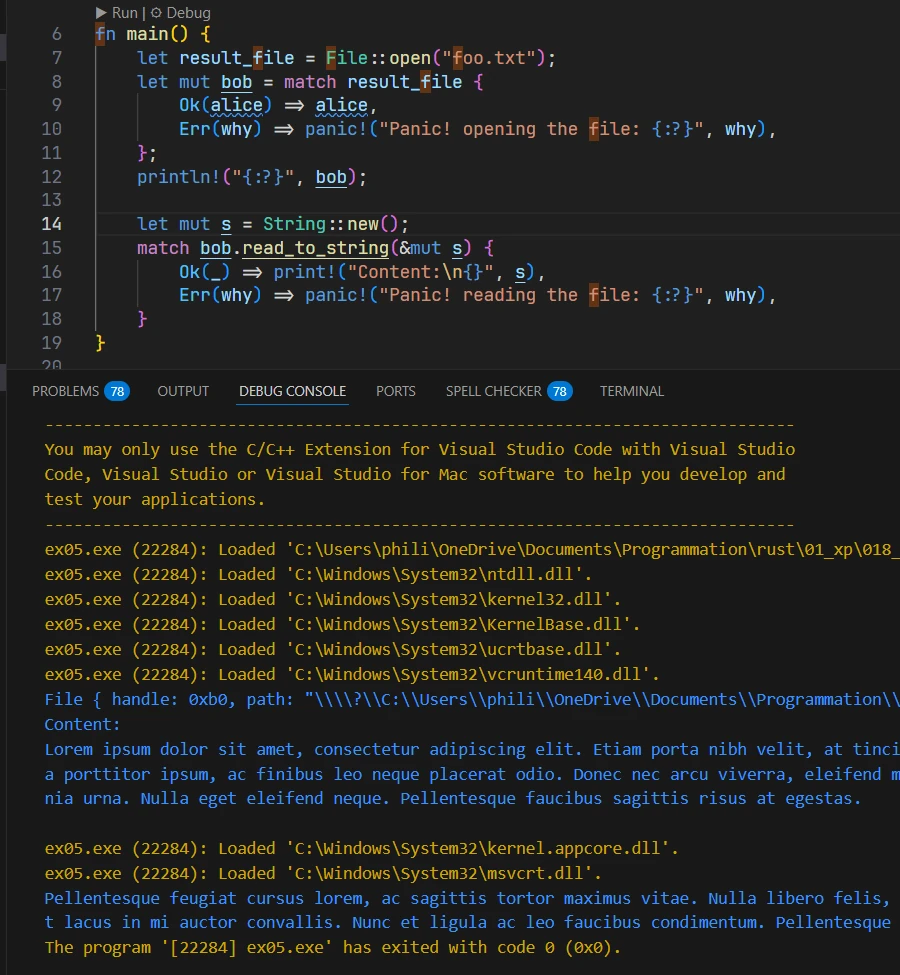
- When the code doesn’t
panic!onopen(), we firstprintln!()theDebugrepresentation ofbob. - Then we call
read_to_string()onbob. The method returns anio::Result<usize>, which is just a type alias forResult<usize, io::Error>. On success, theusizeis the number of bytes read. - In the second
matchwe don’t care about this number, so we use_to ignore it. Instead, we justprintln!()the contents of theString s. - On
Err, the code callspanic!again, prints a message, and the program aborts.
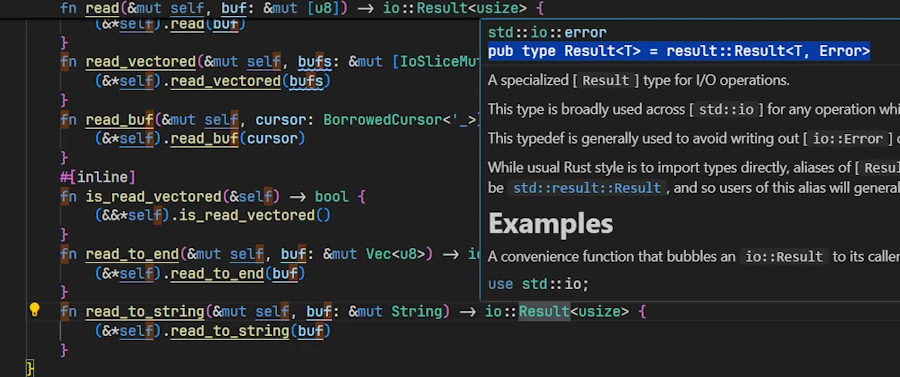
Um… And how do I know io::Result<usize> is a type alias for Result<usize, io::Error>?
Green Slope:
- Set the cursor on
read_to_string - Press F12 (Go To Definition)
- We can see the function signature:
fn read_to_string(&mut self, buf: &mut String) -> io::Result<usize> - Hover
io::Result<usize> - We get access to the type alias
pub type Result<T> = result::Result<T, Error>
North Face:
- Open the std web page
- On the left, find the Crates section
- Click on std
- Look for and click on io
- On the right, go down to the Type Aliases section
- Click on Result
- The page Type Alias Result page explains what is going on:
pub type Result<T> = Result<T, Error>;
K12
- Open the std web page
- On the left, find the Crates section
- Click on std
- Look for and click on io
- On the right side, go down and find the Traits section
- I know I must reach the Traits section and not the Functions section (where there is a
read_to_string) - Because at the top of the source code if I hover the line
use std::io::Read;I’m toldReadis a trait.
- I know I must reach the Traits section and not the Functions section (where there is a
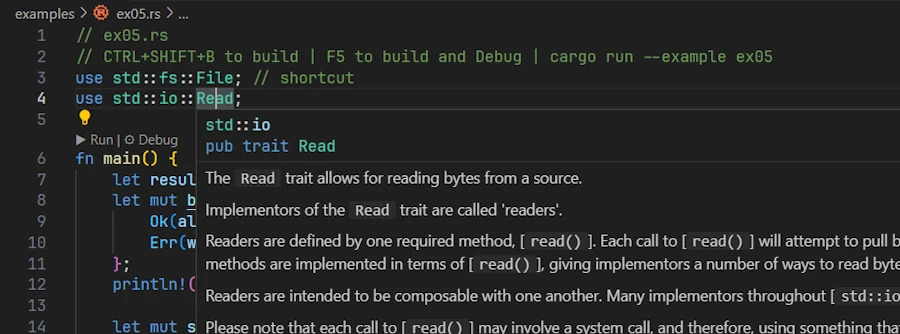
- Click on Read
- At the top you see the function signature:
fn read_to_string(&mut self, buf: &mut String) -> Result<usize> { ... } - At the very end click on
Result<usize> - The page Type Alias Result page explains what is going on:
pub type Result<T> = Result<T, Error>;
I know what you think. But we need to invest time in learning how to navigate and read the documentation. No one can do it for us.
For example instead of asking Google or ChatGPT, I may want to spend time and loose myself in the documentation of std looking for functions to read a .txt file. Or I can look for a sample code in Rust By Example then search for the function signature in the std documentation… Read and navigate the documentation the ROI is high.
It took us some time to reach that point but from now on I consider we know:
- How to play with code of the repo
- How to build (CTRL+SHIFT+B)
- How to set breakpoint (F9) and how to debug (F5)
- How to navigate the documentation (good luck!)
It is time to move on and to read Episode 01 and to dive in Result<T, E>.