Rust, Winit & Pixels: Understanding GPU Selection and Performance
A beginner-friendly guide to exploring GPU backends in Rust using Pixels, Winit, and wgpu.
TL;DR
Pixels::new()is great for prototypes - it just worksPixelsBuildergives us power with more responsibility- Always handle
WindowEvent::Resizedwhen usingPixelsBuilder - Backend choice matters:
- DX12: Windows-only
- Vulkan: cross-platform
- GPU selection is a hint, not a command
- Enable logging to debug GPU/backend selection
- The Rust workspace is on GitHub
- I use VSCode + Win11 (not tested elsewhere)
Rust, Winit & Pixels: Understanding GPU Selection and Performance.
Table of Contents
- Introduction
demo_00.rs- Defining the words
wgpuandbackend - Back to
demo_00.rs, the first level of control demo_01.rs- Explaining
wgpu::PresentMode - Back to
demo_01.rs, the second level of control demo_02.rs, the third level of control- About the Resize Problem
- Benchmarks ?
- Which Method to Use?
- Summary
- Webliography
Introduction
Initially, this post was “Step 11” of the post about Game of Life, Winit and Pixels but the section became way too long so I made a dedicated post. To give you some context, imagine you’re writing a Rust+Winit+Pixels application and you want to better understand what’s going on with the GPU.
For example, which board is used? How the selection is made? Can I force one board to be used? What is a backend? What is the wgpu crate? What can I expect in terms of performances?
Before we dive into the subject, let’s get in sync about my configuration because results will be different on yours (you might be running Linux with 3 video boards).
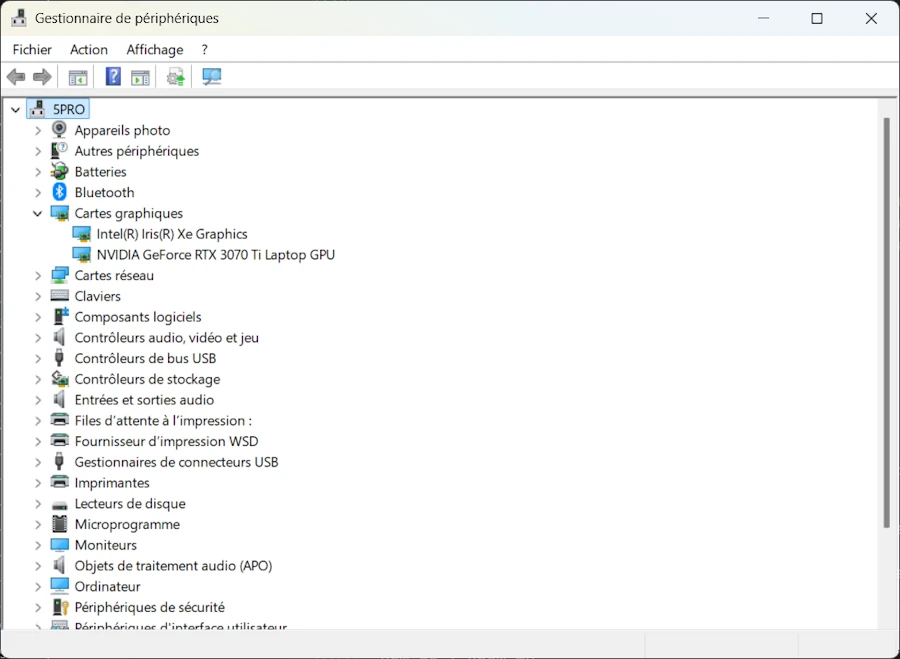
- I use a laptop with 2 video boards
- To check your hardware config you can
WIN+Xthen selectDevice managerthen selectVideo boardsin the tree:
Now, let’s check the status of DirectX. To do so you can use one of the 2 commands below:
dxdiag
dxdiag /t "./dxdiag.txt"
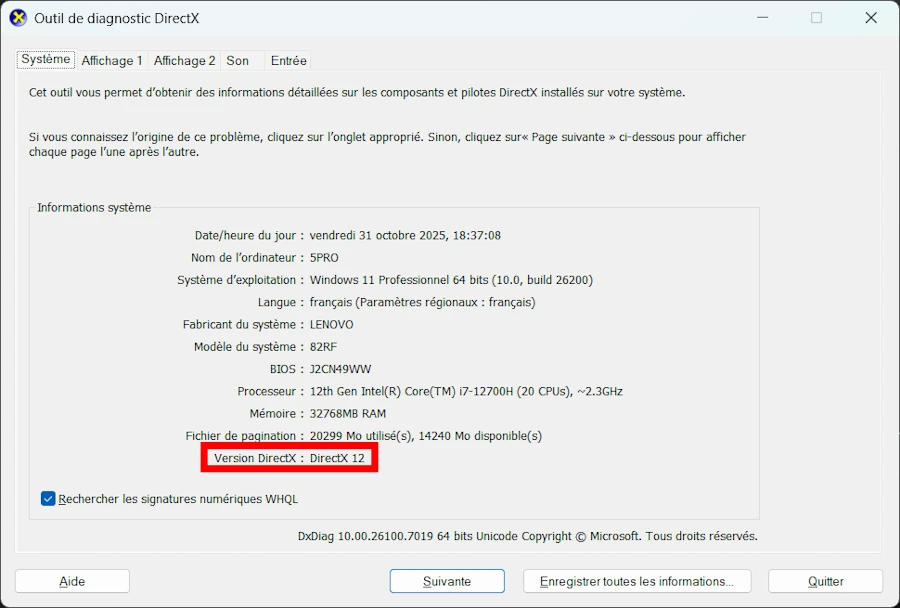
dxdiag
Don’t use this command:
Get-ItemProperty "HKLM:\SOFTWARE\Microsoft\DirectX" | Select-Object Version- It reports obsolete information.
It is time to get the project from GitHub, open it in VSCode and let’s check everything is in place.
To do so, follow me blindly and once in VSCode, open a terminal (CTRL+ù on FR keyboard) then enter the command : cargo run -p step_11 --example demo_00
You should see a blue window like the one below and some logging messages in the terminal.
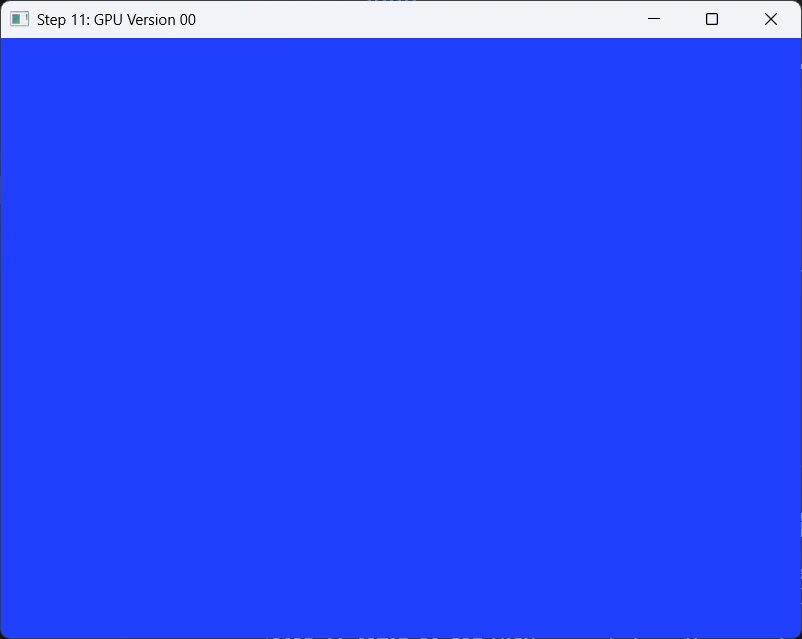
cargo run -p step_11 --example demo_00 If it is the case, welcome on board, everything seems to be in place. Now we can talk…
The Rust workspace includes many different packages : 00_winit_029, 05, 15… 99_rle_downloader
- Optional: If you know how to manage a Rust workspace you can delete all the subdirectories except the one named
11. Don’t forget to edit theCargo.tomlat the root of the directory tree.
Open the directory 11. It should look like this:

Since I plan to have more than one test, I use a feature I really like in Rust packages. I put the source code of the different experiments in the examples/ directory. And look, there is not even a src/ directory in this package. This also explains why we need the command below to run the experiment:
cargo run -p step_11 --example demo_00
-p: indicates that we run the code from the package namedstep_11. The directory name is11but the name of the package isstep_11.--example demo_00: points the source code to build and run
Last point to check before we take off. Open 11/Cargo.toml. It should look like:
[package]
name = "step_11"
version = "0.1.0"
edition = "2024"

[dependencies]
env_logger = "0.11.8"
pixels = "0.15"
winit = { version = "0.30", features = ["rwh_06"] }
In our experiments we need to see the log messages from the wgpu crate so we need to have the env_logger crate in Cargo.toml. In addition, as explained in the initial post I use Pixels 0.15 and Winit 0.30 — both in their latest version (in Nov 2025).
OK… Now, having all this in mind let’s see what happens on my system and don’t be surprised if the results differ on yours.
demo_00.rs
- Run, again, the code with this command:
cargo run -p step_11 --example demo_00 - You can test this command:
$env:RUST_LOG='wgpu_core=trace'; cargo run -p step_11 --example demo_00; Remove-Item env:RUST_LOG
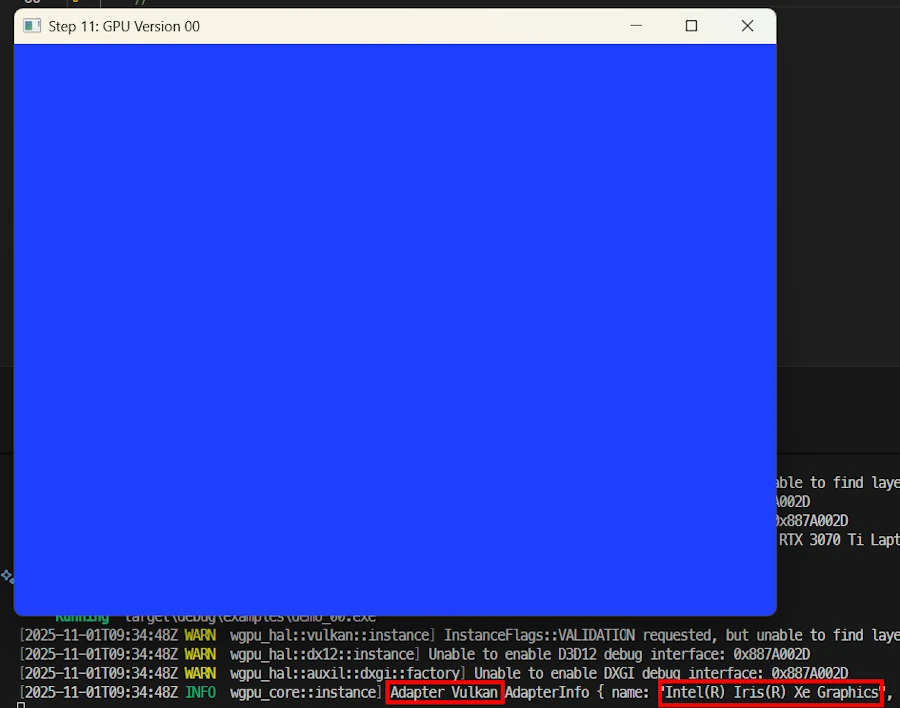
cargo run -p step_11 --example demo_00 Above I moved the window close to the terminal so that we can read a part of the logs. Click on the image above to enlarge it and read the text in the red rectangles.
The code source I use for the experiments is a copy of the first one I had in the initial post when I started to use winit 0.30. It is supposed to be short (less than 70 LOC) and easy to understand. Here it is:
use pixels::{Pixels, SurfaceTexture};
use winit::{
    application::ApplicationHandler,
    event::WindowEvent,
    event_loop::{ActiveEventLoop, ControlFlow, EventLoop},
    window::Window,
};

const WIDTH: u32 = 200;
const HEIGHT: u32 = 150;

pub type Error = Box<dyn std::error::Error>;
pub type Result<T> = std::result::Result<T, Error>;

#[derive(Default)]
struct App {
    window: Option<&'static Window>,
    pixels: Option<Pixels<'static>>,
}

impl ApplicationHandler for App {
    fn resumed(&mut self, event_loop: &ActiveEventLoop) {
        let window = event_loop.create_window(Window::default_attributes().with_title("Step 11: GPU Version 00")).unwrap();
        let window_ref: &'static Window = Box::leak(Box::new(window));
        let size = window_ref.inner_size();
        let surface = SurfaceTexture::new(size.width, size.height, window_ref);
        let pixels = Pixels::new(WIDTH, HEIGHT, surface).unwrap();
        self.window = Some(window_ref);
        self.pixels = Some(pixels);
    }

    fn window_event(&mut self, event_loop: &ActiveEventLoop, _: winit::window::WindowId, event: WindowEvent) {
        match event {
            WindowEvent::CloseRequested => event_loop.exit(),
            WindowEvent::RedrawRequested => {
                if let Some(pixels) = &mut self.pixels {
                    let frame = pixels.frame_mut();
                    for pixel in frame.chunks_exact_mut(4) {
                        pixel[0] = 0x20; // R
                        pixel[1] = 0x40; // G
                        pixel[2] = 0xFF; // B
                        pixel[3] = 0xFF; // A
                    }
                    pixels.render().unwrap();
                }
                if let Some(window) = &self.window {
                    window.request_redraw();
                }
            }
            _ => {}
        }
    }

    fn about_to_wait(&mut self, _: &ActiveEventLoop) {
        self.window.expect("Bug - Window should exist").request_redraw();
    }
}

fn main() -> Result<()> {
    env_logger::Builder::from_env(env_logger::Env::default().default_filter_or("wgpu_core=info,wgpu_hal=warn,wgpu=warn")).init();

    let event_loop = EventLoop::new()?;
    event_loop.set_control_flow(ControlFlow::Poll);

    let mut app = App::default();
    event_loop.run_app(&mut app)?;

    Ok(())
}
The explanations are available in this page
Here, I just add the call env_logger::Builder::from_env(...) at the very beginning of the main() function.
fn main() -> Result<()> {
    env_logger::Builder::from_env(env_logger::Env::default().default_filter_or("wgpu_core=info,wgpu_hal=warn,wgpu=warn")).init();

    let event_loop = EventLoop::new()?;
    event_loop.set_control_flow(ControlFlow::Poll);

    let mut app = App::default();
    event_loop.run_app(&mut app)?;

    Ok(())
}
If you open the source (11/examples/demo_00.rs) don’t be surprised if there are many comment lines with no text. This will help us later to compare the different source code.
Below are the messages I can read in the VSCode’s terminal.
[2025-10-31T16:56:19Z WARN  wgpu_hal::vulkan::instance] InstanceFlags::VALIDATION requested, but unable to find layer: VK_LAYER_KHRONOS_validation
[2025-10-31T16:56:19Z WARN  wgpu_hal::dx12::instance] Unable to enable D3D12 debug interface: 0x887A002D
[2025-10-31T16:56:19Z WARN  wgpu_hal::auxil::dxgi::factory] Unable to enable DXGI debug interface: 0x887A002D
[2025-10-31T16:56:19Z INFO  wgpu_core::instance] Adapter Vulkan AdapterInfo { name: "Intel(R) Iris(R) Xe Graphics", vendor: 32902, device: 18086, device_type: IntegratedGpu, driver: "Intel Corporation", driver_info: "Intel driver", backend: Vulkan }
The WARNings from wgpu are expected when debug layers are not installed (my case). They indicate that Vulkan or DirectX validation layers are missing, not that something is wrong. By default, wgpu selected the integrated Intel GPU (“Intel Iris Xe”) as the rendering device. This is normal behavior on systems with multiple GPUs. At the end of the last line we can read that the backend used is Vulkan.
OK… My laptop cost 2M$ and I’m not able to use the NVIDIA GPU? Interesting…
Defining the words wgpu and backend
Before we can go further, let’s define these 2 important words. A backend is the native graphics API that wgpu uses to communicate with the GPU. The situation looks like:
Your Rust code (Rust + wgpu) <-- see wgpu
         ↓
     [Translation]
         ↓
Backend (DX12 or Vulkan) <-- see backend
         ↓
     GPU driver
         ↓
Physical GPU (Intel Iris or NVIDIA)
The GPU doesn’t understand Rust nor wgpu directly. It understands specific graphics APIs. Choosing a backend doesn’t change which GPU is used (Intel vs NVIDIA) — it changes how wgpu communicates with it.
wgpu is an abstraction layer. Go back to the last logging messages and read again. Do you see [2025-10-31T16:56:19Z WARN wgpu_hal::vulkan::instance] where wgpu_hal has nothing to do with “2001: a space odyssey” but stands for “Hardware Abstraction Layer”
- We write
wgpucode (identical for all platforms) wgputranslates it to the chosenbackend(DX12, Vulkan, Metal, OpenGL…)- The
backendtalks to the GPU driver - The driver controls the physical GPU
Do you remember OpenGL?
The 2 main backends on Windows 11 (my case)
- DirectX 12 (DX12)
- Developed by Microsoft for Windows
- Native and optimized for the Windows ecosystem
- The GPU understands DirectX 12 commands
- NVIDIA/Intel drivers are heavily tuned for DX12 on Windows
- Vulkan
- Graphics API from the Khronos Group
- Open, cross-platform (Windows, Linux, Android)
- Same code runs on Windows, Linux, Android
- Potentially offers more control and performance
- The GPU understands Vulkan commands
- Requires Vulkan drivers to be installed
backends available on other platforms**
- Metal (macOS, iOS) – Apple’s graphics API
- WebGPU – for web browsers
- OpenGL – old cross-platform standard (available on WIN11)
Back to demo_00.rs, the first level of control
Here we are in automatic mode and in a context where we want to learn more about the GPU, the line of code of interest is this one (check the resumed() method):
let pixels = Pixels::new(WIDTH, HEIGHT, surface).unwrap();
With this single line:
wgpuautomatically selects the “best” backend for our platformwgpuautomatically selects the “best” GPU adapter- Default presentation mode (Fifo/vsync)
- Automatic surface resize handling (works well in most cases)
Backend priority on Windows:
- Vulkan (if available and working)
- DX12 (fallback)
- DX11 (last resort)
GPU priority:
- Prefers integrated GPU (lower power consumption)
Intel Iris Xein my case- The
NVIDIA GeForce RTX 3070 Tiis called the discrete GPU
Pros:
- Automatic mode, simple, works out of the box
- Less code to write
- Handles resize events automatically with Vulkan
Cons:
- No control over which GPU or backend
- Does not use my expensive and high-performance GPU (NVIDIA)
demo_01.rs
- Run the experiment with this command:
cargo run -p step_11 --example demo_01
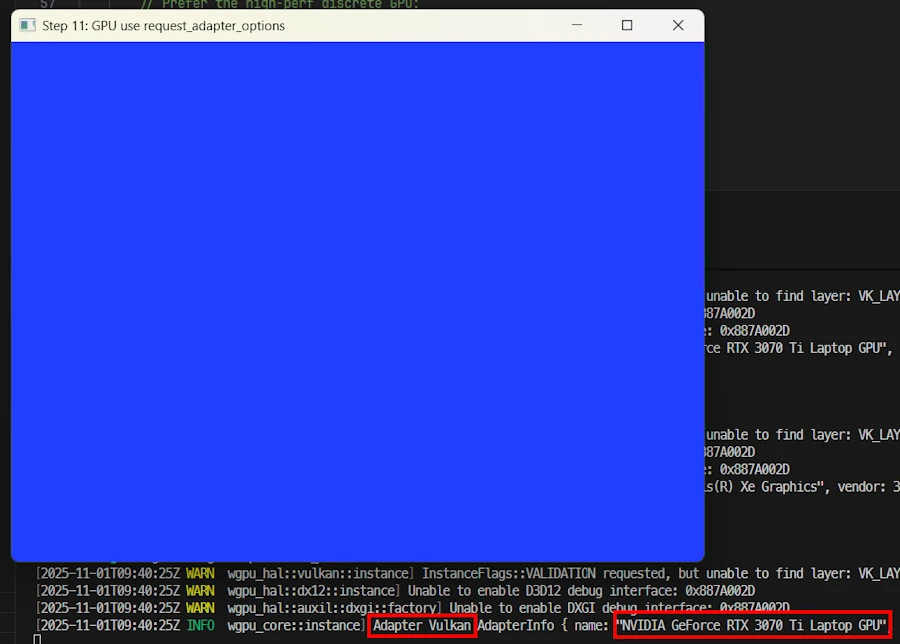
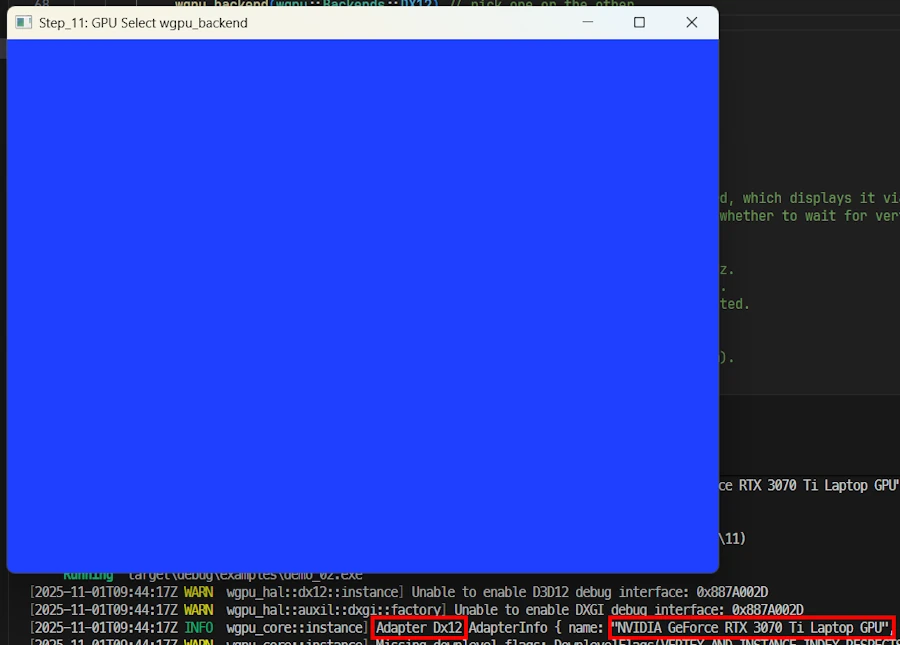
cargo run -p step_11 --example demo_01 Cool, I’m able to select the NVIDIA GPU.
[2025-10-31T17:27:53Z WARN  wgpu_hal::vulkan::instance] InstanceFlags::VALIDATION requested, but unable to find layer: VK_LAYER_KHRONOS_validation
[2025-10-31T17:27:53Z WARN  wgpu_hal::dx12::instance] Unable to enable D3D12 debug interface: 0x887A002D
[2025-10-31T17:27:53Z WARN  wgpu_hal::auxil::dxgi::factory] Unable to enable DXGI debug interface: 0x887A002D
[2025-10-31T17:27:54Z INFO  wgpu_core::instance] Adapter Vulkan AdapterInfo { name: "NVIDIA GeForce RTX 3070 Ti Laptop GPU", vendor: 4318, device: 9440, device_type: DiscreteGpu, driver: "NVIDIA", driver_info: "566.14", backend: Vulkan }
The last INFO line confirms that wgpu now chose the NVIDIA GeForce RTX 3070 Ti hardware and is using the Vulkan backend.
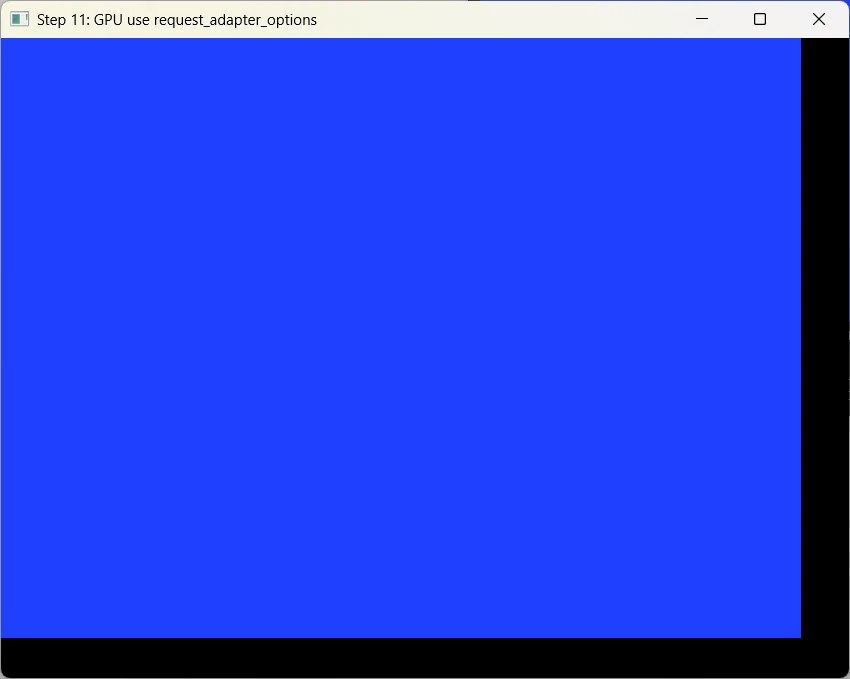
Ooops... I tried to resize the window
Not so cool… Indeed when I resize the window, the blue background seems to be “freezed in place”.
Compared to demo_00.rs, I added use pixels::wgpu; at the top of the code then all the changes are in the resumed() method:
fn resumed(&mut self, event_loop: &ActiveEventLoop) {
        let window = event_loop.create_window(Window::default_attributes().with_title("Step 11: GPU use request_adapter_options")).unwrap();
        let window_ref: &'static Window = Box::leak(Box::new(window));
        let size = window_ref.inner_size();
        let surface = SurfaceTexture::new(size.width, size.height, window_ref);

        let mut builder = PixelsBuilder::new(WIDTH, HEIGHT, surface);

        // Prefer the high-perf discrete GPU
        builder = builder.request_adapter_options(wgpu::RequestAdapterOptions {
            power_preference: wgpu::PowerPreference::HighPerformance,
            compatible_surface: None,
            force_fallback_adapter: false,
        });

        let mut pixels = builder.build().expect("create pixels");

        pixels.set_present_mode(wgpu::PresentMode::Fifo);

        self.window = Some(window_ref);
        self.pixels = Some(pixels);
    }
More specifically the changes are concentrated in these 3 lines of code:
let mut builder = PixelsBuilder::new(WIDTH, HEIGHT, surface);
builder = builder.request_adapter_options(wgpu::RequestAdapterOptions {
    power_preference: wgpu::PowerPreference::HighPerformance,
    compatible_surface: None,
    force_fallback_adapter: false,
});
let mut pixels = builder.build().expect("create pixels");
- With
PixelsBuilder::new()we instantiate “something” which helps us to create the customized pixel buffer we need. - Then we set the options we want. One of interest here is
power_preference. When set towgpu::PowerPreference::HighPerformancethe builder will try to use the discrete GPU rather than the integrated one (wgpu::PowerPreference::LowPower) - Once the attributes are set, we ask the factory method to give us the customized pixel we want
- The pixel buffer is then used in the rest of the code as it was in
demo_00.rs.
Explaining wgpu::PresentMode
The penultimate line of the resume() method above is new. It is not necessary here because I use the default value (wgpu::PresentMode::Fifo). However it is a good opportunity to talk about the different wgpu::PresentMode available.
First, find the line in the previous source code.
pixels.set_present_mode(wgpu::PresentMode::Fifo);
When we call pixels.render(), wgpu sends our image to the GPU, which displays it via the swap chain. The swap chain is a queue of images between the GPU and the screen. The wgpu::PresentMode controls when these images are sent to the screen, and whether to wait for vertical synchronization (vsync).
Fifo (Default - VSync ON)
Each image is displayed at the screen refresh rate, often 60 Hz. The GPU renders to a buffer while the screen displays the previous image. When the screen is ready (new “vertical blank”), the new image is presented.
- Advantages:
- No tearing (tearing happens when the screen displays two frames partially).
- Lower power consumption
- Stable and compatible everywhere (WebGPU requires Fifo at a minimum).
- Disadvantages:
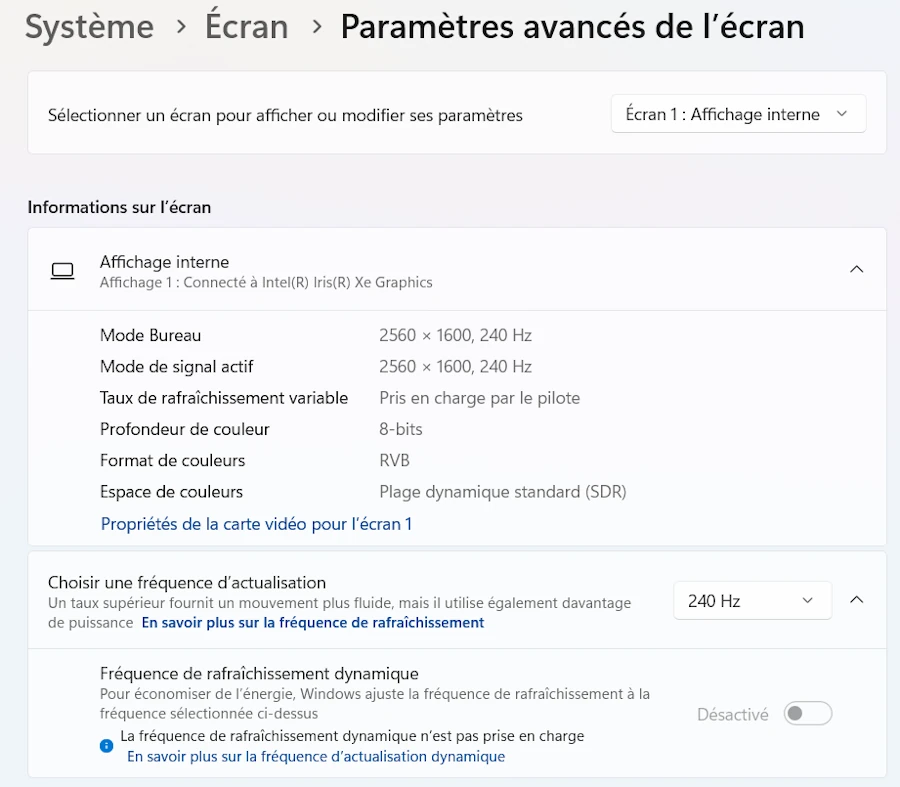
- FPS is limited to the screen refresh rate (60Hz typically, 100Hz on my system)
- Low latency (~1 frame).
Ideal for stable “visual” apps, games, and to save GPU power.
Immediate (VSync OFF)
The GPU displays each frame immediately, without waiting for the next screen refresh.
- Advantages:
- Allows us to measure the actual performance of the GPU pipeline (maximum frames per second).
- Reduction in perceived latency (useful for benchmarking or ultra-fast interactive rendering).
- Disadvantages:
- Risk of tearing.
- Higher GPU consumption (since it runs without pause).
- Not always supported depending on the backend or card (
wgputhen automatically switches to Fifo).
Excellent for benchmarks or performance tests.
Can I use the Immediate presentation mode once I called let pixels = Pixels::new(), the first automatic and easy way of doing? Yes you can.
- Run the experiment with this command:
cargo run -p step_11 --example demo_00bis - Check out the log. You should see : “Present mode: Immediate”
Mailbox (Triple buffering)
- Low latency with reduced tearing
- Higher GPU usage than Fifo
- Best for competitive games, low-latency apps
AutoVsync / AutoNoVsync
- Platform-specific automatic selection
Back to demo_01.rs, the second level of control
let mut builder = PixelsBuilder::new(WIDTH, HEIGHT, surface);
builder = builder.request_adapter_options(wgpu::RequestAdapterOptions {
    power_preference: wgpu::PowerPreference::HighPerformance,
    compatible_surface: None,
    force_fallback_adapter: false,
});
let mut pixels = builder.build().expect("create pixels");
Play the game. In VSCode open demo_00.rs and demo_01.rs side by side and check the modifications.

Alternatively you can right click on demo_00.rs and select Select For Compare. Then right click on demo_01.rs and select Compare with Selected. However, in this particular case, I prefer the first method of comparaison.
What happens:
- Backend selection is still automatic. Here Vulkan.
- The GPU selection is influenced by
power_preferenceHighPerformance→ prefers the discrete GPU (NVIDIA)LowPower→ prefers the integrated GPU (Intel Iris)
Important notes:
power_preferenceis a hint, not a guaranteewgpumay still choose the integrated GPU if:- The discrete GPU driver has issues
- The backend doesn’t support it properly
- Compatibility requirements override the preference
Resize behavior:
- Based on the tests, it seems I need to manually handle
WindowEvent::Resized - Indeed, with this combination (Vulkan/NVIDIA) the blue area won’t resize
demo_02.rs, the third level of control
- Run the experiment with this command:
cargo run -p step_11 --example demo_02
cargo run -p step_11 --example demo_02 I selected the NVIDIA board and the backend. Now it is Dx12 while is was Vulkan until now. Resizing the window seems to be working.
[2025-10-31T17:46:54Z WARN  wgpu_hal::dx12::instance] Unable to enable D3D12 debug interface: 0x887A002D
[2025-10-31T17:46:54Z WARN  wgpu_hal::auxil::dxgi::factory] Unable to enable DXGI debug interface: 0x887A002D
[2025-10-31T17:46:55Z INFO  wgpu_core::instance] Adapter Dx12 AdapterInfo { name: "NVIDIA GeForce RTX 3070 Ti Laptop GPU", vendor: 4318, device: 9440, device_type: DiscreteGpu, driver: "", driver_info: "", backend: Dx12 }
[2025-10-31T17:46:55Z WARN  wgpu_core::instance] Missing downlevel flags: DownlevelFlags(VERTEX_AND_INSTANCE_INDEX_RESPECTS_RESPECTIVE_FIRST_VALUE_IN_INDIRECT_DRAW)
    The underlying API or device in use does not support enough features to be a fully compliant implementation of WebGPU. A subset of the features can still be used. If you are running this program on native and not in a browser and wish to limit the features you use to the supported subset, call Adapter::downlevel_properties or Device::downlevel_properties to get a listing of the features the current platform supports.
[2025-10-31T17:46:55Z WARN  wgpu_core::instance] DownlevelCapabilities {
        flags: DownlevelFlags(
            COMPUTE_SHADERS | FRAGMENT_WRITABLE_STORAGE | INDIRECT_EXECUTION | BASE_VERTEX | READ_ONLY_DEPTH_STENCIL | NON_POWER_OF_TWO_MIPMAPPED_TEXTURES | CUBE_ARRAY_TEXTURES | COMPARISON_SAMPLERS | INDEPENDENT_BLEND | VERTEX_STORAGE | ANISOTROPIC_FILTERING | FRAGMENT_STORAGE | MULTISAMPLED_SHADING | DEPTH_TEXTURE_AND_BUFFER_COPIES | WEBGPU_TEXTURE_FORMAT_SUPPORT | BUFFER_BINDINGS_NOT_16_BYTE_ALIGNED | UNRESTRICTED_INDEX_BUFFER | FULL_DRAW_INDEX_UINT32 | DEPTH_BIAS_CLAMP | VIEW_FORMATS | UNRESTRICTED_EXTERNAL_TEXTURE_COPIES | SURFACE_VIEW_FORMATS | NONBLOCKING_QUERY_RESOLVE,
        ),
        limits: DownlevelLimits,
        shader_model: Sm5,
    }
Read the third line. wgpu is successfully initialized with the DirectX 12 backend. The selected adapter is the NVIDIA GeForce RTX 3070 Ti (see DiscreteGpu). Dx12 debug layers are not installed, which only affects developer diagnostics. “Downlevel” warnings indicate that some optional WebGPU features are not fully supported by the DX12 backend, but this does not affect normal rendering or compute shader usage.
In resumed(), the line of code of interest are the ones below:
let mut builder = PixelsBuilder::new(WIDTH, HEIGHT, surface);
builder = builder.request_adapter_options(wgpu::RequestAdapterOptions {
    power_preference: wgpu::PowerPreference::HighPerformance,
    compatible_surface: None,
    force_fallback_adapter: false,
});

builder = builder.wgpu_backend(wgpu::Backends::DX12); // wgpu::Backends::VULKAN

let mut pixels = builder.build().expect("create pixels");
Compared to demo_01.rs only one line was added :
builder = builder.wgpu_backend(wgpu::Backends::DX12); // wgpu::Backends::VULKAN
What happens:
- GPU: still influenced by
power_preference - Backend: explicitly forced to DX12 (or Vulkan)
About the Resize Problem
To tell the truth I’m NOT 110% sure…
Why demo_00 works without resize handling:
let pixels = Pixels::new(WIDTH, HEIGHT, surface).unwrap();
- It uses Vulkan with default configuration
- In this case, it seems that the automatic resize handling is enabled
Why demo_01 require resize handling and NOT demo_02 ?
let pixels = PixelsBuilder::new(...)
    .request_adapter_options(...) // Custom options
    .build().unwrap();
- With Vulkan Custom configuration seems to disable some automatic behaviors
- We now must explicitly handle resizes
- With Dx12 it seems there is no need to handle the resizes but I recommend to double check if the window content behaves as expected
I would like to propose this rule of thumb: If the window can be resized, when we use PixelsBuilder with custom options, always handle WindowEvent::Resized.
Benchmarks ?
One word of caution. For example with my system I must make sure
- Run the Release version of the code
- To plug the 300W power supply and not the much smaller Ugreen 140W I use to have on the USB PD port
- To check that the PC is not in quiet mode
- For the last benchmark, make sure the pipeline goes directly to the board. See below:
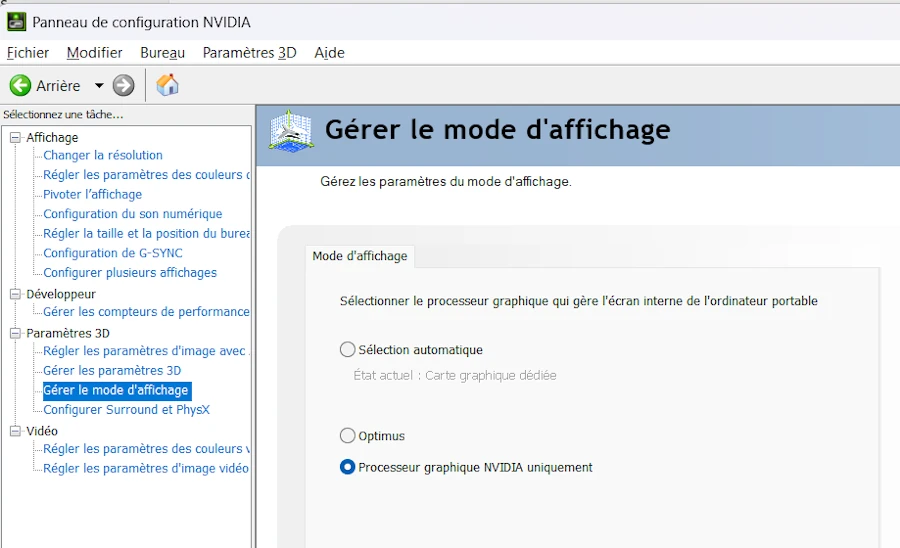
You can learn more about how Optimus works in the video below and Jarrod’sTech channel.
First attempt
cargo run -p step_11 --release --example demo_03
Here are the log I get
cargo run -p step_11 --release --example demo_03
   Compiling step_11 v0.1.0 (C:\Users\phili\OneDrive\Documents\Programmation\rust\14_game_of_life\11)
    Finished `release` profile [optimized] target(s) in 1.03s
     Running `target\release\examples\demo_03.exe`
[2025-11-03T00:30:50Z INFO  wgpu_core::instance] Adapter Dx12 AdapterInfo { name: "NVIDIA GeForce RTX 3070 Ti Laptop GPU", vendor: 4318, device: 9440, device_type: DiscreteGpu, driver: "", driver_info: "", backend: Dx12 }
[2025-11-03T00:30:50Z WARN  wgpu_core::instance] Missing downlevel flags: DownlevelFlags(VERTEX_AND_INSTANCE_INDEX_RESPECTS_RESPECTIVE_FIRST_VALUE_IN_INDIRECT_DRAW)
    The underlying API or device in use does not support enough features to be a fully compliant implementation of WebGPU. A subset of the features can still be used. If you are running this program on native and not in a browser and wish to limit the features you use to the supported subset, call Adapter::downlevel_properties or Device::downlevel_properties to get a listing of the features the current platform supports.
[2025-11-03T00:30:50Z WARN  wgpu_core::instance] DownlevelCapabilities {
        flags: DownlevelFlags(
            COMPUTE_SHADERS | FRAGMENT_WRITABLE_STORAGE | INDIRECT_EXECUTION | BASE_VERTEX | READ_ONLY_DEPTH_STENCIL | NON_POWER_OF_TWO_MIPMAPPED_TEXTURES | CUBE_ARRAY_TEXTURES | COMPARISON_SAMPLERS | INDEPENDENT_BLEND | VERTEX_STORAGE | ANISOTROPIC_FILTERING | FRAGMENT_STORAGE | MULTISAMPLED_SHADING | DEPTH_TEXTURE_AND_BUFFER_COPIES | WEBGPU_TEXTURE_FORMAT_SUPPORT | BUFFER_BINDINGS_NOT_16_BYTE_ALIGNED | UNRESTRICTED_INDEX_BUFFER | FULL_DRAW_INDEX_UINT32 | DEPTH_BIAS_CLAMP | VIEW_FORMATS | UNRESTRICTED_EXTERNAL_TEXTURE_COPIES | SURFACE_VIEW_FORMATS | NONBLOCKING_QUERY_RESOLVE,
        ),
        limits: DownlevelLimits,
        shader_model: Sm5,
    }
FPS (Fifo): 240.1
FPS (Fifo): 222.3
FPS (Fifo): 241.1
FPS (Fifo): 240.1
FPS (Fifo): 222.8
This should not be a surprise since my screen frequency is 240Hz. This means that if the code is able to do what it has to do in less than 1/240 second then the maximum FPS will be 240 Hz. Remember here the code is basic: it uses a for loop to fill the background of the window with blue cells. It could be optimized but I want to keep the code of the initial article.
The code is similar to the previous ones but I added FPS counting capabilities and some comments to easily change the GPU, the backend and the presentation mode. In addition, when creating the window, I use .with_resizable(false) to make sure the window cannot be resized while the test is running. This will help to compare apples with apples.
The log above can be summarized in one line:
NVIDIA DX12 Immediate Average FPS = 240
Now if I change the presentation mode to immediate I get:
cargo run -p step_11 --release --example demo_03
   Compiling step_11 v0.1.0 (C:\Users\phili\OneDrive\Documents\Programmation\rust\14_game_of_life\11)
    Finished `release` profile [optimized] target(s) in 1.27s
     Running `target\release\examples\demo_03.exe`
[2025-11-03T00:27:37Z INFO  wgpu_core::instance] Adapter Dx12 AdapterInfo { name: "NVIDIA GeForce RTX 3070 Ti Laptop GPU", vendor: 4318, device: 9440, device_type: DiscreteGpu, driver: "", driver_info: "", backend: Dx12 }
[2025-11-03T00:27:37Z WARN  wgpu_core::instance] Missing downlevel flags: DownlevelFlags(VERTEX_AND_INSTANCE_INDEX_RESPECTS_RESPECTIVE_FIRST_VALUE_IN_INDIRECT_DRAW)
    The underlying API or device in use does not support enough features to be a fully compliant implementation of WebGPU. A subset of the features can still be used. If you are running this program on native and not in a browser and wish to limit the features you use to the supported subset, call Adapter::downlevel_properties or Device::downlevel_properties to get a listing of the features the current platform supports.
[2025-11-03T00:27:37Z WARN  wgpu_core::instance] DownlevelCapabilities {
        flags: DownlevelFlags(
            COMPUTE_SHADERS | FRAGMENT_WRITABLE_STORAGE | INDIRECT_EXECUTION | BASE_VERTEX | READ_ONLY_DEPTH_STENCIL | NON_POWER_OF_TWO_MIPMAPPED_TEXTURES | CUBE_ARRAY_TEXTURES | COMPARISON_SAMPLERS | INDEPENDENT_BLEND | VERTEX_STORAGE | ANISOTROPIC_FILTERING | FRAGMENT_STORAGE | MULTISAMPLED_SHADING | DEPTH_TEXTURE_AND_BUFFER_COPIES | WEBGPU_TEXTURE_FORMAT_SUPPORT | BUFFER_BINDINGS_NOT_16_BYTE_ALIGNED | UNRESTRICTED_INDEX_BUFFER | FULL_DRAW_INDEX_UINT32 | DEPTH_BIAS_CLAMP | VIEW_FORMATS | UNRESTRICTED_EXTERNAL_TEXTURE_COPIES | SURFACE_VIEW_FORMATS | NONBLOCKING_QUERY_RESOLVE,
        ),
        limits: DownlevelLimits,
        shader_model: Sm5,
    }
FPS (Fifo): 699.1
FPS (Fifo): 2423.8
FPS (Fifo): 3482.3
FPS (Fifo): 3740.3
FPS (Fifo): 3812.9
FPS (Fifo): 3736.0
FPS (Fifo): 3420.1
FPS (Fifo): 3736.8
NVIDIA DX12 Immediate Average FPS = 3700
One could argue that the println!() in the console “break” the bench. Indeed the print is not asynchronous. This is why I wrote a smarter version of the initial bench but the results, at this point, are not significantly different. To give it a try run the command below:
cargo run -p step_11 --release --example demo_03bis
Here are the results I get when I run demo_03 then demo_03bis
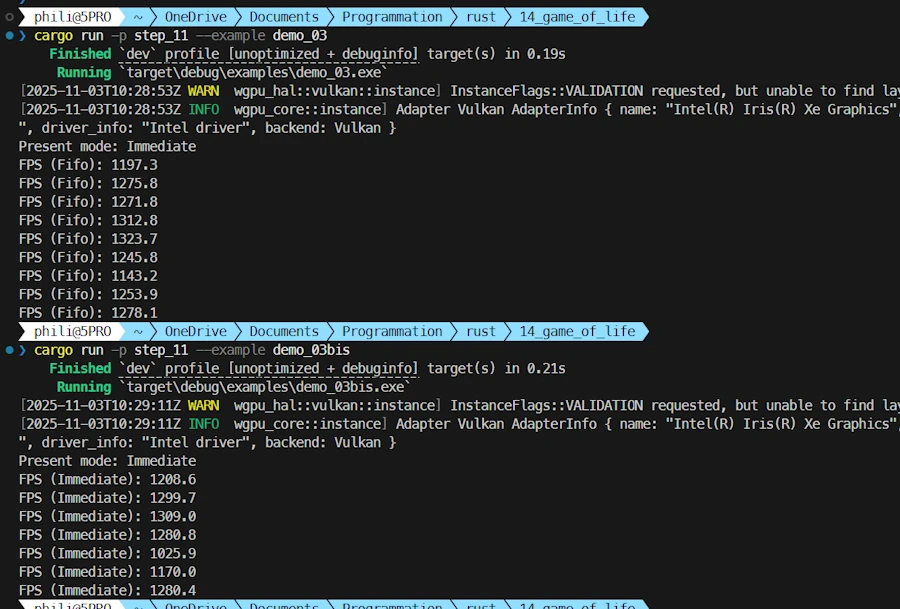
Asynchronous and synchronous versions of the benchmark compared
In the code of demo_03bis.rs the main changes are:
- Import added:
std::sync::mpscandstd::thread - New field in
App. Seelog_sender: mpsc::Sender<String>to send messages - In the
main()function:- A channel is created:
mpsc::channel() - Create a dedicated thread that receives and displays messages asynchronously
- A channel is created:
- The
println!()are replaced with asynchronous sends:- See
self.log_sender.send(message) - They are non-blocking for the rendering thread
- See
This said, let’s try something more intensive and where we are sure the cache is updated each time.
Second attempt
cargo run -p step_11 --release --example demo_04
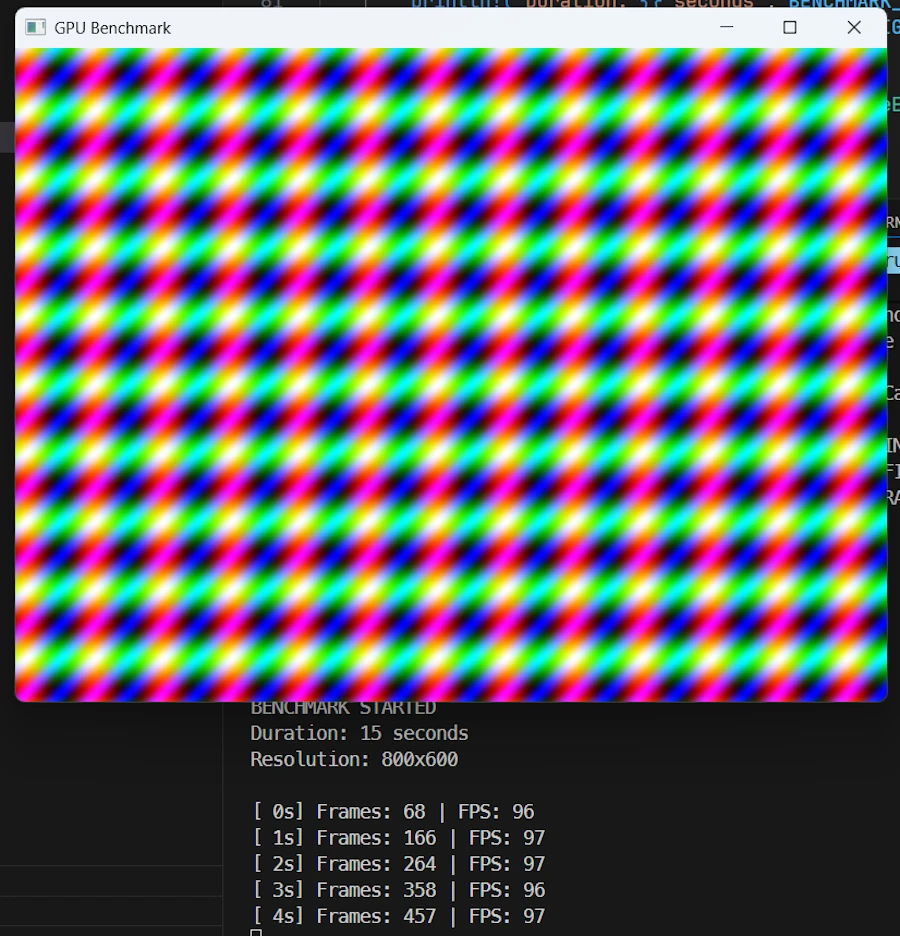
If I select Integrated GPU, Vulkan backend and Fifo presentation mode here is what I get:
==================================================
BENCHMARK COMPLETE
==================================================
Total Frames:  1458
Total Time:    15.01s
Average FPS:   97
Frame Time:    10.29ms
Now if I select Discrete GPU, Dx12 and Immediate presentation mode, here are the results:
==================================================
BENCHMARK COMPLETE
==================================================
Total Frames:  1495
Total Time:    15.01s
Average FPS:   100
Frame Time:    10.04ms
What? How is it possible? In fact, as it is, the code only use the CPU except when the texture is sent to the screen. This is confirmed when I look at the ressource manager. There is no activity on the GPU. The main limiting factor here is the processing on the CPU. Check the code, while animating the waves I use sin(), cos() on f32 then convert everything as u8. To be exact there are 480_000 sin() and 480_000 cos() calculated per frame…
// Render complex animation
if let Some(pixels) = &mut self.pixels {
    let frame = pixels.frame_mut();
    let time = self.frame_count as f32 * 0.05;

    // Draw animated pattern
    for (i, pixel) in frame.chunks_exact_mut(4).enumerate() {
        let x = (i % WIDTH as usize) as f32;
        let y = (i / WIDTH as usize) as f32;

        // Animated waves
        let r = ((x / 10.0 + time).sin() * 127.0 + 128.0) as u8;
        let g = ((y / 10.0 + time).cos() * 127.0 + 128.0) as u8;
        let b = ((x / 5.0 + y / 5.0 + time).sin() * 127.0 + 128.0) as u8;

        pixel[0] = r;
        pixel[1] = g;
        pixel[2] = b;
        pixel[3] = 0xFF;
    }

    pixels.render().ok();
}
Third attempt
cargo run -p step_11 --release --example demo_05
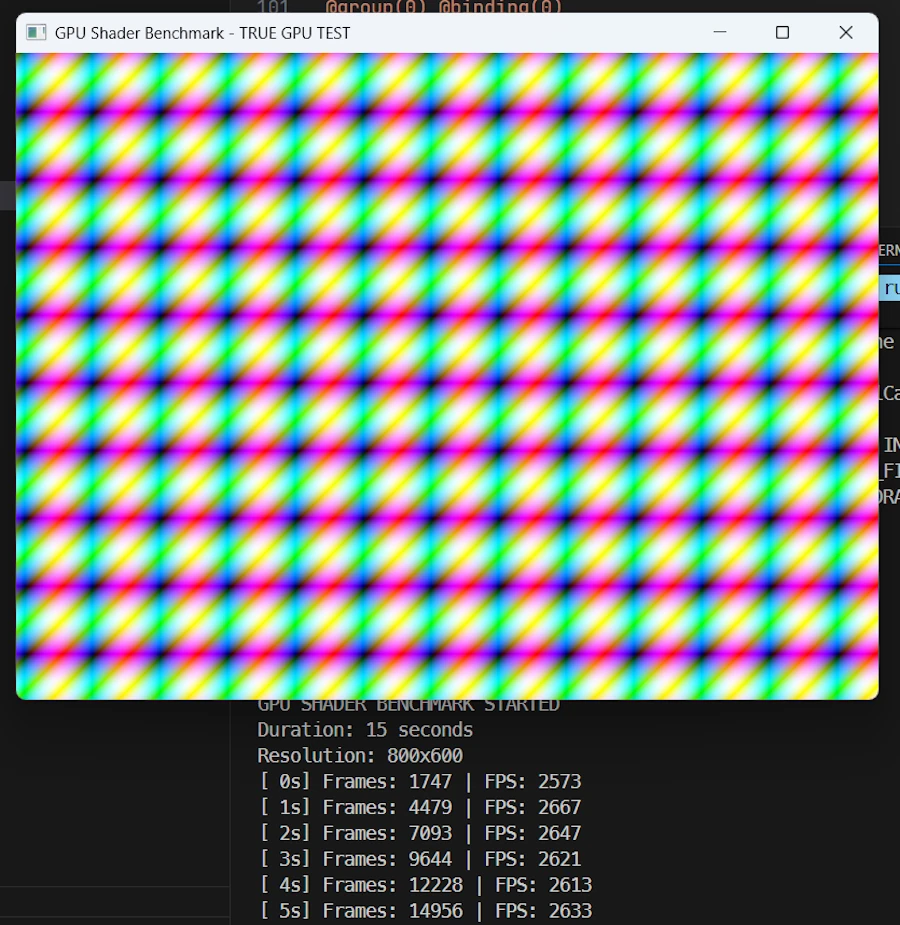
In this version of the code, shaders are used. They run on the GPU. Yes, the code is available. No I will not explain shaders, nor comment the code here because shaders are a complete subject by themselves. I just wanted to show what happen when we really put the GPU at work.
==================================================
BENCHMARK COMPLETE
==================================================
Total Frames:  42460
Total Time:    15.03s
Average FPS:   2825
Frame Time:    0.35ms
Conclusion about the benchmarks
As it is, the code of the Game Of Life does not use shaders. All the processing will be done on the CPU (not the GPU).
We just need to keep this fact in mind. Period.
Which Method to Use?
Are we building a cross-platform app?
├─ YES → Use Vulkan explicitly + handle resize
│        .wgpu_backend(wgpu::Backends::VULKAN)
│
└─ NO (Windows-only)
   │
   Do I need high-performance GPU?
   ├─ YES → Use PixelsBuilder + HighPerformance
   │        + verify with logs that NVIDIA is selected
   │        + handle WindowEvent::Resized
   │        + learn shaders programming ?
   │
   └─ NO (integrated GPU is fine)
      │
      Just want it to work?
      └─ Use Pixels::new()
- In any case, never assume. Double check!
- If needed, write or reuse on of the benches.
- If you don’t plan to use shaders, today my belief is that you should start with
Pixels::new() - The level of complexity of the code will grow exponentially if we want to use
PixelsBuilder::new()while detecting and supporting multiple GPU and backend.
Summary
| Feature | Pixels::new() | PixelsBuilder::new() + options | PixelsBuilder::new() + options + backend |
|---|---|---|---|
| Simplicity | ⭐⭐⭐ | ⭐⭐ | ⭐ |
| GPU Control | ❌ None, Integrated | ⚠️ Hint only | ⚠️ Hint only |
| Backend Control | ❌ None (Vulkan) | ❌ None (Vulkan) | ✅ Full |
| Auto Resize | ✅ Yes | ❌ No | ❌ No |
| Cross-platform | ✅ Yes | ✅ Yes | ⚠️ Backend-dependent |
| Best for | Prototypes | Production apps | Debugging/Optimization |
Webliography
CTRL+click to open the links in a new tab.
- wgpu Documentation
- Pixels Documentation
- Vulkan vs DirectX Comparison
- WGPU Best Practices
- You’re welcome to share comments or suggestions on GitHub to help improve this article.